1. تعارف
The Velleman DVM810 is a compact and economical 3 1/2 digit digital multimeter designed for measuring DC and AC voltages, DC currents, resistance, and for performing diode and transistor (hFE) tests. It features overload protection and automatic polarity indication, making it suitable for hobbyists, field use, and workshops. This manual provides essential information for the safe and effective operation of your DVM810 multimeter.
2. مصنوعات جون خاصيتون
- Automatic polarity indication
- جلدtage measurements: AC 500V and DC 500V maximum
- Current measurements: DC 10A maximum (0.2A fused, 10A unfused)
- Resistance measurements: Up to 2MΩ
- Diode and transistor (hFE) test functions
- اوورلوڊ تحفظ
- Compact design with 3 1/2 digit LCD display
3. پيڪيج مواد
مھرباني ڪري پيڪيج جي مواد کي چيڪ ڪريو ته جيئن پڪ ڪري سگھجي ته سڀئي شيون موجود آھن:
- Velleman DVM810 ڊجيٽل ملٽي ميٽر
- Test Leads (one red, one black)
- ھدايت وارو دستور
4. اهم حفاظتي ڄاڻ
Read all safety warnings and instructions carefully before using this product. Failure to follow these instructions may result in electric shock, fire, or serious injury.
- Always ensure the multimeter is set to the correct function and range before making any measurements.
- Never exceed the maximum input limits for any range. The maximum voltage for AC/DC is 500V.
- Do not attempt to measure current on circuits with voltages 250V کان وڌيڪ.
- هر استعمال کان اڳ خراب ٿيل موصليت يا بي نقاب ڌاتو لاءِ ٽيسٽ ليڊز جو معائنو ڪريو. خراب ٿيل ليڊز کي فوري طور تي تبديل ڪريو.
- Do not use the multimeter if it appears damaged or if the case is open.
- Exercise extreme caution when working with live circuits. Use appropriate personal protective equipment.
- هميشه سرڪٽ کي بجلي بند ڪريو ۽ هاءِ وولٽ کي خارج ڪريوtage capacitors before measuring resistance or performing diode/transistor tests.
- Replace the battery when the low battery indicator appears on the display to ensure accurate readings.
5. پراڊڪٽ ختمview
Familiarize yourself with the components of your Velleman DVM810 multimeter:
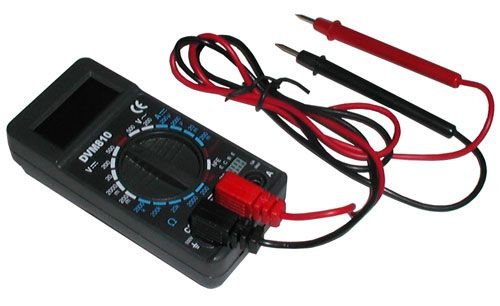
Figure 1: Velleman DVM810 Digital Multimeter. This image displays the front view of the compact multimeter, highlighting its liquid crystal display (LCD), the central rotary function switch, and the input jacks for test leads at the bottom.
- LCD ڊسپلي: Shows measurement readings, units, and polarity.
- روٽري سوئچ: گهربل ماپ جي فنڪشن ۽ رينج کي چونڊڻ لاءِ استعمال ڪيو ويندو آهي.
- ان پٽ جڪس:
- COM جيڪ: سڀني ماپن لاءِ عام (منفي) ان پٽ. هتي ڪاري ٽيسٽ ليڊ کي ڳنڍيو.
- وي ايم اي جڪ: وول لاءِ مثبت ان پٽtage, resistance, and current measurements up to 200mA. Connect the red test lead here.
- 10A جڪ: Positive input for high current measurements (up to 10A). Connect the red test lead here for 10A measurements.
- ٽيسٽ ليڊز: Red and black leads used to connect the multimeter to the circuit under test.
6. سيٽ اپ
6.1 بيٽري لڳائڻ
The DVM810 multimeter requires a 9V battery (not always included). To install or replace the battery:
- Ensure the multimeter is turned OFF (rotary switch set to OFF).
- يونٽ جي پوئين پاسي بيٽري جي ڪمپارٽمينٽ ڪَوَر کي ڳوليو.
- Remove the screw(s) securing the cover and carefully lift it off.
- صحيح پولارٽي کي ڏسندي، بيٽري ڪلپ سان هڪ نئين 9V بيٽري ڳنڍيو.
- بيٽري کي ڪمري ۾ رکو ۽ ڍڪ کي تبديل ڪريو، ان کي اسڪرو سان محفوظ ڪريو.
6.2 ٽيسٽ ليڊز کي ڳنڍڻ
Always connect the test leads correctly for accurate and safe measurements:
- ۾ ڪارو ٽيسٽ ليڊ داخل ڪريو COM (عام) جڪ.
- گھڻن ماپن لاءِ (جلدtage, resistance, diode, hFE, and current up to 200mA), insert the red test lead into the VΩmA جيڪ
- For high current measurements (up to 10A), insert the red test lead into the 10A جيڪ
7. آپريٽنگ هدايتون
Before making any measurement, ensure the test leads are correctly connected and the rotary switch is set to the appropriate function and range.
7.1 ڊي سي وول جي ماپtagاي (وي =)
- ۾ ڳاڙهي ليڊ داخل ڪريو VΩmA jack and the black lead into the COM جيڪ
- Set the rotary switch to the desired DC Voltage (V=) range. Start with the highest range if the voltage نامعلوم آهي.
- Connect the test leads across the component or circuit to be measured (in parallel).
- جلد پڙهوtage value on the LCD display. The display will show the correct polarity.
7.2 اي سي وولٽ جي ماپtage (V~)
- ۾ ڳاڙهي ليڊ داخل ڪريو VΩmA jack and the black lead into the COM جيڪ
- Set the rotary switch to the desired AC Voltage (V~) range. Start with the highest range if the voltage نامعلوم آهي.
- Connect the test leads across the component or circuit to be measured (in parallel).
- جلد پڙهوtagاي قدر LCD ڊسپلي تي.
7.3 Measuring DC Current (A=)
Caution: Never connect the multimeter in parallel with a voltage source when measuring current, as this can blow the fuse or damage the meter.
- Determine the expected current. For currents up to 200mA, insert the red lead into the VΩmA jack. For currents up to 10A, insert the red lead into the 10A jack. Always insert the black lead into the COM جيڪ
- Set the rotary switch to the appropriate DC Current (A=) range. Start with the highest range if the current is unknown.
- Turn off power to the circuit. Open the circuit where the current is to be measured.
- ملٽي ميٽر کي سرڪٽ سان سيريز ۾ ڳنڍيو.
- Restore power to the circuit and read the current value on the LCD display.
7.4 مزاحمت جي ماپ (Ω)
Caution: Ensure the circuit is completely de-energized and all capacitors are discharged before measuring resistance.
- ۾ ڳاڙهي ليڊ داخل ڪريو VΩmA jack and the black lead into the COM جيڪ
- Set the rotary switch to the desired Resistance (Ω) range. Start with a higher range if the resistance is unknown.
- ماپڻ لاءِ جزو جي پار ٽيسٽ ليڊز کي ڳنڍيو.
- LCD ڊسپلي تي مزاحمت جي قيمت پڙهو.
7.5 ڊيوڊ ٽيسٽ
Caution: Ensure the diode is disconnected from the circuit or the circuit is de-energized before testing.
- ۾ ڳاڙهي ليڊ داخل ڪريو VΩmA jack and the black lead into the COM جيڪ
- Set the rotary switch to the Diode symbol (→|).
- ڳاڙهي ليڊ کي اينوڊ سان ۽ ڪاري ليڊ کي ڊاءِڊ جي ڪيٿوڊ سان ڳنڍيو. ڊسپلي فارورڊ وول ڏيکاريندوtagاي ڊراپ (عام طور تي سلڪون ڊاءِڊس لاءِ 0.5V کان 0.8V).
- Reverse the leads. The display should show 'OL' (Overload) for a good diode. If it shows a reading in both directions or 'OL' in both directions, the diode may be faulty.
7.6 Transistor (hFE) Test
Caution: Ensure the transistor is disconnected from the circuit before testing.
- ۾ ڳاڙهي ليڊ داخل ڪريو VΩmA jack and the black lead into the COM جيڪ
- روٽري سوئچ کي hFE پوزيشن ڏانھن سيٽ ڪريو.
- Identify if the transistor is NPN or PNP. Insert the transistor's emitter, base, and collector leads into the corresponding holes in the hFE socket on the multimeter.
- LCD ڊسپلي تي hFE (DC ڪرنٽ گين) ويليو پڙهو.
8. وضاحتون
| پيرا ميٽر | قدر |
|---|---|
| برانڊ | ويلمين |
| ماڊل نمبر | ڊي وي ايم 810 |
| ماپ جو قسم | ملٽي ميٽر |
| ڊي سي جلدtage حد | 500V تائين |
| AC جلدtage حد | 500V تائين |
| ڊي سي موجوده رينج | Up to 10A (0.2A fused, 10A unfused) |
| مزاحمت جي حد | Up to 2MΩ |
| ڊيوڊ ٽيسٽ | ها |
| ٽرانزسٽر (hFE) ٽيسٽ | ها |
| ڏيکاريو | 3 1/2 عدد LCD |
| طاقت جو ذريعو | 9 وولٽ جي بيٽري (شامل نه آهي) |
| طول و عرض | تقريبن 3.70" x 1.81" x 1.03" |
| شيءِ جو وزن | Approximately 3.2 ounces (0.2 lbs) |
| يو پي سي | 836479002272 |
9. سار سنڀال
9.1 بيٽري مٽائڻ
When the low battery indicator appears on the LCD, replace the 9V battery as described in Section 6.1. A weak battery can lead to inaccurate readings.
9.2 صفائي
ملٽي ميٽر صاف ڪرڻ لاءِ، ڪيس کي اشتهار سان صاف ڪريوamp cloth and a mild detergent. Do not use abrasives or solvents. Ensure the unit is completely dry before use.
9.3 ٽيسٽ ليڊ انسپيڪشن
Regularly inspect the test leads for any signs of damage, such as cracked insulation, exposed wires, or loose connections. Replace damaged leads immediately to prevent electric shock hazards.
10. مسئلا حل ڪرڻ
- ڪابه ڊسپلي يا ڪمزور ڊسپلي ناهي: بيٽري چيڪ ڪريو. جيڪڏهن ضروري هجي ته تبديل ڪريو.
- غلط پڙهڻ:
- Ensure the rotary switch is set to the correct function and range.
- بيٽري جو حجم چيڪ ڪريوtage؛ جيڪڏهن گهٽ هجي ته تبديل ڪريو.
- پڪ ڪريو ته ٽيسٽ ليڊز صحيح طرح سان ڳنڍيل آهن ۽ خراب نه آهن.
- For resistance measurements, ensure the circuit is de-energized.
- 'OL' (اوورلوڊ) ڏيکاريل: The measured value exceeds the selected range. Select a higher range or ensure the circuit is within the meter's capabilities.
- Fuse blown (during current measurement): If the meter stops measuring current, the internal fuse may have blown. Refer to a qualified technician for fuse replacement.
11. وارنٽي ۽ سپورٽ
Warranty information for the Velleman DVM810 Digital Multimeter is typically provided with your purchase documentation or can be found on the official Velleman website. For technical support, service, or further inquiries, please refer to the contact information provided by your retailer or the manufacturer's official support channels.