
1. تعارف
خريد ڪرڻ لاءِ مهربانيasing the Udreamer Turntable Vinyl Record Player Model UD001. This manual provides essential information for the proper setup, operation, and maintenance of your new record player. Please read these instructions carefully before use to ensure optimal performance and longevity of the product. Keep this manual for future reference.

Image 1.1: Udreamer Turntable Vinyl Record Player Model UD001. This image shows the turntable with its clear dust cover open, revealing the black platter, tonearm, and cartridge.
2. حفاظتي هدايتون
- طاقت جو ذريعو: صرف مخصوص پاور اڊاپٽر استعمال ڪريو. پڪ ڪريو ته وولٽtage توهان جي مقامي پاور سپلائي سان ملندو آهي.
- پاڻي ۽ نمي: Do not expose the unit to rain, moisture, or liquids. Do not place objects filled with liquids, such as vases, on the unit.
- گرمي: يونٽ کي گرمي جي ذريعن جهڙوڪ ريڊيئيٽر، گرمي رجسٽر، اسٽو، يا ٻيو سامان (بشمول ampلائفائرز) جيڪي گرمي پيدا ڪن ٿا.
- وينٽيليشن: مناسب وينٽيليشن کي يقيني بڻايو. ڪنهن به وينٽيليشن جي سوراخن کي بند نه ڪريو.
- صفائي: صفائي ڪرڻ کان اڳ يونٽ کي ڀت جي آئوٽليٽ مان ڪڍو. صرف نرم، سڪل ڪپڙو استعمال ڪريو.
- خدمت ڪرڻ: ھن پراڊڪٽ کي پنھنجي خدمت ڪرڻ جي ڪوشش نه ڪريو. س servني خدمتن جو حوالو ڏيو قابل سروس اهلڪارن کي.
- لڳائڻ: Place the unit on a stable, level surface to prevent damage from falling.
3. پيڪيج مواد
مھرباني ڪري پڪ ڪريو ته ھيٺ ڏنل سڀ شيون توھان جي پيڪيج ۾ شامل آھن:
- Udreamer Turntable Unit
- مٽي ڍڪڻ
- پليٽر
- محسوس ٿيل مٽي
- ضد وزن
- 45 آر پي ايم اڊاپٽر
- پاور اڊاپٽر
- USB ڪيبل
- استعمال ڪندڙ جو دستياب (ھي دستاويز)
4. پراڊڪٽ ختمview
Familiarize yourself with the various parts and controls of your Udreamer Turntable.

Image 4.1: Key features of the Udreamer Turntable. This image highlights the turntable's capabilities such as Vinyl to Computer conversion, Bluetooth output, iron platter, built-in phono equalizer, needle pressure adjustment, speed alignment, and moving magnet cartridge.

تصوير 4.2: تفصيلي view of the turntable's components. This image shows the solid iron platter for stability and the moving magnet cartridge, which provides accurate audio reproduction and has a longer lifespan.

Image 4.3: Internal and external components of the turntable system. This diagram illustrates the belt-driven mechanism, arm lifter, record mat, foot pads for vibration isolation, and the 45 RPM adapter.
4.1 اڳيان ۽ مٿي View
- مٽي ڍڪڻ: پليٽر ۽ ٽوني بازو کي مٽيءَ کان بچائي ٿو.
- پليٽ: The surface on which records are placed.
- اسپنڊل: پليٽ تي رڪارڊ کي جاءِ تي رکي ٿو.
- Felt Mat: Provides cushioning for records and reduces static.
- ٽونيرم: ڪارٽريج ۽ اسٽائلس رکي ٿو.
- Cartridge with Stylus: رڪارڊ جا ڳوڙها پڙهي ٿو.
- سڌي وزن ٽون آرم کي متوازن ڪري ٿو ۽ ٽريڪنگ فورس کي ترتيب ڏئي ٿو.
- ڪيونگ ليور: Raises and lowers the tonearm gently.
- ٽونر آرام: استعمال ۾ نه هجڻ جي صورت ۾ ٽوني آرم کي محفوظ بڻائي ٿو.
- رفتار چونڊيندڙ: Switches between 33 1/3 and 45 RPM.
- پچ ڪنٽرول: Adjusts playback speed fine-tuning.
4.2 ريئر پينل
- LINE/BT OUT/PHONO Switch: Selects output mode (Line Out, Bluetooth Out, Phono Out).
- آر سي اي آئوٽ پُٽ جڪس (ايل/آر): Connects to external active speakers or an ampوierيڪ زنده
- USB-PC Port: Connects to a computer for vinyl-to-digital conversion.
- جيڪ ۾ ڊي سي: پاور اڊاپٽر کي ڳنڍي ٿو.
- پاور آن / بند سوئچ: يونٽ کي آن يا بند ڪري ٿو.
5. سيٽ اپ
5.1 Unpacking ۽ لڳائڻ
- Carefully remove the turntable from its packaging. Retain packaging for future transport.
- Place the turntable on a stable, level surface, away from direct sunlight, heat sources, and excessive dust or vibrations.
5.2 پليٽر ۽ بيلٽ جي انسٽاليشن
- Place the platter onto the center spindle.
- Carefully lift the felt mat to expose the drive belt underneath the platter.
- Locate the motor pulley (a small brass cylinder) on the top left of the turntable chassis.
- Using the provided ribbon or your fingers, gently stretch the drive belt and hook it around the motor pulley. Ensure the belt is flat and not twisted.
- Place the felt mat back on the platter.
5.3 Counterweight Adjustment
Proper counterweight adjustment is crucial for optimal sound quality and to prevent damage to your records and stylus.

Image 5.1: Counterweight and Pitch Adjustment. This image illustrates how to accurately adjust the tonearm pressure using the counterweight and fine-tune the playback speed with the pitch control.
- Gently remove the stylus protector.
- Place the counterweight onto the rear of the tonearm. Rotate it clockwise until it is fully threaded.
- Release the tonearm from its rest. Move the cueing lever to the down position.
- Carefully rotate the counterweight until the tonearm is perfectly balanced horizontally, floating freely without touching the surface or rising too high.
- Once balanced, hold the counterweight steady with one hand and rotate the numbered ring on the front of the counterweight until '0' aligns with the line on the tonearm.
- Rotate the entire counterweight (including the numbered ring) counter-clockwise to the recommended tracking force. For the pre-installed magnetic cartridge, a typical tracking force is between 2.5 to 3.5 grams. Refer to your cartridge's specific recommendations if available.
- Return the tonearm to its rest and engage the tonearm clamp.
5.4 مٽيءَ جي ڍڪڻ جي انسٽاليشن
Insert the hinges of the dust cover into the hinge receptacles at the rear of the turntable chassis.
5.5 پاور ڪنيڪشن
Connect the power adapter to the DC IN jack on the rear of the turntable, then plug the adapter into a wall outlet.
6. آپريٽنگ هدايتون
6.1 بنيادي رڪارڊ پلے بیک
- پليٽر تي رڪارڊ رکو. جيڪڏهن 45 RPM سنگل کيڏي رهيا آهيو، ته پهريان 45 RPM اڊاپٽر کي اسپنڊل تي رکو.
- Select the appropriate speed (33 1/3 or 45 RPM) using the speed selector switch.
- Ensure the LINE/BT OUT/PHONO switch is set to 'LINE OUT' or 'PHONO' if connecting to external speakers, or 'BT OUT' for Bluetooth.
- Turn on the turntable using the Power ON/OFF switch.
- Release the tonearm from its rest.
- ڪيونگ ليور استعمال ڪندي ٽوني آرم کي مٿي کڻو.
- Manually position the tonearm over the desired starting groove of the record.
- Gently lower the tonearm using the cueing lever. The stylus will make contact with the record, and playback will begin.
- At the end of the record, the auto-stop function will stop the platter rotation. Lift the tonearm, return it to its rest, and turn off the turntable.
6.2 Pitch Adjustment
Use the Pitch Control knob (refer to Image 5.1) to fine-tune the playback speed. Rotate the knob to increase or decrease the speed slightly.
6.3 Bluetooth Output
The turntable can wirelessly stream audio to Bluetooth-enabled devices such as headphones, speakers, or soundbars.

Image 6.1: Bluetooth Output functionality. This image demonstrates the turntable's ability to wirelessly connect to various Bluetooth receivers like earphones, soundbars, and external speakers.
- Ensure the LINE/BT OUT/PHONO switch on the rear is set to 'BT OUT'.
- Turn on your Bluetooth receiving device (e.g., speaker, headphones) and set it to pairing mode.
- Turn on the turntable. The Bluetooth indicator light on the turntable will flash, indicating it is searching for a device.
- Once paired, the Bluetooth indicator light will become solid. Audio from the turntable will now play through your Bluetooth device.
- If pairing fails, turn off both devices and try again.
6.4 Vinyl to Computer Recording (USB-PC)
توهان پنهنجي وينائل رڪارڊ کي ڊجيٽل آڊيو ۾ تبديل ڪري سگهو ٿا files using the USB-PC output.

Image 6.2: Vinyl to Computer conversion setup. This image shows the turntable connected to a laptop via a USB cable, illustrating the process of converting vinyl audio to MP3 format for computer playback.
- Connect the USB cable from the turntable's USB-PC port to an available USB port on your computer.
- Ensure the LINE/BT OUT/PHONO switch is set to 'LINE OUT' or 'PHONO'.
- Install and open audio recording software on your computer (e.g., Audacity, a free open-source software).
- In your recording software's preferences, select the turntable as the audio input device (it may appear as 'USB Audio CODEC' or similar).
- Start recording in the software, then begin playing your record on the turntable (refer to Section 6.1).
- Once the record finishes, stop recording in the software and save your digital audio file.
6.5 Connecting External Speakers (RCA)
The turntable features RCA output jacks for connecting to external active speakers or an ampوierيڪ زنده
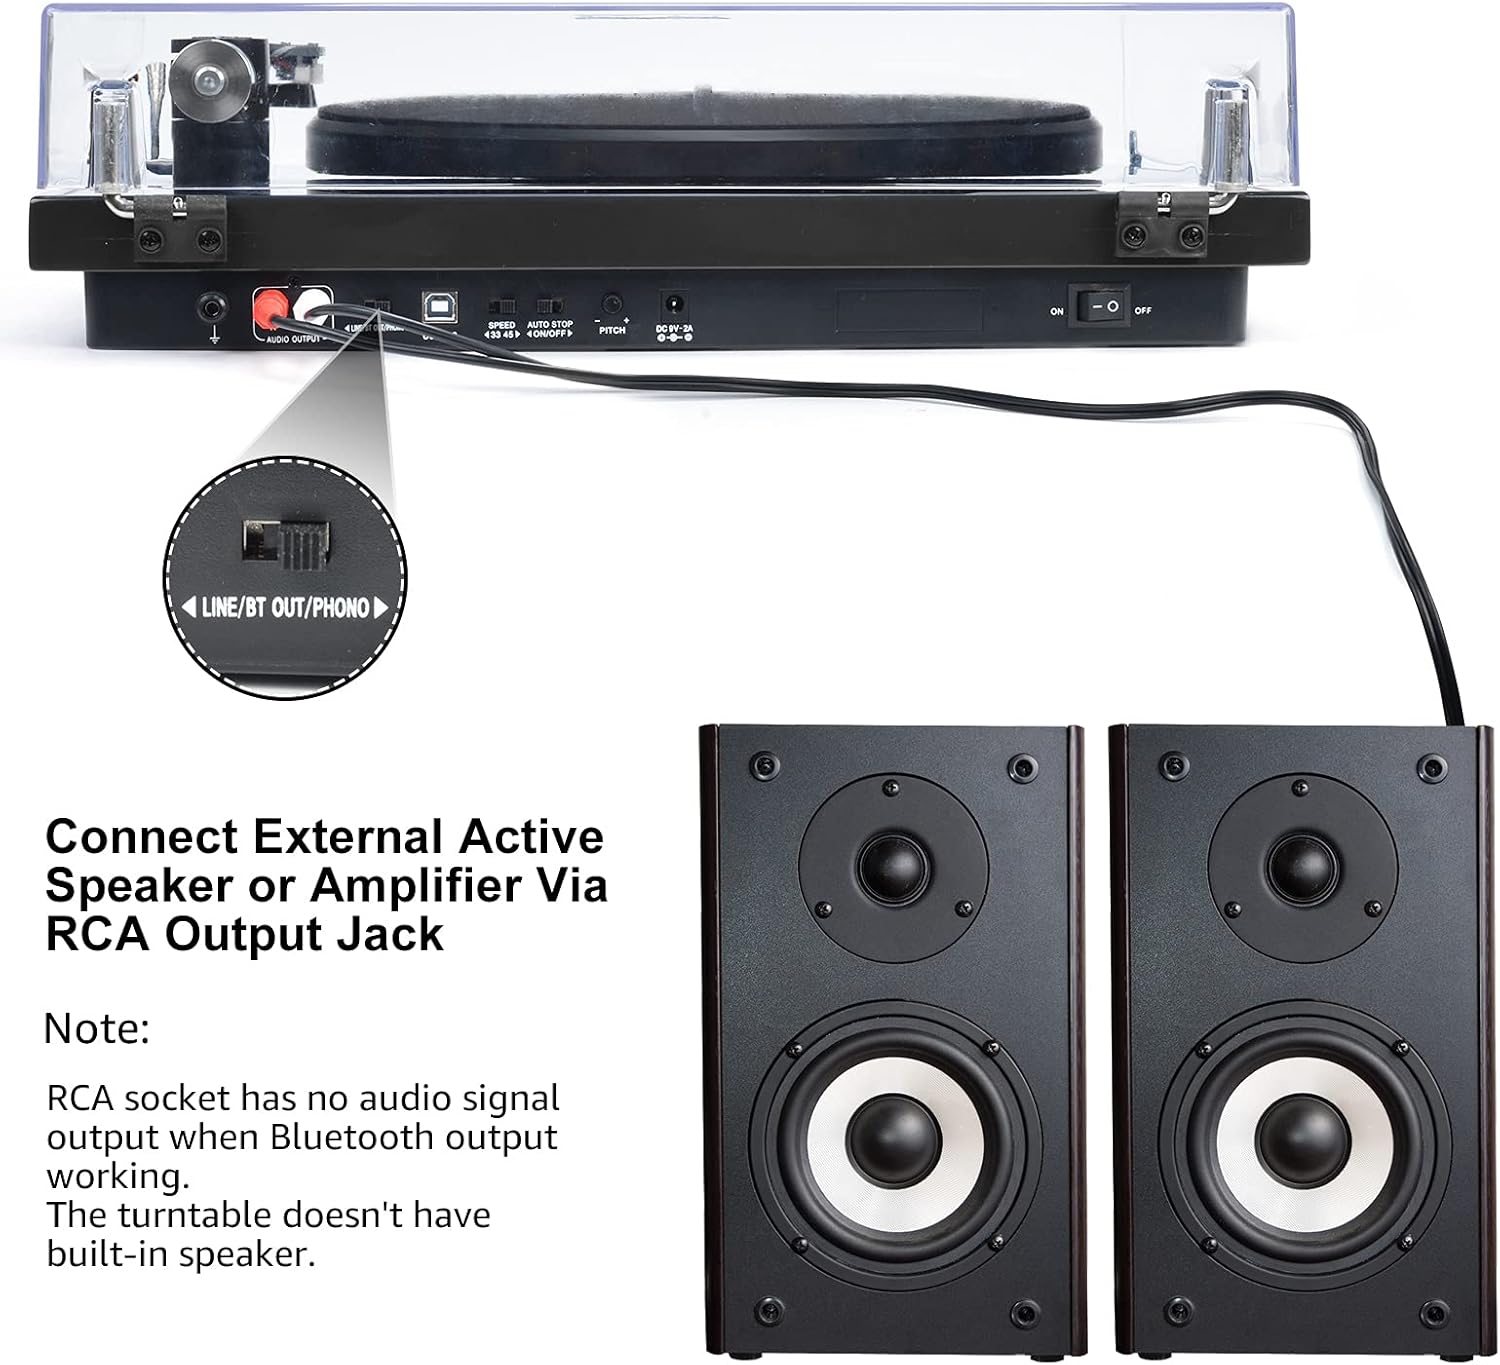
Image 6.3: Connecting to external speakers. This image shows the rear panel of the turntable with the RCA output jacks connected to a pair of external active speakers, indicating how to route audio for amplified playback.
- Ensure the LINE/BT OUT/PHONO switch on the rear is set to 'LINE OUT' if connecting to active speakers (speakers with their own amplifier) يا هڪ amplifier's 'LINE IN' input. Set to 'PHONO' if connecting to an amplifier with a dedicated 'PHONO' input.
- Connect the RCA cables (red for right channel, white for left channel) from the turntable's RCA output jacks to the corresponding input jacks on your active speakers or ampوierيڪ زنده
- Turn on your external audio system and adjust the volume.
نوٽ: The Udreamer Turntable Model UD001 does not have built-in speakers. An external audio system (active speakers, amplifier, or Bluetooth device) is required for sound output.
7. سار سنڀال
7.1 صفائي
- Turntable Unit: Wipe the exterior with a soft, dry, lint-free cloth. Do not use harsh chemicals or abrasive cleaners.
- مٽي ڍڪڻ: Clean with a soft cloth and a mild, non-abrasive cleaner. Avoid scratching the surface.
- اسٽائلس Use a soft stylus brush, brushing gently from back to front (in the direction of play) to remove dust and debris. Never use your fingers.
7.2 اسٽائلس جي متبادل
The stylus (needle) is a consumable part and will wear out over time, typically after 300-500 hours of playback. A worn stylus can damage your records and degrade sound quality. Replace the stylus when you notice a decrease in sound quality or visible wear.
- Gently grasp the front of the cartridge body.
- Pull the old stylus assembly downwards and forwards to detach it from the cartridge body.
- نئين اسٽائلس اسيمبلي کي ڪارٽريج باڊي سان ترتيب ڏيو ۽ ان کي مٿي ۽ پوئتي ڌڪيو جيستائين اهو جاءِ تي ڪلڪ نه ڪري.
- Re-adjust the tracking force if necessary after replacing the stylus.
8. مسئلا حل ڪرڻ
جيڪڏهن توهان کي پنهنجي ٽرن ٽيبل سان مسئلا درپيش اچن ٿا، ته هيٺ ڏنل عام مسئلن ۽ حلن جو حوالو ڏيو:
| مسئلو | ممڪن سبب | حل |
|---|---|---|
| طاقت نه آهي | Power adapter not connected; Power switch off | Ensure power adapter is securely plugged in; Turn power switch ON |
| آواز ڪونهي | Incorrect output mode selected; External speakers not connected/powered; Bluetooth not paired | Set LINE/BT OUT/PHONO switch correctly; Connect/power on external speakers; Pair Bluetooth device |
| آواز بگڙيل يا لڪجي وڃڻ | Stylus dirty or worn; Tracking force incorrect; Turntable not level; Record dirty or damaged | Clean or replace stylus; Adjust counterweight; Place turntable on a level surface; Clean record |
| پليٽ نه ڦري رهي آهي | Drive belt dislodged or broken; Auto-stop engaged | Re-install or replace drive belt; Ensure tonearm is over the record to disengage auto-stop |
| بلوٽوٿ جوڙڻ ناڪام ٿيو | Device too far; Device not in pairing mode; Interference | Move devices closer; Ensure receiving device is in pairing mode; Restart both devices |
9. وضاحتون
| خاصيت | تفصيل |
|---|---|
| پيداوار جي ماپ | 12.8 x 9.8 x 4.7 انچ |
| شيءِ جو وزن | 5.79 پائونڊ |
| شيون ماڊل نمبر | UD001 |
| برانڊ | اُڀريندڙ |
| خاص خصوصيت | بلٽ ان بلوٽوت وصول ڪندڙ |
| مواد | پلاسٽڪ |
| انداز | ونtage |
| مطابقت رکندڙ ڊوائيسز | هيڊ فون ، اسپيڪر |
| موٽر جو قسم | AC موٽر |
| سگنل فارميٽ | ڊجيٽل |
| طاقت جو ذريعو | تار ٿيل برقي |
| سگنل کان شور جي نسبت | 60 ڊي بي |
10. وارنٽي ۽ سپورٽ
Udreamer products are designed and manufactured to the highest quality standards. For warranty information or technical support, please refer to the contact details provided with your purchase or visit the official Udreamer website. Please have your model number (UD001) and purchase information ready when contacting support.