
1. تعارف
This manual provides comprehensive instructions for the installation, operation, and maintenance of your FLEXISPOT Gas Spring Monitor Arm F8LB. Designed for single monitors ranging from 17 to 36 inches, this arm enhances your workspace ergonomics and frees up valuable desk space. Please read this manual thoroughly before installation and use to ensure safe and optimal performance.
2. حفاظت جي ڄاڻ
- Ensure the monitor arm is securely attached to a stable desk surface capable of supporting the combined weight of the arm and your monitor.
- وڌ ۾ وڌ وزن جي گنجائش 9 ڪلوگرام (19.8 پائونڊ) کان وڌيڪ نه ڪريو.
- انسٽاليشن ۽ ترتيب ڏيڻ دوران ٻارن ۽ پالتو جانورن کي مانيٽر بازو کان پري رکو.
- Be cautious of pinch points when adjusting the arm.
- If any parts are missing or damaged, do not attempt to install the product. Contact customer support immediately.
3. پيڪيج مواد
مھرباني ڪري تصديق ڪريو ته انسٽاليشن شروع ڪرڻ کان اڳ سڀئي جزا موجود آھن:
- مانيٽر آرم اسيمبلي
- وي اي ايس جي پليٽ
- ڊيسڪ ڪلamp بنياد
- Grommet Mount Base (optional installation method)
- هارڊويئر ڪٽ (اسڪرو، واشر، اسپيسر)
- Allen Keys for assembly and tension adjustment
- ڪيبل مينيجمينٽ ڪلپس
4. وضاحتون
| خاصيت | تفصيل |
|---|---|
| ماڊل | F8LB |
| رنگ | ڪارو |
| VESA مطابقت | 75x75mm، 100x100mm |
| اسڪرين جي سائيز مطابقت | 17 "- 36" |
| لوڊ ڪرڻ جي صلاحيت | 2 - 9 ڪلوگرام (4.4 - 19.8 پائونڊ) |
| ڇڪڻ جي حد | -90° کان +15° |
| سِيولِيل رينج | 180° |
| گردش جي حد | 360° |
| چڙهڻ جو قسم | ڊيسڪ ڪلamp يا Grommet Mount |
| ڊيسڪ جي ٿولهه (Clamp) | 20-60mm |
| ڊيسڪ جي ٿولهه (گروميٽ) | 25-100mm |
| يو پي سي | 810054072508 |

Image: Illustration of the monitor arm's extensive angle adjustment capabilities, including 360-degree rotation and a tilt range from -90 to +15 degrees.
5. سيٽ اپ
5.1 Choose Mounting Method
The monitor arm supports two installation methods: desk clamp or grommet mount. Select the method suitable for your desk.

Image: Visual guide illustrating the two available installation options: a C-clamp for securing the arm to the edge of a desk, and a grommet mount for installation through a desk hole.
5.2 Attach Base to Desk
- ڪل لاءِamp جبل: C-cl سان ڳنڍيوamp to the edge of your desk and tighten the knob until it is secure. Ensure the desk thickness is between 20-60mm.
- For Grommet Mount: If your desk has a grommet hole (8.5-70mm diameter), use the grommet base and secure it through the hole. Ensure the desk thickness is between 25-100mm.
5.3 مانيٽر ڪرڻ لاء VESA پليٽ سان ڳنڍيو
The arm head is removable for easier monitor installation.
- Remove the VESA plate from the monitor arm.
- Align the VESA plate with the mounting holes on the back of your monitor (75x75mm or 100x100mm).
- Secure the VESA plate to the monitor using the provided screws and washers.

Image: The VESA plate is shown detached from the monitor arm, highlighting the convenience of attaching it directly to the monitor before re-attaching the monitor to the arm.
5.4 Mount Monitor to Arm
- Slide the monitor (with the attached VESA plate) onto the arm head.
- Ensure the monitor is securely locked in place.

Image: A black monitor arm is shown securely clamped to a desk, supporting a black monitor from its rear VESA mount.
5.5 Adjust Gas Spring Tension
The gas spring tension needs to be adjusted to match the weight of your monitor. Use the provided Allen key to turn the adjustment screw on the arm. Turn clockwise to decrease tension (for lighter monitors) or counter-clockwise to increase tension (for heavier monitors) until the monitor stays at the desired height.
5.6 ڪيبل مينيجمينٽ
Route your monitor cables through the integrated cable management channels on the arm to maintain a tidy workspace.

Image: A monitor arm is installed on a wooden desk in an office environment, showcasing a clean setup with a keyboard and mouse, and cables neatly managed.
6. آپريٽنگ هدايتون
The FLEXISPOT Gas Spring Monitor Arm allows for flexible adjustment to achieve an ergonomic viewتجربو.
6.1 اونچائي جي ترتيب
Gently push or pull the monitor up or down to your desired height. The gas spring mechanism will hold it in place once released. This helps alleviate neck, eye, and back strain by allowing you to maintain a comfortable posture.
6.2 جھلڻ جي ترتيب
Tilt your monitor up or down to reduce glare and find the optimal viewing angle. The arm supports a tilt range of -90° to +15°.
6.3 گھمڻ ۽ گردش
Swivel the monitor left or right up to 180° to share your screen with colleagues or adjust your viewing position. You can also rotate the monitor 360° from landscape to portrait orientation.
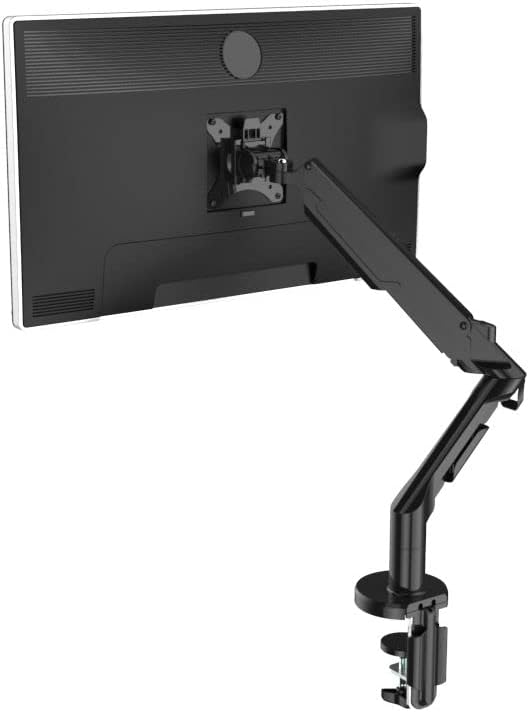
Image: The monitor arm is depicted at its maximum extension, demonstrating its wide range of motion and flexibility in positioning the monitor.
6.4 Optimizing Desk Space and Ergonomics
By elevating your monitor, the arm frees up significant desk space. Its design also promotes better posture, reducing discomfort during long work sessions.

Image: A visual comparison illustrating how a monitor arm (right) creates more usable desk space compared to a traditional monitor stand (left).

Image: An illustration demonstrating the improvement in ergonomic posture when using a monitor arm (right) compared to a standard monitor setup (left), reducing strain on the neck and back.

Image: A monitor arm is shown integrated with a standing desk, enabling users to maintain an ergonomic viewing height whether sitting or standing.
7. سار سنڀال
- Regularly check all screws and connections to ensure they are tight and secure.
- مانيٽر بازو کي نرم، ڊي سان صاف ڪريوamp ڪپڙو. گھڙڻ وارا صاف ڪندڙ يا محلولن کان پاسو ڪريو.
- گئس اسپرنگ ميڪانيزم کي لوبريڪيٽ نه ڪريو.
8. مسئلا حل ڪرڻ
- Monitor sags or does not stay at desired height: The gas spring tension is too low for your monitor's weight. Increase tension by turning the adjustment screw counter-clockwise with the provided Allen key.
- مانيٽر کي هلڻ ڏکيو يا تمام سخت آهي: The gas spring tension is too high. Decrease tension by turning the adjustment screw clockwise.
- Monitor wobbles: Ensure all mounting screws (VESA plate to monitor, arm to base, base to desk) are securely tightened. Check if the desk surface is stable.
- Cables are messy: Utilize the integrated cable management clips and channels on the arm to organize cables.
9. وارنٽي ۽ سپورٽ
Your FLEXISPOT Gas Spring Monitor Arm F8LB comes with a 1 سال وارنٽي خريداري جي تاريخ کان.
If you encounter any issues, have questions, or require assistance, please do not hesitate to contact our customer support team:
اي ميل: contact@flexispot.jp
Please provide your purchase details and a description of the issue when contacting support to ensure a prompt resolution.