تعارف
This manual provides detailed instructions for the setup, operation, maintenance, and troubleshooting of your Pisichen 24-inch Touchscreen Monitor with Built-in Webcam (Model 238TS-CMR). This monitor features a 2K QHD (2560x1440) resolution display with a 100Hz refresh rate, 10-point multi-touch functionality, and an integrated pop-up webcam, designed to enhance your productivity and interactive experience.
حفاظت جي ڄاڻ
- Always place the monitor on a stable, flat surface to prevent accidental falls.
- مانيٽر کي مينهن، نمي، يا انتهائي گرمي پد جي سامهون نه رکو.
- اوور گرم ٿيڻ کان بچڻ لاءِ وينٽيليشن جي سوراخن کي روڪڻ کان پاسو ڪريو.
- صرف مانيٽر سان فراهم ڪيل پاور اڊاپٽر استعمال ڪريو.
- Disconnect the power cable from the outlet before cleaning or if the monitor will be unused for an extended period.
- مانيٽر کي پاڻ ڌار ڪرڻ يا مرمت ڪرڻ جي ڪوشش نه ڪريو. سڀني سروسنگ کي قابل اهلڪارن جي حوالي ڪريو.
پيڪيج مواد
مھرباني ڪري چيڪ ڪريو ته سڀ شيون توھان جي پيڪيج ۾ موجود آھن:
- Pisichen 24-inch Touchscreen Monitor (Model 238TS-CMR)
- Monitor Stand (Base and Arm)
- پاور اڊاپٽر ۽ ڪيبل
- HDMI ڪيبل
- USB-C کان USB-C ڪيبل
- USB-A to USB-B Cable (for touch functionality with non-USB-C devices)
- استعمال ڪندڙ جو دستياب (ھي دستاويز)
سيٽ اپ ڪريو
1. اسٽينڊ اسيمبلي
- احتياط سان مانيٽر کي ان جي پيڪنگ مان هٽايو ۽ ان کي منهن هيٺ نرم، صاف مٿاڇري تي رکو ته جيئن ڇڪڻ کان بچي سگهجي.
- Attach the stand arm to the back of the monitor using the provided screws.
- Connect the stand base to the stand arm and secure it with the designated screw.
- Once assembled, carefully lift the monitor and place it upright on your desk.

Figure 1: Monitor stand assembly and adjustment capabilities.
2. توهان جي ڊوائس سان ڳنڍڻ
The monitor supports multiple connection types. Choose the appropriate cable for your device.
- پاور ڪنيڪشن: Connect the power adapter to the monitor's DC power port and then plug it into a power outlet.
- USB-C Connection (Recommended for full functionality): If your device has a USB-C port that supports DisplayPort Alternate Mode, connect the monitor using the provided USB-C to USB-C cable. This single cable can transmit video, audio, and touch signals, and may also provide power delivery to your laptop.
- HDMI or DisplayPort Connection: Connect an HDMI or DisplayPort cable from your device to the corresponding port on the monitor for video and audio. For touch functionality, you must also connect the USB-A to USB-B cable from your device's USB port to the monitor's USB-B upstream port.
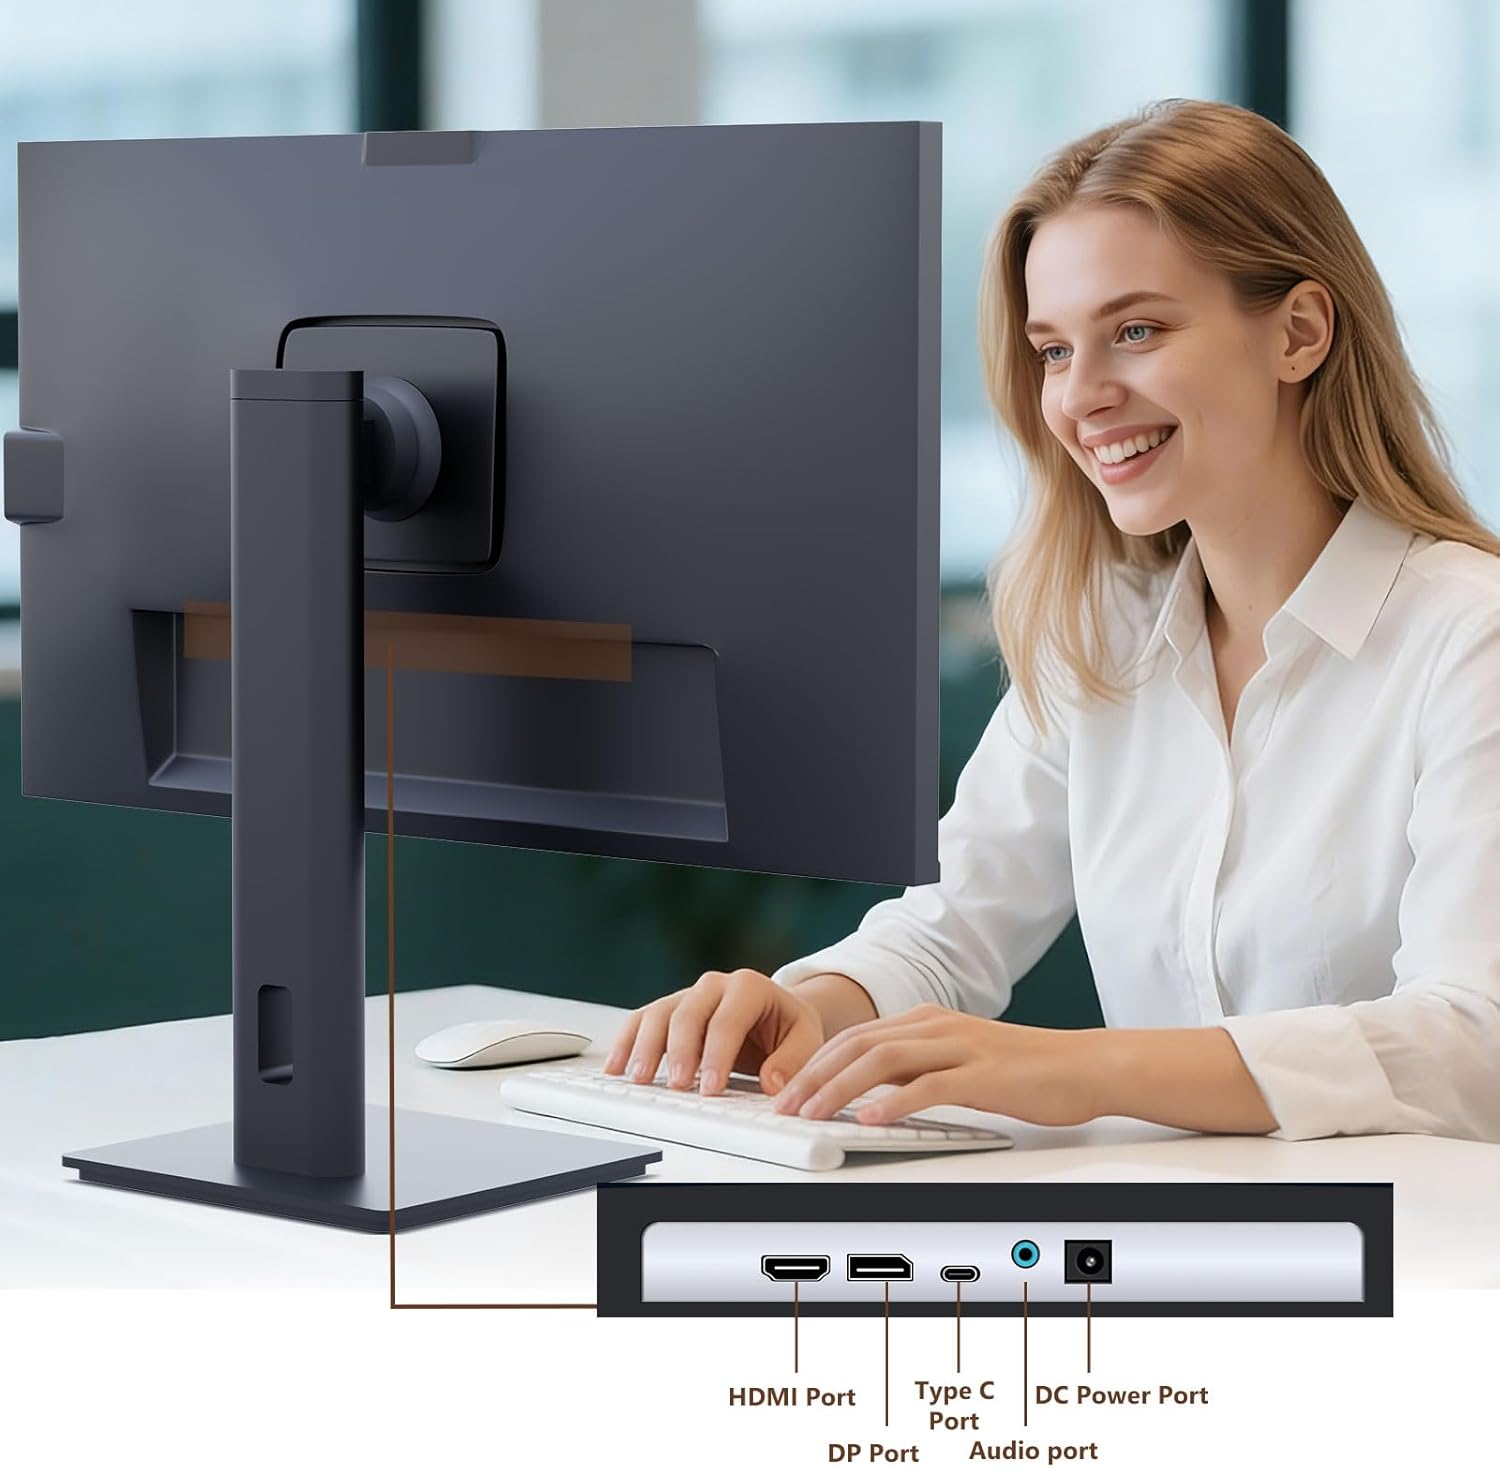
Figure 2: Available ports on the Pisichen monitor.

Figure 3: USB-C one-cable connection for simplified setup.

Figure 4: Connection options for desktop and laptop devices.
3. شروعاتي پاور آن
Press the power button located on the monitor to turn it on. The monitor will automatically detect the active input source. If multiple sources are connected, you may need to select the correct input via the On-Screen Display (OSD) menu.
آپريٽنگ هدايتون
1. ٽچ اسڪرين جي ڪارڪردگي
The monitor supports 10-point multi-touch. Ensure the USB-C cable is connected (for full functionality) or the USB-A to USB-B cable is connected in addition to your video cable for touch input to work. Touch gestures are similar to those used on tablets or smartphones.
- ٽيپ ڪريو: Single touch for selection or activation.
- ڇڪيو: Touch and hold, then move your finger to move items.
- پنچ/ اسپريڊ: زوم ان يا آئوٽ ڪرڻ لاءِ ٻه آڱريون استعمال ڪريو.
- سوائپ اسڪرول ڪرڻ يا نيويگيٽ ڪرڻ لاءِ پنهنجي آڱر کي اسڪرين تي گھمايو.

Figure 5: Demonstrating intuitive touch interaction.

Figure 6: Collaborative use of the multi-touch display.
2. Built-in Webڪئميرا جو استعمال
The monitor features a pop-up webcam for privacy and convenience. To use the webcam, gently press the top center of the monitor frame where the webcam is located. It will pop up. To retract it, gently press it down until it clicks into place.
Ensure your operating system and video conferencing software recognize the webcam. No additional drivers are typically required for basic functionality.

Figure 7: The monitor with its built-in pop-up webcam in use during a video conference.

Figure 8: High-definition video calls using the integrated webڪيم.
3. آن-اسڪرين ڊسپلي (OSD) مينيو
او ايس ڊي مينيو توهان کي مختلف مانيٽر سيٽنگون ترتيب ڏيڻ جي اجازت ڏئي ٿو. نيويگيٽ ڪرڻ ۽ اختيارن کي چونڊڻ لاءِ مانيٽر جي پوئين يا تري ۾ بٽڻ استعمال ڪريو.
- چمڪ/ برعڪس: ڊسپلي جي روشني ۽ برعڪس جي سطحن کي ترتيب ڏيو.
- رنگ سيٽنگون: رنگ جي درجه حرارت، گاما، ۽ ٻين رنگ سان لاڳاپيل پيرا ميٽرز کي تبديل ڪريو.
- ان پٽ جو ذريعو: Manually select between HDMI, DisplayPort, or USB-C inputs.
- آڊيو: Adjust volume for built-in speakers or connected headphones.
- تصويري موڊ: Select preset display modes (e.g., Standard, Game, Movie).
- HDR: Enable or disable High Dynamic Range settings for improved dark detail optimization.

Figure 9: HDR feature for enhanced visual detail.
4. ايرگونومڪ ترتيبون
مانيٽر اسٽينڊ توهان جي کي بهتر بڻائڻ لاءِ مختلف ترتيبن جي اجازت ڏئي ٿو viewآرام ڪرڻ:
- اونچائي جي ترتيب: مانيٽر کي نرميءَ سان مٿي يا هيٺ دٻايو يا ڇڪيو.
- جھلڻ: Tilt the screen forward or backward to find the ideal angle.
- گھمڻ: مانيٽر کي ان جي بنياد تي کاٻي يا ساڄي طرف گھمايو.
- محور: پورٽريٽ موڊ لاءِ اسڪرين کي 90 درجا گھمايو viewing.
Figure 10: Ergonomic adjustments for optimal viewing.
سار سنڀال
- اسڪرين جي صفائي: نرم، لِنٽ فري ڪپڙي سان اسڪرين کي نرميءَ سان صاف ڪريو. ضدي نشانن لاءِ، ڊيampڪپڙي کي پاڻي يا غير رگڙيندڙ اسڪرين ڪلينر سان ٿورو ڇڪيو. اسڪرين تي سڌو سنئون مائع نه اسپري ڪريو.
- جسم جي صفائي: مانيٽر جي سي کي صاف ڪرڻ لاءِ نرم، سڪل ڪپڙو استعمال ڪريوasinج. مضبوط ڊٽرجنٽ يا رگڙيندڙ صاف ڪندڙ استعمال ڪرڻ کان پاسو ڪريو.
- اسٽوريج: جيڪڏهن مانيٽر کي گهڻي عرصي تائين ذخيرو ڪري رهيا آهيو، ته سڀئي ڪيبل ڌار ڪريو ۽ ان کي ٿڌي، سڪل جاءِ تي ذخيرو ڪريو، ترجيحي طور تي ان جي اصل پيڪنگنگ ۾.
مشڪلاتون
ڪابه طاقت
- پڪ ڪريو ته پاور ڪيبل مانيٽر ۽ پاور آئوٽليٽ ٻنهي سان محفوظ طور تي ڳنڍيل آهي.
- ٻئي ڊوائيس کي پلگ ان ڪندي پڪ ڪريو ته پاور آئوٽليٽ ڪم ڪري رهيو آهي.
- Check if the power adapter is correctly connected to the monitor.
ڪوبه سگنل ناهي / خالي اسڪرين
- Confirm the video cable (HDMI, DP, or USB-C) is securely connected to both the monitor and your device.
- پڪ ڪريو ته مانيٽر جي OSD مينيو ۾ صحيح ان پٽ سورس چونڊيو ويو آهي.
- پنهنجي ڪمپيوٽر جي ڊسپلي سيٽنگز کي چيڪ ڪريو ته جيئن پڪ ڪري سگهجي ته مانيٽر ڳوليو ويو آهي ۽ فعال آهي.
- جيڪڏهن موجود هجي ته ڪا ٻي وڊيو ڪيبل يا پورٽ آزمايو.
Touch Functionality Not Working
- If using HDMI or DisplayPort, ensure the USB-A to USB-B cable is connected from your device to the monitor.
- If using USB-C, ensure your device's USB-C port supports DisplayPort Alternate Mode and touch data transmission.
- Check your operating system's touch settings.
- Note that some devices, such as game consoles (PS3/4/5, Xbox, Steam Deck, Fire TV Cube) and certain Apple products (iPhone, iPad, Switch), do not support touch functionality with this monitor.

Figure 11: Touch compatibility chart for various devices.
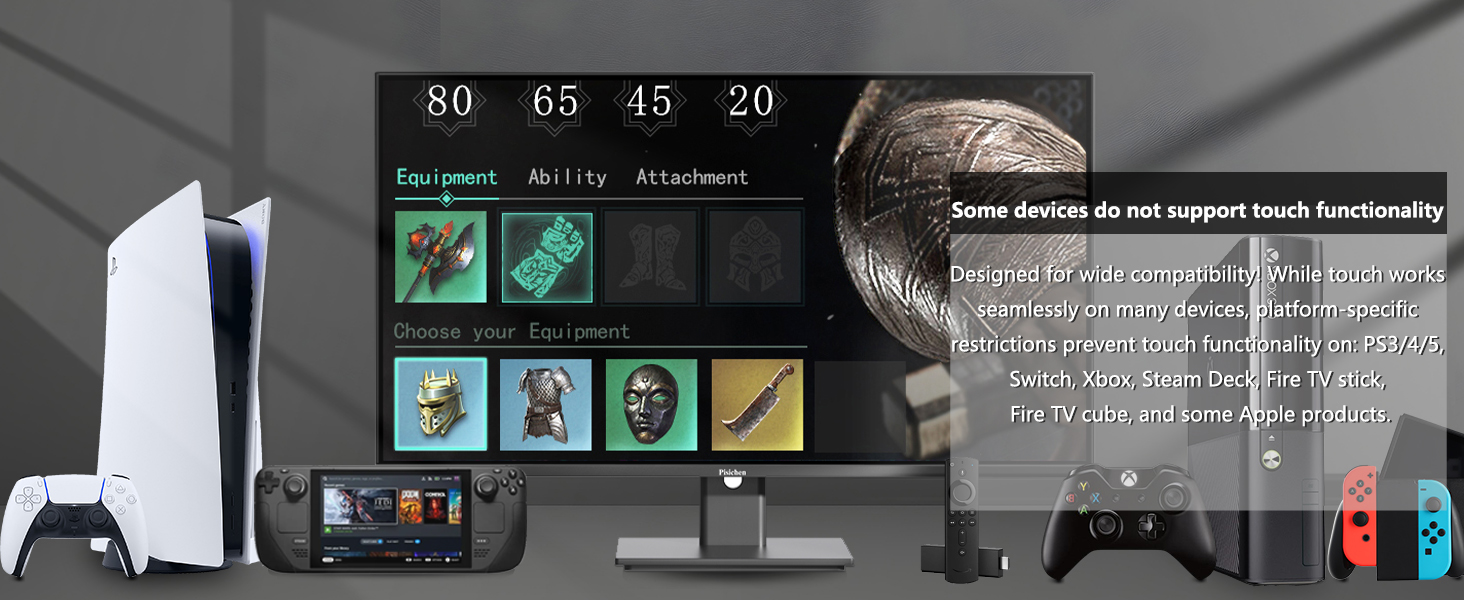
Figure 12: Devices that do not support touch functionality.
Webڪيم نه مليو
- کي يقيني بڻايو webcam is fully popped up.
- Verify that the USB connection (either USB-C or USB-A to USB-B) is properly established.
- Check your operating system's privacy settings to ensure camera access is granted to applications.
- پنهنجي ڪمپيوٽر کي ٻيهر شروع ڪريو.
وضاحتون
| خاصيت | وصف |
|---|---|
| ماڊل نمبر | 238TS-CMR |
| اسڪرين جي ماپ | 23.8 انچ |
| قرارداد | 2560 x 1440 (QHD Wide 1440p) |
| ريفريش جي شرح | 100Hz |
| روشني | 400 ڪينڊيلا (نِٽ) |
| مقابلي جي نسبت | 3000:1 |
| ٽچ ٽيڪنالاجي | 10 پوائنٽ ملٽي ٽچ |
| Webڪئميرا | Built-in Pop-up Camera |
| رابطي | HDMI, DisplayPort (DP), USB Type-C, USB-B (upstream), Audio Out, DC Power |
| اسپيڪٽ ريشو | 16:9 |
| اسڪرين جي مٿاڇري | چمڪندڙ |
| پيداوار جي ماپ | 1.97 x 21.26 x 12.6 انچ |
| شيءِ جو وزن | 11.53 پائونڊ |
| ٺاهيندڙ | Shenzhen Konowa Electronics Co., LTD |
وارنٽي ۽ سپورٽ
Your Pisichen monitor is covered by a limited warranty. Please refer to the warranty card included in your package for specific terms and conditions, including the warranty period and coverage details.
For technical support, troubleshooting assistance, or warranty claims, please contact Pisichen customer service. Contact information can typically be found on the manufacturer's webسائيٽ تي يا وارنٽي ڪارڊ تي.
When contacting support, please have your monitor's model number (238TS-CMR) and purchase information readily available.