1. تعارف
This manual provides comprehensive instructions for the setup, operation, and maintenance of your KitVision 7-inch Digital Photo Frame, model DPF7BKK. Please read this manual thoroughly before using the device to ensure proper functionality and longevity.

شڪل 1: سامهون view of the KitVision 7-inch Digital Photo Frame. The frame is silver with a black bezel, displaying a vibrant image of a person holding a child on a beach.
2. پيڪيج مواد
پڪ ڪريو ته هيٺ ڏنل سڀئي شيون توهان جي پيڪيج ۾ موجود آهن:
- KitVision 7-inch Digital Photo Frame (DPF7BKK)
- اي سي پاور ايڊاپٽر
- لاتعداد اسٽينڊ
- استعمال ڪندڙ جو دستياب (ھي دستاويز)

Figure 2: The product packaging for the KitVision 7-inch Digital Photo Frame. The box features a blue background with wave patterns and an image of the digital photo frame displaying a beach scene.
3. پراڊڪٽ ختمview
3.1. Rear Panel and Controls

شڪل 3: پوئتي view of the digital photo frame. Visible features include the USB port, SD/MMC/MS card slot, DC power input, control buttons (ENTER, arrows, MENU, STANDBY), and a detachable stand.
- USB پورٽ: USB فليش ڊرائيو کي ڳنڍڻ لاءِ.
- SD/MMC/MS Card Slot: For inserting compatible memory cards.
- ڊي سي ان پٽ: Power connection port for the AC adapter.
- ڪنٽرول بٽڻ:
- داخل ٿيڻ: چونڊ جي تصديق ڪري ٿي.
- < / > (Left/Right Arrows): Navigates through menus and images.
- ^ / v (Up/Down Arrows): مينيو ۽ اختيارن جي ذريعي وڃو.
- مينيو مکيه مينيو تائين رسائي.
- تيار رهو: Powers the frame on or off.
- هٽائڻ وارو اسٽينڊ: Allows for tabletop placement in landscape or portrait orientation.
- ڀت تي لڳل سوراخ: ڀت تي فريم لڳائڻ لاءِ.
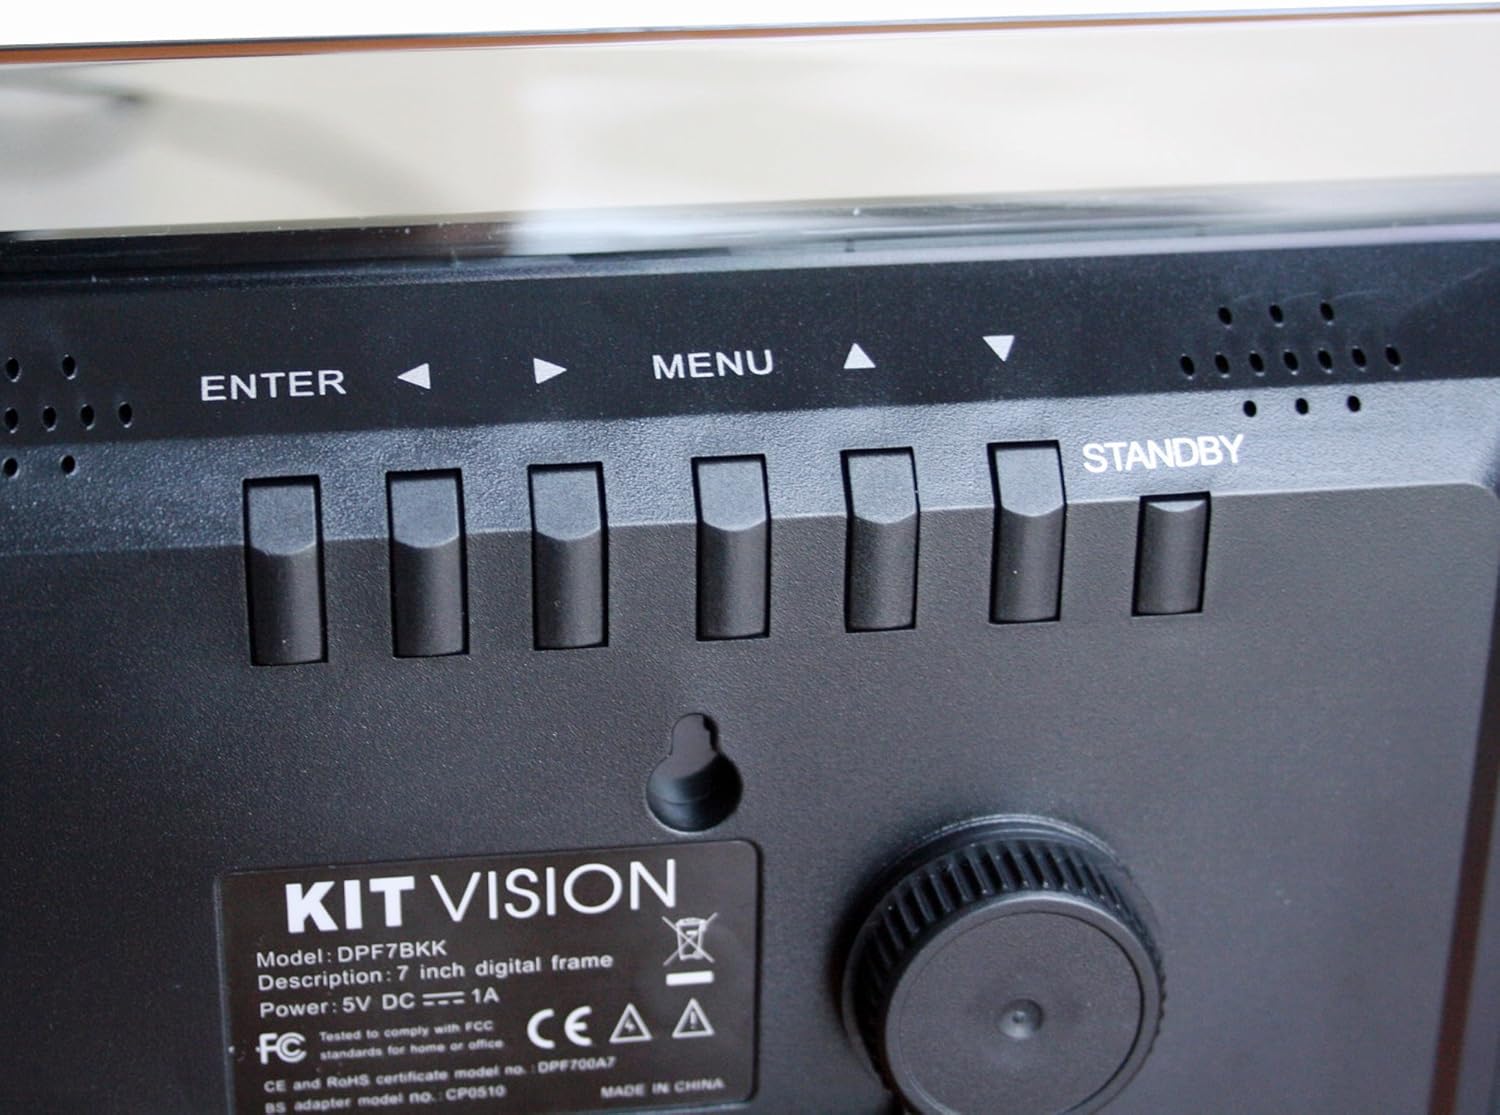
شڪل 4: بند اپ view of the control buttons and product label on the rear of the digital photo frame. The label clearly shows "KITVISION", "Model: DPF7BKK", and power specifications.
4. سيٽ اپ
4.1. اسٽينڊ کي ڳنڍڻ
- Locate the detachable stand in the package.
- Insert the stand's peg into the designated hole on the rear of the photo frame.
- Rotate the stand to secure it in place and adjust the angle for optimal viewing. The stand supports both landscape and portrait orientations.
4.2. پاور ڪنيڪشن
- Connect the AC power adapter to the DC input port on the rear of the frame.
- پاور اڊاپٽر جي ٻئي ڇيڙي کي معياري اليڪٽريڪل آئوٽليٽ ۾ لڳايو.
- The frame will typically power on automatically or can be turned on using the STANDBY button.
4.3. Inserting a Memory Card or USB Drive
The frame supports SD, MMC, MS memory cards, and USB flash drives. Ensure your photos are in a compatible format (e.g., JPEG).
- Carefully insert your memory card into the SD/MMC/MS slot or your USB flash drive into the USB port.
- Ensure the card or drive is inserted correctly and fully seated. Do not force it.
- The frame should automatically detect the storage device and begin displaying photos, or prompt you to select a source.
5. آپريٽنگ هدايتون
5.1. بنيادي نيويگيشن
- استعمال ڪريو </> (Left/Right) and ^ / وي (Up/Down) arrow buttons to navigate through menus and select options.
- کي دٻايو داخل ڪريو button to confirm a selection or open a sub-menu.
- کي دٻايو مينيو button to return to the previous menu or access the main menu from a slideshow.
- کي دٻايو ۽ رکو تيار رهو button to power the frame off or on.
5.2. Viewتصويرون
Once a memory card or USB drive is inserted, the frame will typically start a slideshow automatically. If not, navigate to the "Photo" or "Slideshow" option in the main menu and press داخل ڪريو.
5.3. Slideshow Settings
To customize your slideshow:
- کي دٻايو مينيو مين مينيو تائين رسائي حاصل ڪرڻ لاءِ بٽڻ.
- Navigate to "Settings" or "Slideshow Options" using the arrow buttons and press داخل ڪريو.
- Adjust settings such as:
- ڊسپلي وقت: Duration each photo is shown.
- منتقلي جو اثر: How photos change (e.g., fade, wipe).
- ورجائي موڊ: Loop all photos or play once.
- فوٽو آرڊر: Sequential or random.
- دٻايو داخل ڪريو to confirm changes and مينيو نڪرڻ.
6. سار سنڀال
6.1. فريم کي صاف ڪرڻ
- هميشه صاف ڪرڻ کان اڳ پاور اڊاپٽر کي ختم ڪريو.
- اسڪرين ۽ فريم کي نرميءَ سان صاف ڪرڻ لاءِ نرم، سڪل، لِنٽ فري ڪپڙو استعمال ڪريو.
- اسڪرين تي ضدي نشانن لاءِ، هلڪو ڊيampڪپڙي کي پاڻي يا اسڪرين محفوظ صفائي واري محلول سان ڌوئڻ ڏيو. اسڪرين تي سڌو سنئون مائع نه اسپري ڪريو.
- Avoid using abrasive cleaners, solvents, or alcohol-based solutions, as these can damage the surface.
6.2. اسٽوريج
- When not in use for extended periods, store the digital photo frame in a cool, dry place, away from direct sunlight and extreme temperatures.
- It is recommended to store the frame in its original packaging to protect it from dust and physical damage.
7. مسئلا حل ڪرڻ
| مسئلو | ممڪن سبب | حل |
|---|---|---|
| فريم آن نٿو ٿئي. | No power, faulty adapter, or STANDBY button not pressed. | Ensure power adapter is securely connected to both the frame and a working electrical outlet. Press the STANDBY button. Try a different outlet. |
| ڪابه تصوير نه ڏيکاري وئي آهي. | No memory card/USB, incompatible file format, or card/USB not inserted correctly. | Insert a memory card or USB drive with compatible image files (JPEG). Ensure it is fully seated. Check if the frame is set to the correct source input in the menu. |
| تصويرون مسخ ٿيل يا گهٽ معيار جون نظر اچن ٿيون. | Low resolution images, damaged memory card/USB, or screen issue. | Use higher resolution images. Try a different memory card or USB drive. Clean the screen. |
| بٽڻ غير جوابي آهن. | عارضي سافٽ ويئر جي خرابي. | Disconnect the power adapter, wait 10 seconds, then reconnect it to reset the device. |
8. وضاحتون
| ماڊل نمبر | DPF7BKK |
| اسڪرين جي ماپ | 7 انچ |
| قرارداد | WXGA |
| پيداوار جي ماپ | 9.06 x 6.5 x 1.26 انچ |
| شيءِ جو وزن | 0.012 اونس |
| رابطي ٽيڪنالاجي | USB |
| طاقت جو ذريعو | Corded Electric (5V DC === 1A) |
| سپورٽ ٿيل ميموري ڪارڊ | SD, MMC, MS |
| سپورٽ ٿيل تصويري شڪلون | JPEG (common format, specific list not provided in input) |
9. وارنٽي ۽ سپورٽ
For warranty information and technical support, please refer to the documentation provided at the time of purchase or contact KitVision customer service. Specific warranty terms may vary by region and retailer.


