1. تعارف
This manual provides comprehensive instructions for the installation, operation, and maintenance of your Hertz HDP4 4-Channel 1000W Max D-Class Amplifier. Please read this manual thoroughly before attempting installation or operation to ensure proper function and safety.
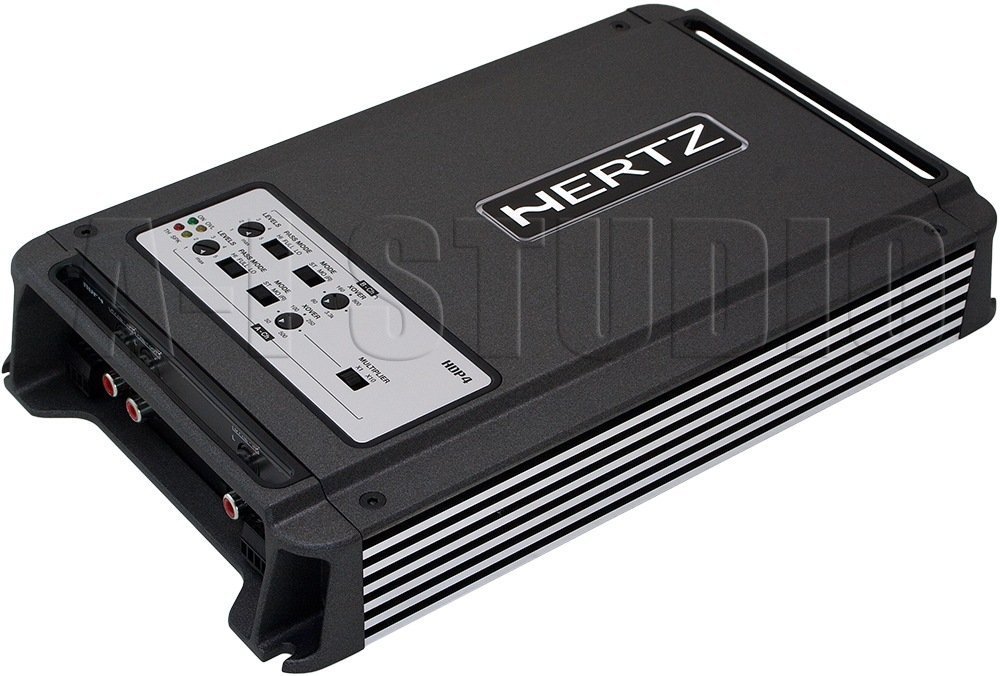
شڪل 1.1: مٿي کان هيٺ تائين زاويه view of the Hertz HDP4 ampلائفائر، شوڪasinجي اهو ڪمپيڪٽ ڪارو ج آهي.asing and control panel on the top surface. The Hertz logo is visible on the main body.
2. حفاظت جي ڄاڻ
هميشه هيٺ ڏنل حفاظتي احتياطن تي عمل ڪريو:
- Disconnect the vehicle's battery before any installation or wiring.
- پڪ ڪريو ته سڀئي وائرنگ صحيح طرح سان موصل ٿيل آهن ته جيئن شارٽ سرڪٽ کي روڪي سگهجي.
- جبل amplifier securely in a well-ventilated area, away from moisture and direct heat.
- انسٽاليشن سيڪشن ۾ بيان ڪيل بجلي ۽ زميني ڪنيڪشن لاءِ مناسب گيج وائرنگ استعمال ڪريو.
- جيڪڏهن توهان کي انسٽاليشن جي عمل جي ڪنهن به حصي بابت پڪ ناهي ته هڪ پيشيور انسٽالر سان صلاح ڪريو.
3. پيڪيج مواد
پڪ ڪريو ته سڀئي شيون پيڪيج ۾ موجود آهن:
- Hertz HDP4 Ampلائفائر يونٽ
- ماؤنٽنگ هارڊويئر (اسڪرو، بریکٹس)
- استعمال ڪندڙ جو دستياب (ھي دستاويز)
4. سيٽ اپ ۽ تنصيب
4.1 چڙهڻ Ampزندگي گذاريندڙ
لڳائڻ لاءِ مناسب جڳھ چونڊيو amplifier. It should be a dry, well-ventilated area, protected from direct sunlight and excessive vibration. Ensure there is sufficient space around the ampهوا جي گردش لاء لفيئر.

شڪل 4.1: مٿي view of the Hertz HDP4 amplifier, illustrating its compact design and potential mounting points. The amplifier features a textured black finish with the Hertz logo prominently displayed.
- جاءِ amplifier in the desired mounting location and mark the screw holes.
- Drill pilot holes if necessary, ensuring not to damage any vehicle components.
- محفوظ ڪريو ampمهيا ڪيل ماؤنٽنگ اسڪرو استعمال ڪندي لائفائر.
4.2 وائرنگ ڪنيڪشن
Proper wiring is critical for performance and safety. Refer to the diagram below for power, ground, remote, and speaker connections.

Figure 4.2: Rear panel of the Hertz HDP4 amplifier, detailing the power input (BATT), ground (GND), remote turn-on (REM) terminals, and speaker output terminals (L/R mono for channels A and B). Two 40A fuses are also visible.
- Power (BATT): Connect a fused power cable (minimum 8 AWG recommended) directly from the vehicle's positive battery terminal to the BATT terminal on the ampوierيڪ زنده
- گرائونڊ (GND): Connect a ground cable of the same gauge as the power cable from the GND terminal to a clean, unpainted metal point on the vehicle chassis.
- ريموٽ (REM): Connect a remote turn-on wire from your head unit's remote output to the REM terminal.
- اسپيڪر جا نتيجا: Connect your speakers to the appropriate L (left) and R (right) terminals for each channel (A and B). Ensure correct polarity. The amplifier supports mono bridging for increased power output to a single speaker or subwoofer.
- فیوز: جي amplifier is equipped with two 40A fuses. Replace only with fuses of the same type and rating.
4.3 Input Connections and Controls
جي amplifier offers both RCA (low-level) and High-Level inputs, along with various crossover and gain controls.

Figure 4.3: Input and control panel of the Hertz HDP4 amplifier. This panel includes RCA pre-inputs (A PRE-IN, B PRE-IN), high-level inputs (A HI-IN, B HI-IN), and various adjustment knobs for levels, pass mode, and crossover settings. A switch for HI-IN AUTO TURN-ON is also present.
- RCA Pre-Inputs (A PRE-IN, B PRE-IN): Connect your head unit's RCA outputs to these inputs for low-level signal.
- High-Level Inputs (A HI-IN, B HI-IN): If your head unit does not have RCA outputs, connect speaker-level signals directly to these inputs. The amplifier features an auto turn-on function for high-level inputs.
- سطحون: Adjust the input sensitivity (gain) to match the output of your head unit. Start with the gain at minimum and slowly increase until desired volume is achieved without distortion.
- پاس موڊ: Select the desired crossover mode (e.g., Full, HPF, LPF) for each channel pair.
- Crossover Frequency (XOVER): Adjust the frequency point for the selected crossover mode.
- ملائيندڙ: Use this switch to multiply the crossover frequency setting by 1 or 10, depending on your system requirements.
5. آپريٽنگ هدايتون
5.1 شروعاتي پاور اپ
- After all connections are made and verified, reconnect the vehicle's battery.
- پنهنجو هيڊ يونٽ آن ڪريو. amplifier should power on automatically (if remote wire is connected or HI-IN AUTO TURN-ON is active).
- Start with the head unit volume low and gradually increase it, listening for clear audio.
5.2 Adjusting Audio Settings
ٺيڪ ٺاڪ amplifier's settings for optimal sound quality:
- Gain Matching: ترتيب ڏيو amplifier's gain controls (LEVELS) to match the output voltage of your head unit. This is crucial to prevent distortion.
- ڪراس اوور سيٽنگون: Set the crossover frequencies (XOVER) and pass modes (PASS MODE) according to the specifications of your speakers. For full-range speakers, a high-pass filter (HPF) is often used to protect them from low bass frequencies. For subwoofers, a low-pass filter (LPF) is used.
6. سار سنڀال
To ensure the longevity and optimal performance of your Hertz HDP4 ampلائفائر، انهن سار سنڀال جي هدايتن تي عمل ڪريو:
- صفائي: وقتي طور تي صاف ڪريو ampلائفائر جي ٻاهرين حصي کي نرم، سڪل ڪپڙي سان صاف ڪريو. سخت ڪيميڪل يا رگڙيندڙ صاف ڪندڙ استعمال نه ڪريو.
- وينٽيليشن: انهي کي يقيني بڻايو وڃي ته ampلائيفائر جا کولنگ فين مٽي ۽ رڪاوٽن کان پاڪ آهن ته جيئن مناسب گرمي جي ضايع ٿيڻ کي برقرار رکي سگهجي.
- ڪنيڪشن: Regularly check all wiring connections for tightness and corrosion. Loose connections can lead to poor performance or damage.
- فیوز: If a fuse blows, replace it only with a fuse of the exact same type and rating (2 x 40A). Using an incorrect fuse can cause severe damage to the amplifier or vehicle electrical system.

Figure 6.1: Bottom panel of the Hertz HDP4 amplifier, displaying the serial number label and important caution notes regarding insulated screws. This area should be kept clean and free from obstructions.
7. مسئلا حل ڪرڻ
جيڪڏهن توهان پنهنجي سان مسئلا محسوس ڪندا آهيو ampلائفائر، سپورٽ سان رابطو ڪرڻ کان اڳ هيٺ ڏنل جدول سان صلاح ڪريو:
| مسئلو | ممڪن سبب | حل |
|---|---|---|
| بجلي ناهي / Ampلائفائر آن نه ٿو | ڦاٽل فيوز، لوز پاور/گرائونڊ/ريموٽ وائر، ناقص هيڊ يونٽ ريموٽ آئوٽ پُٽ. | Check and replace fuses. Verify all power, ground, and remote connections are secure. Test remote wire for 12V signal. |
| ڪو آواز | Loose RCA/speaker wires, incorrect input selection, amplifier in protection mode, faulty speakers. | Check all signal and speaker connections. Ensure correct input mode is selected. Check for protection light. Test speakers. |
| بگڙيل آواز | Gain set too high, incorrect crossover settings, poor quality audio source, damaged speakers. | Reduce gain. Adjust crossover settings. Test with a different audio source. Inspect speakers for damage. |
| Ampوڌيڪ گرم ڪرڻ وارو | Insufficient ventilation, impedance mismatch, prolonged high-power operation. | چوڌاري مناسب هوا جي وهڪري کي يقيني بڻايو وڃي ampلائفائر. اسپيڪر امپيڊنس ميچز جي تصديق ڪريو amplifier's capabilities. Reduce volume or operating time. |
8. وضاحتون
Technical specifications for the Hertz HDP4 4-Channel 1000W Max D-Class Ampزنده:
- ماڊل: HDP4
- برانڊ: هرٽز
- قسم: 4-Channel D-Class Ampزندگي گذاريندڙ
- وڌ ۾ وڌ طاقت: 1000W (as per product title, specific RMS not provided in data)
- پيداوار جي ماپ (L x W x H): 11.18 x 6.73 x 1.83 انچ
- وزن: 6.35 پائونڊ
- جلدtage: 14.4 وولٽ (آپريٽنگ)
- چڙهڻ جو قسم: مٿاڇري جبل
- فیوز: 2 x 40A
- ASIN: B00AWBU1FQ
9. وارنٽي ڄاڻ
Hertz products are designed and manufactured to the highest quality standards. For specific warranty terms and conditions, please refer to the warranty card included with your product or visit the official Hertz webسائيٽ. وارنٽي دعوائن لاءِ خريداري جي ثبوت طور پنهنجي خريداري جي رسيد رکو.
10. سپورٽ
For technical assistance, troubleshooting beyond this manual, or warranty inquiries, please contact Hertz customer support through their official website or authorized dealer. Ensure you have your product model (HDP4) and serial number ready when contacting support.
Official Hertz Webسائيٽ: www.hertzaudiovideo.com


