1. تعارف
خريد ڪرڻ لاءِ مهربانيasing the RHYTHM 8RZ166SR03 Fit Wave Smart Alarm Clock. This device is a radio-controlled alarm clock equipped with a thermometer, hygrometer, and calendar display. Its compact design and user-friendly interface make it ideal for various indoor settings. This manual provides detailed instructions to help you set up, operate, and maintain your new alarm clock.
اهم خاصيتون:
- Atomic Clock Movement: Automatically synchronizes time via radio waves for precise accuracy.
- درجه حرارت ڊسپلي: Shows ambient temperature from -9.9 to 50 ℃.
- نمي ڏيکاري: Shows ambient humidity from 20% to 95%.
- Electronic Sound Alarm: Features an alarm with an auto-stop function.
- سست جو ڪم: عارضي طور تي الارم کي خاموش ڪري ٿو.
- Dial Light: Includes an afterglow function for visibility in low light (5 seconds).
- ڪئلينڊر ڊسپلي: Shows date and day of the week, including Rokuyoku (Japanese traditional calendar).
- 12/24 ڪلاڪ ڊسپلي: Switchable time format.
2. پيڪيج مواد
مھرباني ڪري چيڪ ڪريو ته سڀ شيون پيڪيج ۾ موجود آھن:
- RHYTHM 8RZ166SR03 Fit Wave Smart Alarm Clock
- هدايت نامو (هي دستاويز)
Note: 2 x AA manganese batteries are required and sold separately.
3. پراڊڪٽ ختمview
سامهون View and Display Elements:

This image displays the front of the RHYTHM 8RZ166SR03 alarm clock. It features a large digital LCD screen at the top, showing time, date, temperature, and humidity. Below the screen are five circular control buttons labeled (from left to right): Monitor, Time Adjustment, Reset, Back, and Forward.

This diagram illustrates the various elements of the LCD display:
- وقت ڏيکاري: Shows the current time in 12-hour (AM/PM) or 24-hour format.
- Radio Wave Reception Indicator: Displays the status of radio wave reception.
- الارم جو اشارو: An icon appears when the alarm is activated.
- درجه حرارت ڊسپلي: ڏيکاري ٿو موجوده ڪمري جو گرمي پد.
- نمي ڏيکاري: Shows the current room humidity.
- ڪئلينڊر ڊسپلي: Shows the current date and day of the week, including Rokuyoku.
پوئتي View ۽ ڪنٽرول:
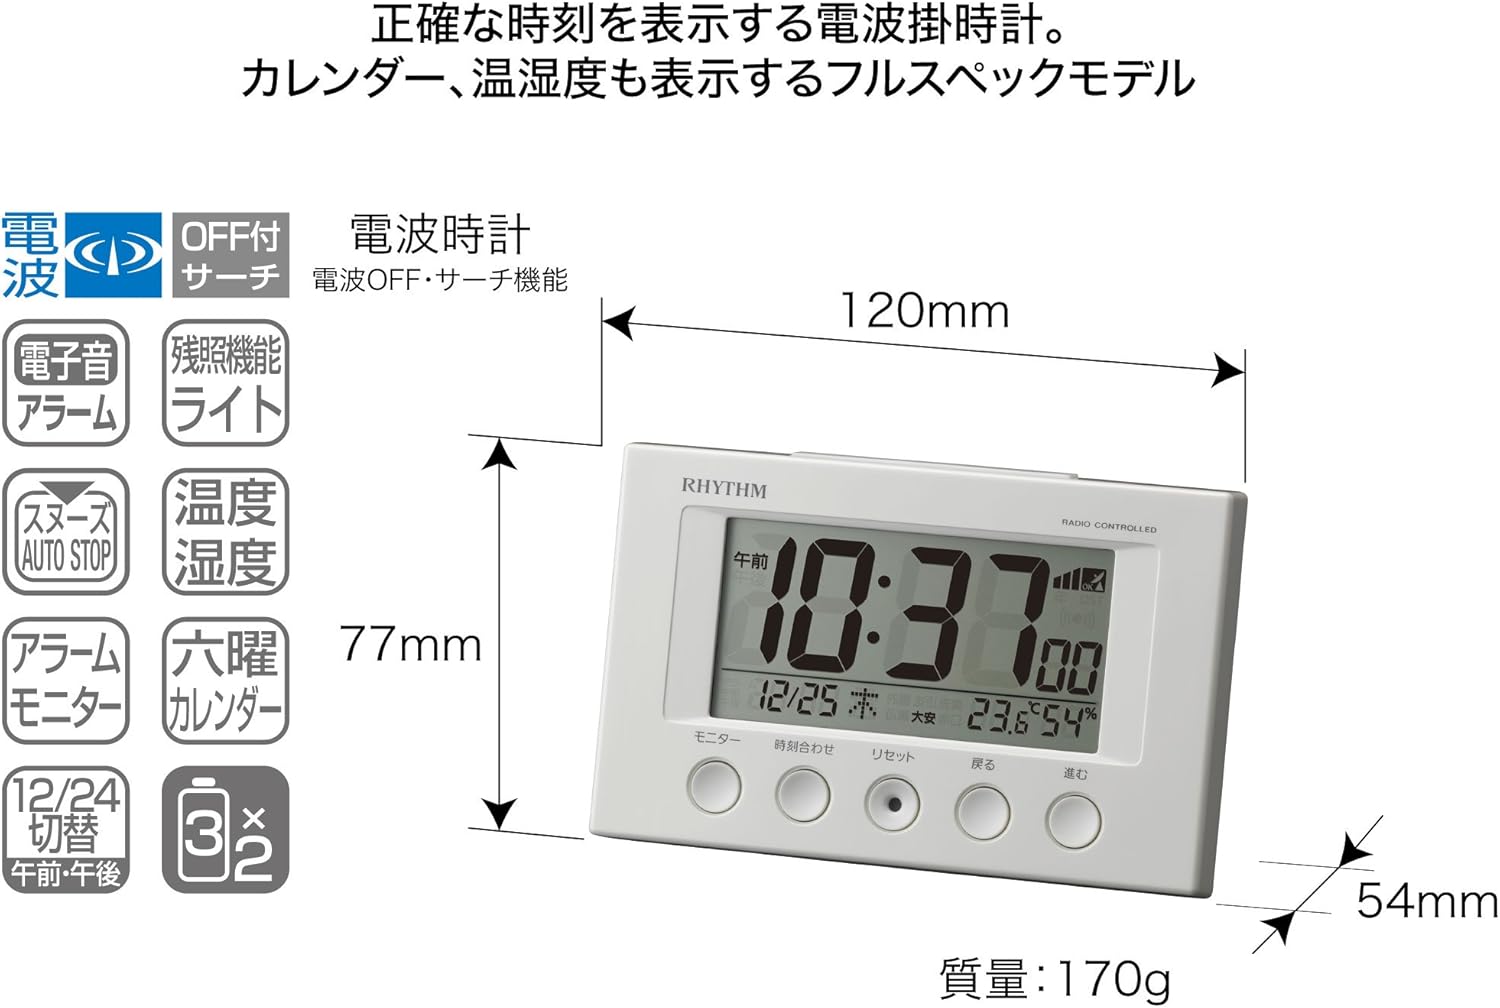
The back of the clock features the alarm ON/OFF slide switch on the left side and the battery compartment cover in the center. The model number '8RZ166' and 'MADE IN CHINA' are also visible.
Control Buttons Explained:

This image details the function of each button:
- مانيٽر بٽڻ: Used to check the alarm sound.
- Time Adjustment Button: Used for manual time setting and switching between 12/24 hour display.
- ري سيٽ بٽڻ: Resets the clock and also functions as a forced radio wave reception button.
- Back Button (←): Used to decrease values during alarm or time settings.
- Forward Button (→): Used to increase values during alarm or time settings.
- Alarm Switch (on back): Slides up for ON, down for OFF.
- Snooze Button (top): Activates the snooze function and the dial light.
4. سيٽ اپ
4.1 بيٽري لڳائڻ
- Remove the battery compartment cover on the back of the clock.
- Insert two (2) AA manganese batteries, ensuring the correct polarity (+/-) as indicated inside the compartment.
- بيٽري جي ڪمري واري ڍڪ کي تبديل ڪريو.
This image shows the open battery compartment with two AA batteries correctly inserted, indicating the positive and negative terminals.
4.2 Initial Power On and Radio Wave Reception
After battery installation, the clock will automatically attempt to receive radio waves to set the correct time. This process may take several minutes. Ensure the clock is placed in an area with good reception, away from electronic devices that may cause interference.

This diagram illustrates how radio-controlled clocks receive standard time signals from two transmission stations (one in Fukushima, 40kHz, and one in Fukuoka/Saga, 60kHz) to automatically correct and display the precise time. The clock will automatically adjust its time based on these signals.
If reception is successful, the time will be set automatically. If not, you may need to manually set the time (refer to Section 5.1).
5. آپريٽنگ هدايتون
5.1 دستي وقت ۽ تاريخ جي ترتيب
In cases where radio wave reception is difficult or for specific time zone adjustments:
- کي دٻايو ۽ رکو وقت جي ترتيب بٽڻ دٻايو جيستائين وقت جي ڊسپلي چمڪائڻ شروع نه ٿئي.
- استعمال ڪريو Back (←) ۽ Forward (→) ڪلاڪ کي ترتيب ڏيڻ لاء بٽڻ.
- کي دٻايو وقت جي ترتيب button again to move to minutes, then adjust using Back (←) ۽ Forward (→).
- دٻائڻ جاري رکو وقت جي ترتيب سال، مهيني ۽ ڏينهن جي سيٽنگن ذريعي چڪر ڪرڻ لاءِ، هر هڪ کي ترتيب ڏيڻ سان Back (←) ۽ Forward (→).
- هڪ دفعو سڀئي سيٽنگون صحيح ٿي وڃن، دٻايو وقت جي ترتيب button one last time to confirm and exit the setting mode.
5.2 الارم سيٽنگون
- الارم جو وقت مقرر ڪرڻ لاءِ، دٻايو ۽ رکو وقت جي ترتيب button until the alarm time starts flashing (this may require cycling past the current time settings if already in manual time setting mode).
- استعمال ڪريو Back (←) ۽ Forward (→) buttons to set the desired alarm hour and minute.
- کي دٻايو وقت جي ترتيب الارم جي وقت جي تصديق ڪرڻ لاءِ بٽڻ دٻايو.
5.3 الارم کي چالو ڪرڻ/غير فعال ڪرڻ
استعمال ڪريو Alarm ON/OFF slide switch located on the back of the clock:
- سوئچ سلائيڊ ڪريو UP to activate the alarm. An alarm icon will appear on the display.
- سوئچ سلائيڊ ڪريو هيٺ to deactivate the alarm. The alarm icon will disappear.
5.4 Snooze Function and Dial Light
جڏهن الارم وڄي، وڏو دٻايو اسنوز بٽڻ located on the top of the clock. This will:
- Temporarily silence the alarm (snooze duration is preset).
- Activate the dial light for approximately 5 seconds, illuminating the display for easy viewاونداهي ۾.
The alarm will sound again after the snooze period. To stop the alarm completely, slide the الارم آن / آف سوئچ بند ڪرڻ.
5.5 Display Modes (12/24 Hour Format)
To switch between 12-hour (with AM/PM indicator) and 24-hour time formats, briefly press the وقت جي ترتيب سيٽنگ موڊ کان ٻاهر بٽڻ.
5.6 Checking Alarm Sound
اڳي ڪرڻview the alarm sound, press the مانيٽر button on the front of the clock.
6. سار سنڀال
6.1 صفائي
گھڙي کي صاف ڪرڻ لاءِ، ان کي نرم، سڪل ڪپڙي سان نرميءَ سان صاف ڪريو. گھڙيال صاف ڪندڙ، سالوينٽس، يا ڪيميائي اسپري استعمال نه ڪريو، ڇاڪاڻ ته اهي c کي نقصان پهچائي سگهن ٿا.asinجي يا ڊسپلي.
6.2 بيٽري مٽائڻ
When the display becomes dim or the clock functions erratically, it is time to replace the batteries. Follow the battery installation steps in Section 4.1. It is recommended to replace both batteries at the same time with new ones.
7. مسئلا حل ڪرڻ
| مسئلو | ممڪن سبب | حل |
|---|---|---|
| گھڙي ڪجھ به نه ڏيکاريندي آهي يا ڊسپلي مدھم آهي. | بيٽريون ختم ٿي ويون آهن يا غلط طور تي لڳايون ويون آهن. | بيٽرين کي نئين AA بيٽرين سان تبديل ڪريو، صحيح پولارٽي کي يقيني بڻايو. |
| Time is incorrect or does not set automatically. | Poor radio wave reception; clock is outside reception area; interference from other electronics. | Move the clock to a different location, away from electronic devices. Try manual time setting (Section 5.1). Press the Reset button to force reception. |
| الارم نٿو وڄي. | الارم چالو نه آهي؛ الارم جو آواز تمام گهٽ آهي (جيڪڏهن ترتيب ڏئي سگهجي)؛ غلط الارم وقت مقرر ڪيو ويو آهي. | Ensure the Alarm ON/OFF switch is in the ON position. Verify the alarm time is set correctly. |
| Time drifts by an hour occasionally. | Daylight Saving Time (DST) adjustment issues, especially if the clock is designed for a specific region's DST rules. | Manually adjust the time if the automatic DST adjustment is not suitable for your region. Some radio-controlled clocks are optimized for specific regional signals. |
| Display is difficult to read from certain angles. | LCD ڊسپلي ۾ بهترين آهن viewing angles. | ترتيب ڏيو viewing angle or the position of the clock for better clarity. |
8. وضاحتون
| خاصيت | تفصيل |
|---|---|
| ماڊل نمبر | 8RZ166SR03 |
| برانڊ | تال |
| تحريڪ | Atomic clock (Radio-controlled) |
| فريم مواد | پلاسٽڪ |
| ڊسپلي جو قسم | ڊجيٽل LCD |
| طاقت جو ذريعو | Battery Powered (2 x AA manganese batteries, sold separately) |
| شيءِ جو وزن | 0.17 ڪلوگرام |
| پيداوار جي ماپ | 12W x 7.7H x 5.4D centimetres (approx. 4.7 x 3.0 x 2.1 inches) |
| درجه حرارت ڊسپلي جي حد | -9.9 ℃ کان 50 ℃ |
| نمي جي نمائش جي حد | 20٪ کان 95٪ RH |
| خاص خاصيتون | Calendar Display, Humidity Display, Snooze, Temperature Display, Dial Light (afterglow function) |
| ڪمري جو قسم | Bedroom, General Indoor Use |
9. وارنٽي ۽ سپورٽ
RHYTHM products are manufactured with high-quality standards. For warranty information, please refer to the documentation provided at the time of purchase or contact your retailer. If you encounter any issues or require technical assistance, please contact the RHYTHM customer support or your local distributor. Keep your purchase receipt as proof of purchase.