1. تعارف
This instruction manual provides essential information for the safe and proper installation, use, and maintenance of your Keramag Renova Nr.1 Plan Laying Plate, 600mm. Please read this manual thoroughly before installation and retain it for future reference.
The Keramag Renova Nr.1 Plan Laying Plate is a high-quality sanitary ceramic product designed for wall-hanging. It features a special KeraTect glaze for enhanced durability and ease of cleaning.
2. حفاظت جي ڄاڻ
- Always handle ceramic products with care to prevent chipping or breakage.
- Ensure the wall structure is suitable to support the weight of the laying plate and any items placed upon it.
- Use appropriate personal protective equipment (PPE) during installation, such as gloves and safety glasses.
- ساهه کڻڻ جي خطرن کان بچڻ لاءِ پيڪنگنگ مواد کي ٻارن کان پري رکو.
- If unsure about any installation step, consult a qualified professional.
3. پيڪيج مواد
انسٽاليشن سان اڳتي وڌڻ کان اڳ پڪ ڪريو ته سڀئي جزا موجود آهن ۽ انهن کي ڪو نقصان نه پهتو آهي.
- Keramag Renova Nr.1 Plan Laying Plate (1 unit)
- (Mounting hardware may be sold separately or included depending on the retailer/region. Please check your specific purchase details.)
4. سيٽ اپ ۽ تنصيب
The Keramag Renova Nr.1 Plan Laying Plate is designed for wall-hanging installation. Professional installation is recommended for sanitary ceramic products to ensure proper mounting and stability.
4.1. قبل از انسٽاليشن چيڪ
- Inspect the product for any visible damage before installation. Do not install damaged items.
- Ensure the installation area on the wall is clean, dry, and structurally sound.
- Confirm that you have all necessary tools and mounting hardware (e.g., screws, wall plugs suitable for your wall type, level, drill).
4.2. Dimensions and Mounting Points
Refer to the technical drawing below for precise dimensions and potential mounting points. The plate has a width of 60 cm, a height of 6 cm, and a depth of 12 cm.
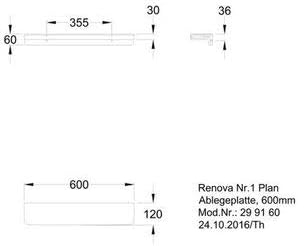
Image: Technical drawing showing the dimensions of the Keramag Renova Nr.1 Plan Laying Plate. This includes measurements for width, height, and depth, crucial for accurate installation.
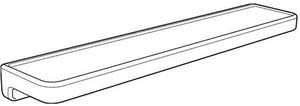
Image: Line drawing illustrating the design and profile of the Keramag Renova Nr.1 Plan Laying Plate. This view helps visualize the product's form for placement considerations.
4.3. انسٽاليشن جا مرحلا (عام هدايت)
- نشان لڳائڻ: Carefully measure and mark the desired position for the laying plate on the wall, ensuring it is level. Use the technical drawing for reference on mounting hole spacing.
- سوراخ ڪرڻ: Drill holes at the marked positions using a drill bit appropriate for your wall material and the chosen wall plugs.
- Inserting Plugs: Insert the wall plugs flush with the wall surface.
- چڙهڻ: Secure the laying plate to the wall using appropriate screws, ensuring it is firmly attached and stable. Do not overtighten, as this can damage the ceramic.
- فائنل چيڪ: Gently test the stability of the installed plate.
5. آپريٽنگ هدايتون
The Keramag Renova Nr.1 Plan Laying Plate is designed as a fixed storage surface. No specific operational steps are required. Ensure that items placed on the plate do not exceed its weight capacity or cause instability. Avoid placing excessively hot items directly on the surface without protection.
6. سار سنڀال ۽ صفائي
The KeraTect special glaze surface of your laying plate is highly durable and easy to clean. Regular cleaning will maintain its appearance and hygiene.
- روزاني صفائي: Use a soft cloth and mild, non-abrasive cleaning agents. Rinse thoroughly with clean water and dry with a soft cloth to prevent water spots.
- بچڻ: Do not use abrasive cleaners, scouring pads, strong acids, or alkaline solutions, as these can damage the KeraTect surface.
- داغ: For stubborn stains, use a ceramic-safe cleaner and follow the product instructions.
7. مسئلا حل ڪرڻ
As a static ceramic fixture, troubleshooting is generally limited. Most issues relate to installation or physical damage.
| مسئلو | ممڪن سبب | حل |
|---|---|---|
| Plate feels loose after installation | Improper mounting hardware; insufficient tightening; unsuitable wall material. | Re-check mounting screws and wall plugs. Ensure they are appropriate for your wall type and securely fastened. If issues persist, consult a professional. |
| Surface scratches or dullness | Use of abrasive cleaners or materials; impact from hard objects. | Ensure only soft cloths and non-abrasive cleaners are used. Avoid dropping hard objects onto the surface. Minor scratches on KeraTect are rare but can occur with extreme force. |
| Chipping or cracking | Impact damage; overtightening during installation. | Ceramic damage is typically irreversible. For significant damage, replacement may be necessary. Contact your supplier for options. |
8. وضاحتون
| خاصيت | تفصيل |
|---|---|
| ماڊل | Renova Nr.1 Plan Laying Plate |
| ٺاهيندڙ | Keramag (Geberit Group) |
| مواد | Sanitary Ceramic |
| مٿاڇري | Special glaze KeraTect |
| رنگ | اڇو |
| ويڪر | 60 سينٽي ميٽر (600 ملي ميٽر) |
| اوچائي | 6 سينٽي |
| کوٽائي | 12 سينٽي |
| شيءِ جو وزن | 10.93 پائونڊ (تقريبن 4.96 ڪلوگرام) |
| قسم | Wall-hanging edge all the way round |
9. وارنٽي ۽ سپورٽ
For warranty information and customer support, please refer to the documentation provided with your purchase or contact your retailer. You may also visit the official Keramag or Geberit Group webوڌيڪ مدد ۽ رابطي جي تفصيل لاءِ سائيٽ.
ٺاهيندڙ: Keramag (part of Geberit Group)
Webسائيٽ: www.geberit.com (as Keramag is part of Geberit Group)


