1. پراڊڪٽ ختمview
The VAIS Technology GSR-TY02-w/Tuner Kit is designed to integrate SiriusXM Satellite Radio functionality directly into select factory Toyota radio systems. This adapter allows users to access SiriusXM channels using their vehicle's existing radio controls and display, maintaining the original aesthetic and functionality of the vehicle's dashboard.
2. ڇا شامل آهي
The following components are included in your GSR-TY02-w/Tuner Kit:
- GSR انٽرفيس اڊاپٽر
- GSR USB Cable
- طاقت جو استعمال
- گاڏين جي اينٽينا
- سيريس ايڪس ايم ٽيونر ايس ايڪس وي 300

Figure 2.1: Components of the GSR-TY02-w/Tuner Kit.
3. GSR Connectors and Ports
Familiarize yourself with the connectors and ports on the GSR unit for proper installation and functionality.

Figure 3.1: GSR Unit Connectors and Ports.
- Brown USB Interface Connector: Connects to the vehicle's factory USB data port.
- Interface Connector for SiriusXM SXV300 Tuner: Connects the SiriusXM tuner.
- پاور رابط: Connects to the vehicle's power source via the OBD II harness.
- ايل ايز: Indicate unit status.
- مائڪرو USB ڪنيڪٽر: firmware تازه ڪاري لاء استعمال ڪيو.
4. مطابقت
The VAIS - GSR-TY02 is specifically designed for select Factory Toyota models. Ensure your vehicle is listed below for proper functionality:
- Camry/Solara (2018 - 2022) - With factory USB
- C-HR (2019-2022) - With factory USB
- Corolla/Corolla Hybrid (2020-2022) - With factory USB
- Corolla Hatchback (2019-2022) - With factory USB
- Highlander (2020-2022) - With factory USB
- Prius (2020-2022) - With factory USB
- RAV4 (2019-2022) - With factory USB
- Sienna (2019-2020) - With factory USB
- Tacoma (2020-2022) - With factory USB
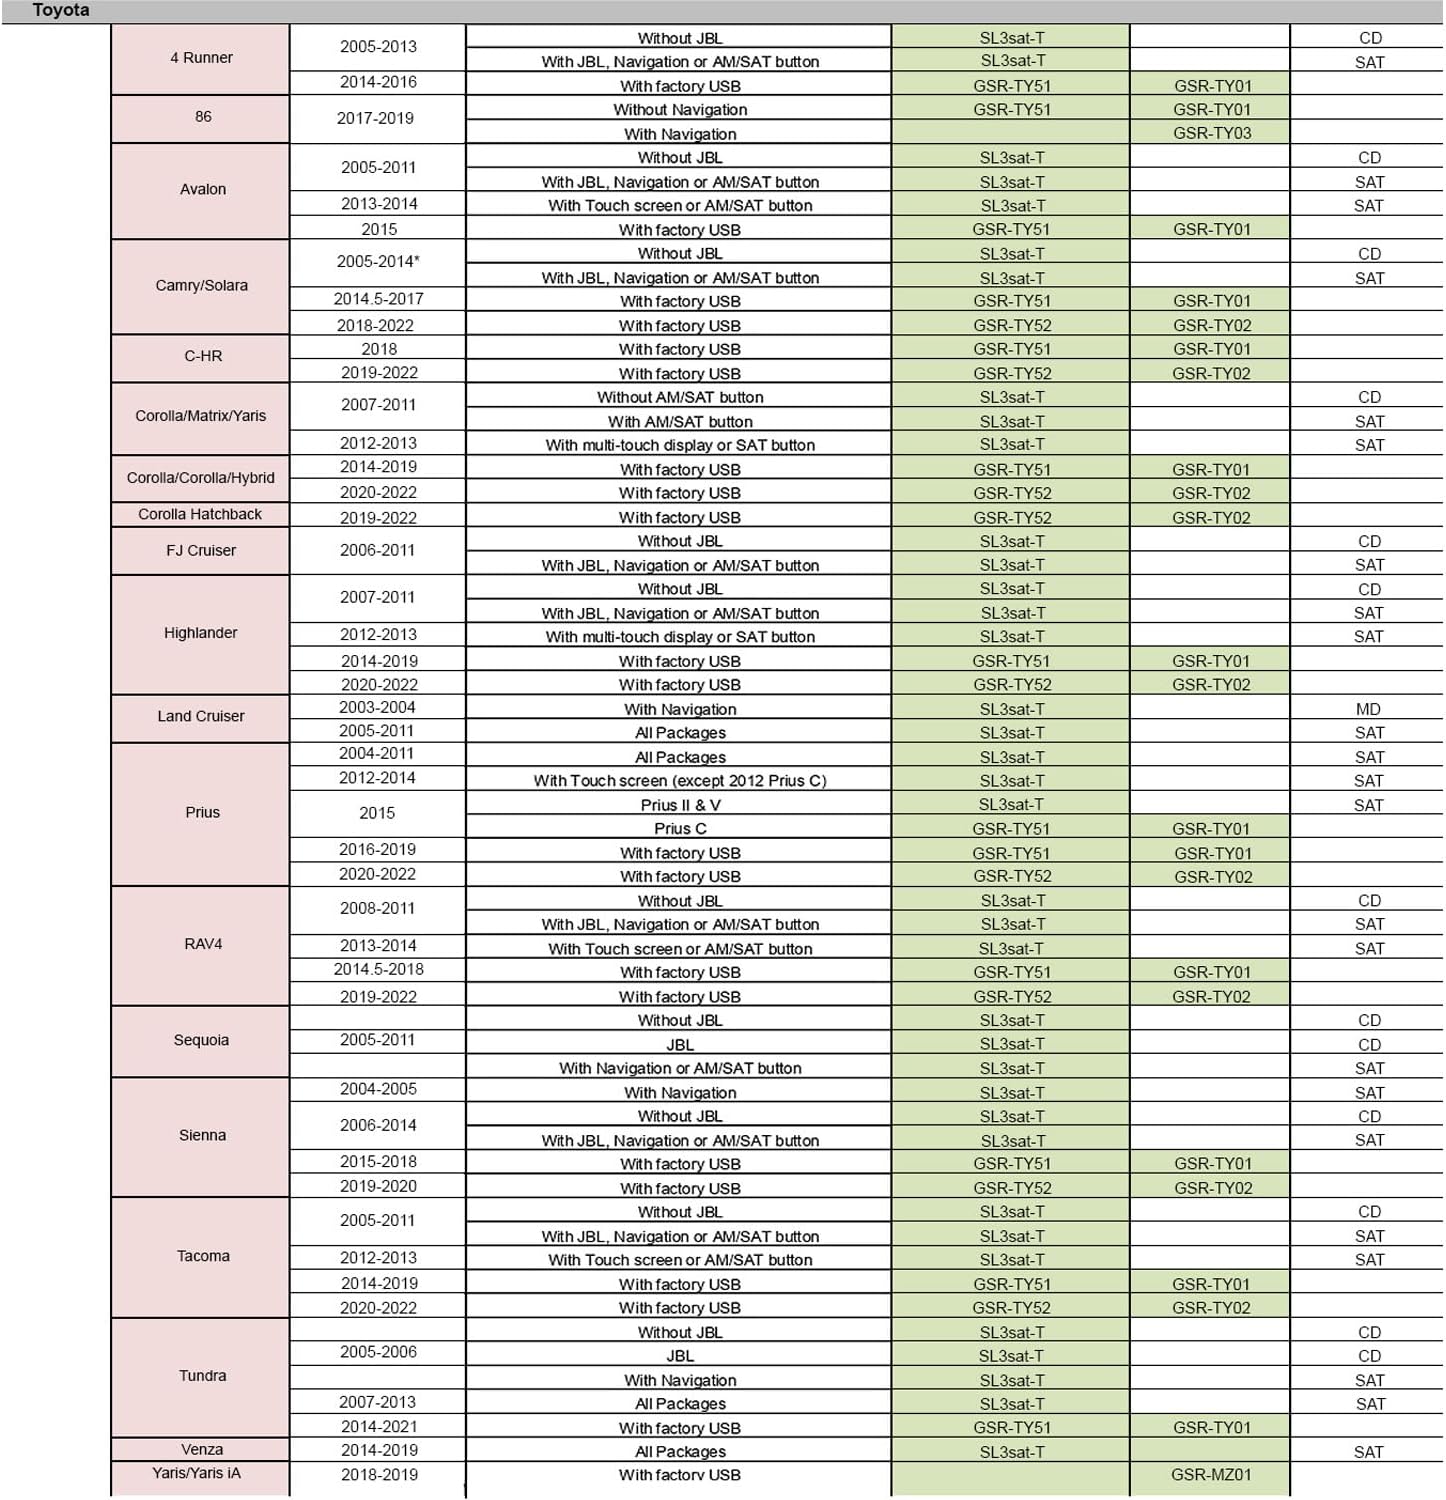
Figure 4.1: Detailed Compatibility Chart for Toyota Vehicles.
5. تنصيب جون هدايتون
Follow these steps for a successful installation of your VAIS Technology SiriusXM adapter. Professional installation is recommended if you are uncomfortable with any of these steps.
5.1. عام انسٽاليشن جا مرحلا
- Connect the OBD II connector to your vehicle's OBD II port for power.
- Plug the VAIS adapter into the factory USB data port to send SiriusXM data to the radio.
- Mount the antenna on the highest point of the vehicle’s roof for optimal reception.
- Secure the GSR and SiriusXM tuner behind the dash panels.

شڪل 5.1: ختمview of Installation Steps.
5.2. SiriusXM Antenna Installation
Proper placement and routing of the SiriusXM antenna are crucial for optimal signal reception. The antenna should be placed on a horizontal surface that always faces the sky, typically the vehicle's roof.
Video 5.2: Detailed guide on installing the SiriusXM antenna, including recommended placement and cable routing techniques to ensure proper signal and a clean installation.
5.2.1. Antenna Placement Guidelines:
- Place the magnetic mount antenna on the outside of your vehicle, on a horizontal surface that always faces the sky.
- For most vehicles, this is the roof, centered above the rear window or front windshield.
- Avoid placing the antenna where a clear view of the sky would be blocked (e.g., inside the car, under a roof rack, on side panels, or near another antenna).
- If your vehicle roof is made from non-magnetic material (e.g., aluminum, fiberglass, carbon fiber), consult a professional installer for alternative mounting locations.
5.2.2. ڪيبل روٽنگ:
- Once the antenna is placed, use an antenna installation tool to feed the cable under the rubber molding around the window.
- Route the cable out of the window molding and into the weather stripping around the trunk opening.
- Continue routing the cable along the trunk wall and into the vehicle cabin.
- From the trunk, route the cable under the interior trim, into the cabin, and towards the front of your vehicle to reach the car stereo receiver.
- Coil and secure any excess cable under the carpet or behind the dash.
- Ensure the antenna cable is kept away from moving parts such as gas and brake pedals, trunk and door hinges, and sliding seat brackets to prevent damage.
6. آپريشن
After successful installation, you can begin using your SiriusXM Satellite Radio adapter.
6.1. Activating SiriusXM
- Locate the USB port in your vehicle's dashboard and ensure the adapter is plugged in.
- Activate your SiriusXM subscription.
- Turn on your vehicle and select SiriusXM from the audio source menu on your factory radio.
6.2. Using Factory Radio Controls
The adapter allows you to browse and enjoy SiriusXM channels using your vehicle's factory radio controls, including steering wheel controls.

Figure 6.1: Operating the SiriusXM Adapter with Factory Controls.
6.3. SiriusXM Source Selection
Access SiriusXM by selecting it as an audio source on your vehicle's display. You can then navigate channels and presets.

Figure 6.2: SiriusXM Audio Source Selection and Channel Browsing.
- ڳنڍڻ وارو ڪنب: Switch to the next available channel, depending on the direction of rotation.
- "Track Seek+" and "Track Seek-" buttons: Switch to the next available channel.
- Long Touch on "Track Seek+" and "Track Seek-" buttons: Switch to the next available Preset.
7. وضاحتون
| خاصيت | تفصيل |
|---|---|
| پيداوار جي ماپ | 5 x 3 x 8 انچ (12.7 x 7.6 x 20.3 سينٽي) |
| شيءِ جو وزن | 1 پائونڊ (0.45 ڪلو) |
| شيون ماڊل نمبر | GSR-TY02-w/Tuner Kit |
| رابطي ٽيڪنالاجي | USB |
| Tuner ٽيڪنالاجي | Internet Radio (for SiriusXM integration) |
| ريڊيو بينڊ جي حمايت ڪئي وئي | FM (for factory radio integration) |
| تعدد | 108 MHz |
| يو پي سي | 793597748171 |
8. سار سنڀال
The VAIS Technology GSR-TY02-w/Tuner Kit is designed for minimal maintenance. Keep the unit and connections clean and dry. Avoid exposing the unit to extreme temperatures or moisture. Periodically check all connections to ensure they are secure.
Firmware updates may be released periodically to improve performance or add features. Use the Micro USB connector on the GSR unit for any necessary firmware updates, following instructions provided by VAIS Technology.
9. مسئلا حل ڪرڻ
If you encounter issues with your GSR-TY02-w/Tuner Kit, consider the following troubleshooting steps:
- No SiriusXM Signal: Ensure the antenna is correctly placed on the vehicle's roof with a clear view of the sky and that the antenna cable is securely connected and not damaged.
- يونٽ کي بجلي ناهي: Verify the OBD II connector is firmly plugged into the vehicle's OBD II port. Check vehicle's fuse box if necessary.
- Radio Not Recognizing SiriusXM: Confirm the VAIS adapter is securely plugged into the factory USB data port. Ensure your SiriusXM subscription is active. Try restarting the vehicle's ignition.
- وقفي وقفي سان آڊيو: Check all cable connections for looseness or damage. Ensure the antenna cable is not routed near sources of electrical interference.
- ڪنٽرول جواب نه ڏيڻ: Verify all connections are secure. Ensure the vehicle's factory radio is set to the SiriusXM source.
If problems persist after attempting these steps, please contact VAIS Technology customer support for further assistance.
10. وارنٽي ۽ سپورٽ
For warranty information, product registration, or technical support, please refer to the documentation included with your product or visit the official VAIS Technology webسائيٽ. وارنٽي جي دعوي لاء توهان جي خريداري جي رسيد رکو.


