1. تعارف
This manual provides comprehensive instructions for the setup, operation, maintenance, and troubleshooting of your Easytry123 Universal Remote Control. This remote is designed as a replacement for various Optoma DLP 3D Projector models, ensuring seamless control over your device.
Compatible Optoma Projector Models include: TW635-3D, DW326, S311, W311, W501, WX31, X302, X303, X31, X501, W556-3D, DS339, DX339, DW339, TX635-3D.
2. پراڊڪٽ ختمview
2.1 ريموٽ ڪنٽرول لي آئوٽ

تصوير: سامهون view of the remote control, displaying all buttons and their labels. Key buttons include Power, Source, Menu, Volume, Keystone, Zoom, and input selections like HDMI1, HDMI2, VGA1, VGA2, Video, 3D.
2.2 بٽڻ جا ڪم
- طاقت: پروجيڪٽر کي آن يا آف ڪري ٿو.
- ذريعو: Cycles through available input sources (e.g., HDMI, VGA, Video).
- مينيو: Opens the projector's on-screen display (OSD) menu.
- Navigation (Up, Down, Left, Right, Enter): مينيو ذريعي نيويگيٽ ڪرڻ ۽ چونڊن جي تصديق ڪرڻ لاءِ استعمال ڪيو ويندو آهي.
- حجم (+/-): آڊيو آئوٽ جي سطح کي ترتيب ڏئي ٿو.
- Page (+/-): Used for presentation control or specific menu navigation.
- چاٻي Adjusts the image's vertical keystone correction.
- Zoom (+/-): Adjusts the digital zoom level of the projected image.
- Input Selectors (HDMI1, HDMI2, VGA1, VGA2, Video, 3D): Directly selects the corresponding input source or activates 3D mode.
- منجمد: Pauses the current image display.
- AV خاموش: عارضي طور تي آڊيو کي خاموش ڪري ٿو ۽ اسڪرين کي خالي ڪري ٿو.
- Re-Sync: Resynchronizes the input signal.
- سوئچ: Toggles between different display modes or functions.
- چمڪ (+/-): تصوير جي روشني کي ترتيب ڏئي ٿو.
3. سيٽ اپ
3.1 بيٽري لڳائڻ
ريموٽ ڪنٽرول کي هلائڻ لاءِ ٻه AAA بيٽريون (شامل نه آهن) جي ضرورت آهي. بيٽريون انسٽال ڪرڻ لاءِ انهن قدمن تي عمل ڪريو:
- ريموٽ ڪنٽرول جي پٺي تي بيٽري جي خاني کي ڳوليو.
- Press down on the latch and slide the battery compartment cover downwards to remove it.
- ٻہ AAA بيٽريون داخل ڪريو، پڪ ڪريو ته مثبت (+) ۽ منفي (-) ٽرمينل ڪمري اندر نشانن سان صحيح طرح سان ترتيب ڏين.
- بيٽري جي ڪمپارٽمينٽ جي ڍڪ کي واپس جاءِ تي سلائڊ ڪريو جيستائين اهو محفوظ طور تي ڪلڪ نه ڪري.

تصوير: پوئين پاسي view of the remote control, highlighting the battery compartment cover at the bottom.
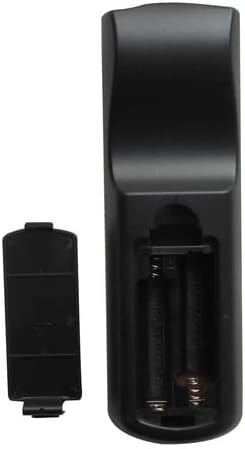
Image: The remote control's battery compartment with the cover removed, revealing two empty slots for AAA batteries and the positive/negative terminals.

تصوير: هڪ زاويه view of the remote control with the battery cover detached, illustrating the correct orientation for inserting AAA batteries into the compartment.
4. آپريٽنگ هدايتون
Point the remote control directly at the projector's IR receiver for optimal performance.
4.1 پاور آن/آف
کي دٻايو طاقت button once to turn the projector on. Press it again to turn the projector off. Confirm any power-off prompts on the projector screen if applicable.
4.2 ان پٽ سورس چونڊڻ
کي دٻايو ذريعو button repeatedly to cycle through available input sources (e.g., HDMI1, HDMI2, VGA1, VGA2, Video). Alternatively, use the dedicated input buttons (e.g., HDMI1, VGA1) for direct selection.
4.3 حجم کي ترتيب ڏيڻ
استعمال ڪريو جلد + button to increase the audio volume and the جلد جو ان کي گھٽ ڪرڻ لاءِ بٽڻ.
4.4 مينيو نيويگيٽ ڪرڻ
کي دٻايو مينيو button to open the projector's on-screen display (OSD). Use the مٿي، هيٺ، کاٻي، ساڄي arrow buttons to navigate through menu options. Press داخل ڪريو to confirm a selection or access a sub-menu. Press مينيو ٻيهر او ايس ڊي مان نڪرڻ لاءِ.
4.5 ڪيسٽون جي اصلاح
استعمال ڪريو ڪيئي اسٽون buttons to correct trapezoidal distortion in the projected image, ensuring a rectangular display.
4.6 زوم فنڪشن
کي دٻايو زوم + button to digitally enlarge the image or وڏو ڪريو - to reduce it.
4.7 3D Mode Activation
If your projector and content support 3D, press the 3D button to activate or deactivate 3D display mode.
5. سار سنڀال
5.1 ريموٽ صاف ڪرڻ
ريموٽ ڪنٽرول کي صاف ڪرڻ لاءِ، نرم، سڪل ڪپڙي سان ان جي مٿاڇري کي نرميءَ سان صاف ڪريو. ضدي مٽيءَ لاءِ، ٿورو ڊيampڪپڙي کي پاڻي سان ڍڪيو. سخت ڪيميڪل يا رگڙيندڙ ڪلينر استعمال ڪرڻ کان پاسو ڪريو، ڇاڪاڻ ته اهي ريموٽ جي ختم يا اندروني حصن کي نقصان پهچائي سگهن ٿا.
5.2 بيٽري مٽائڻ
Replace batteries when the remote's response becomes sluggish or stops functioning. Always replace both batteries simultaneously with new AAA batteries. Do not mix old and new batteries, or different types of batteries. Dispose of used batteries responsibly according to local regulations.
6. مسئلا حل ڪرڻ
- ريموٽ جواب نه ڏئي رهيو آهي:
- پڪ ڪريو ته تازيون AAA بيٽريون صحيح طرح سان نصب ٿيل آهن.
- ريموٽ ۽ پروجيڪٽر جي IR رسيور جي وچ ۾ ڪنهن به رڪاوٽ جي جانچ ڪريو.
- Verify that you are within the effective range of the projector's IR receiver.
- محدود ڪارڪردگي:
- While this remote is compatible with listed Optoma models, some advanced or specific functions of your original projector remote may not be replicated. Refer to your projector's original manual for specific features.
- Ensure the projector is powered on and not in a standby mode that restricts remote commands.
7. وضاحتون
- طاقت جو ذريعو: 2 x AAA بيٽريون (شامل نه آهن)
- رابطي ٽيڪنالاجي: انفراريڊ (IR)
- مطابقت رکندڙ ڊوائيسز: Optoma DLP 3D Projectors (specific models listed in Introduction)
- سپورٽ ٿيل ڊوائيسز جو وڌ ۾ وڌ تعداد: 1 (dedicated to the paired projector)
8. وارنٽي ۽ سپورٽ
For any issues not covered in this manual or for further assistance, please contact the manufacturer, Easytry123, through your purchase platform. Keep your purchase receipt as proof of purchase for any warranty claims.


