تعارف
The Keychron Q1 is a fully assembled, customizable 75% layout mechanical keyboard designed for enthusiasts and professionals. It features QMK/VIA support for extensive programmability, a full aluminum CNC machined body, a double-gasket design for enhanced typing feel, and hot-swappable Gateron G Pro Blue switches. This manual provides instructions for setup, operation, maintenance, and troubleshooting to ensure optimal use of your Keychron Q1 keyboard.
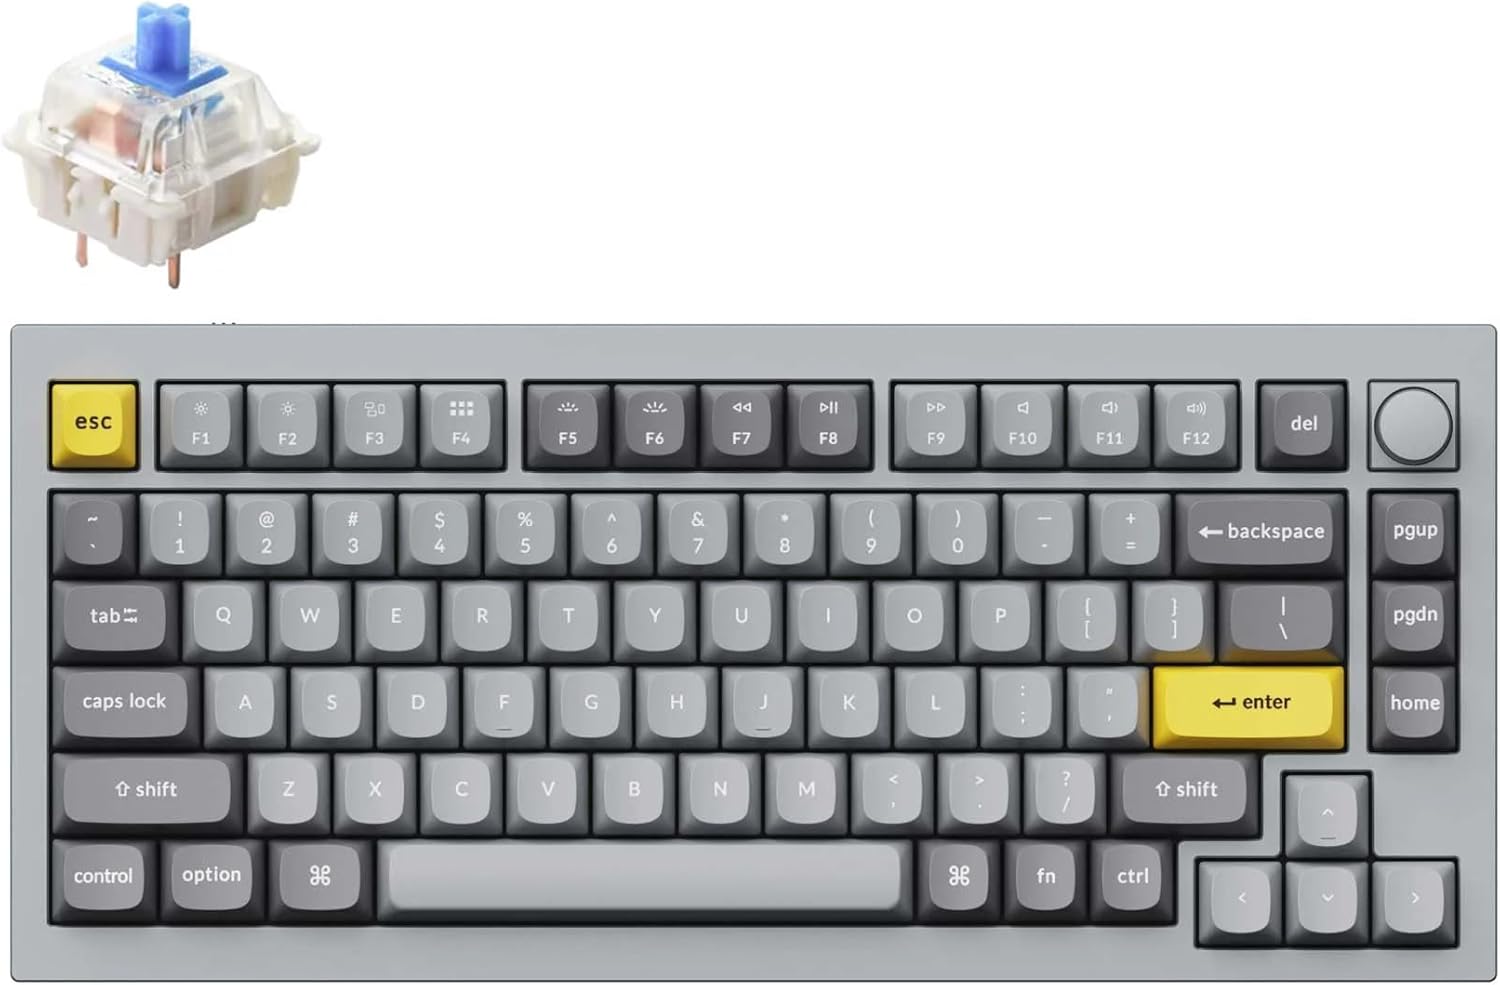
Image: The Keychron Q1 RGB Wired Custom Mechanical Keyboard, showcasing its 75% layout and keycap design.
سيٽ اپ ڪريو
1. انباڪسنگ ۽ اجزاء
Carefully remove all items from the packaging. The Keychron Q1 package typically includes:
- 1x Fully Assembled Keyboard (Aluminum Case, PCB, Steel Plate, Sound Absorbing Foam, Case Foam)
- 16x Gaskets (8 installed, 8 in box)
- 4 سيٽ x اسٽيبلائيزر
- 1 set x Keycaps (Double-Shot OSA PBT)
- 1 set x Switches (Gateron G Pro Blue)
- 1x ٽائپ-سي کان ٽائپ-سي ڪيبل
- 1x ٽائپ-اي کان ٽائپ-سي اڊاپٽر
- 1x سوئچ پلر
- 1x ڪي ڪيپ پلر
- 1x اسڪوائر
- 1x ھيڪس چاٻي
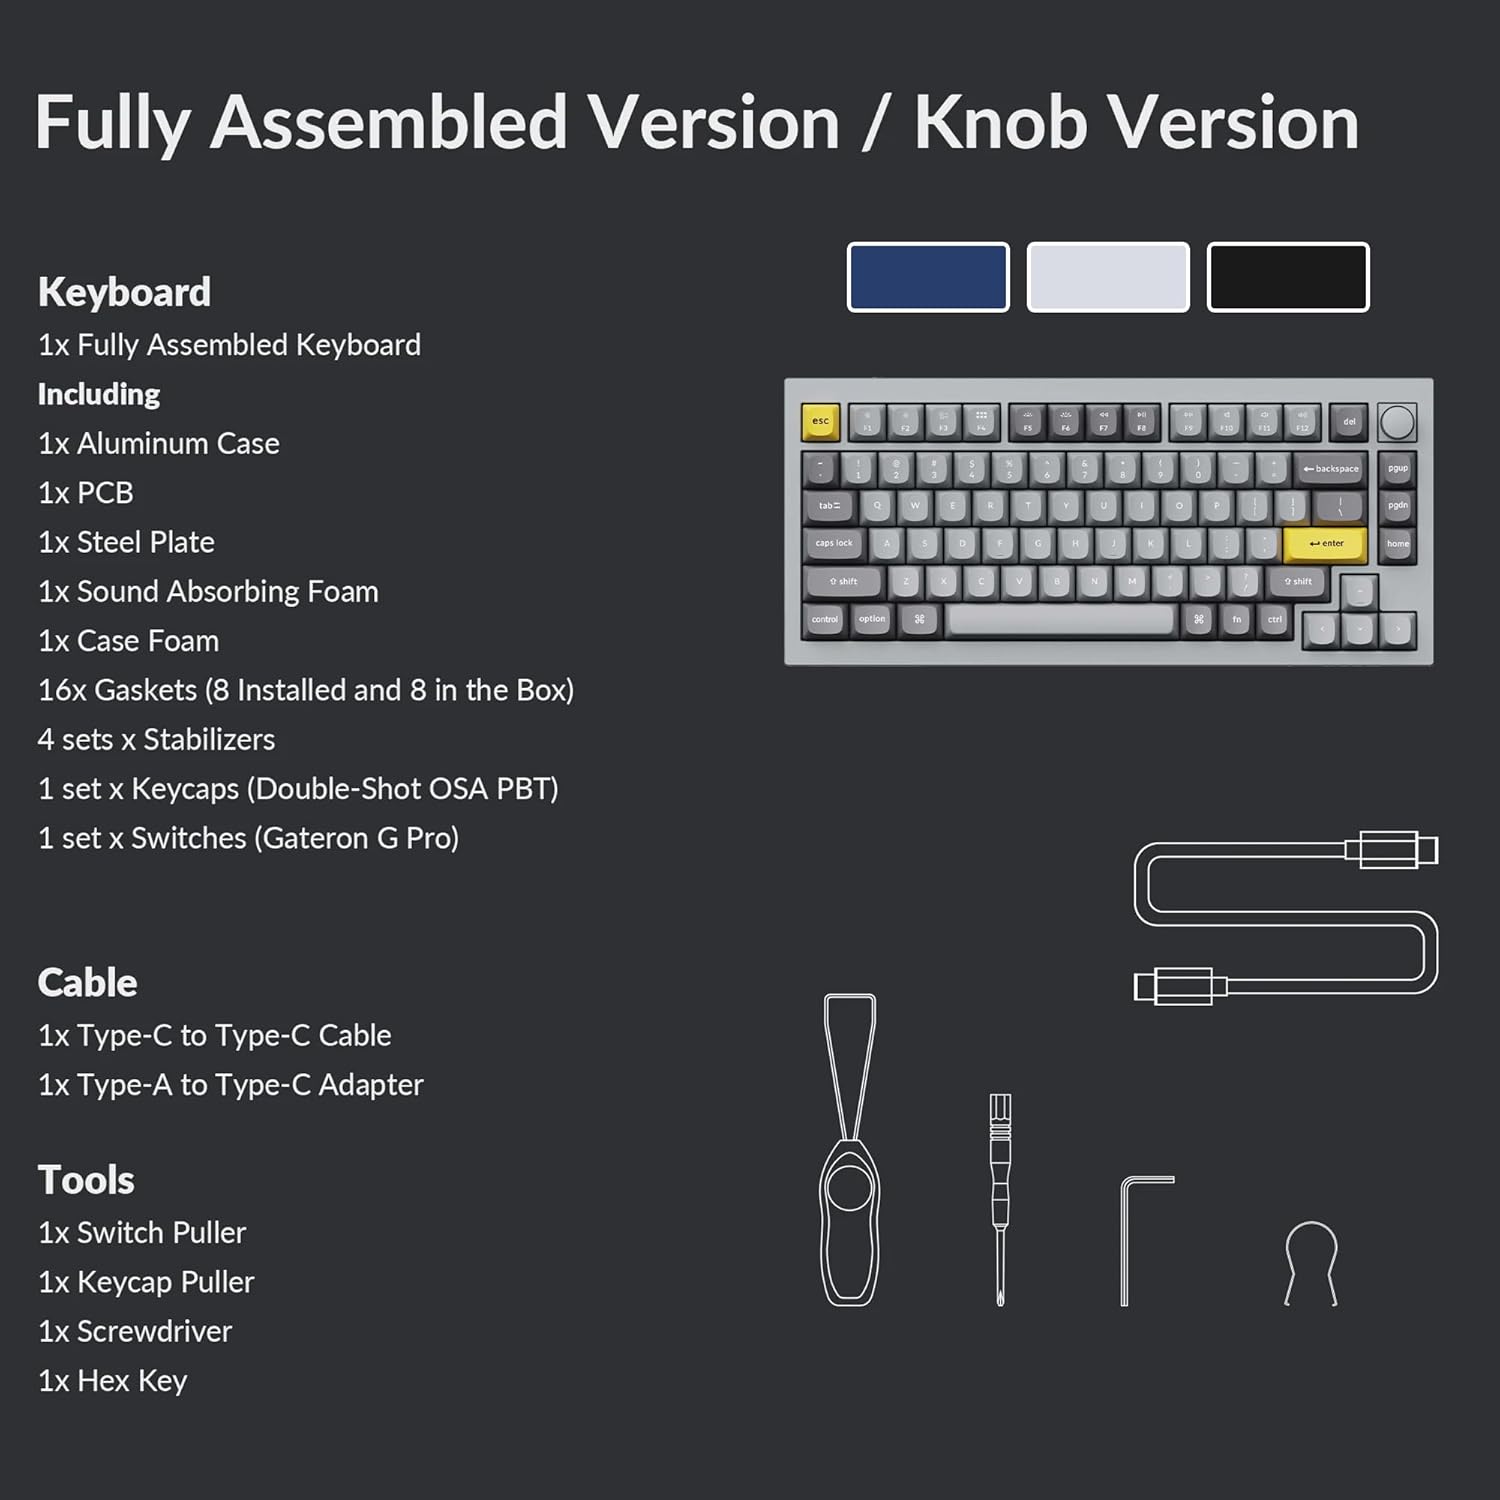
Image: Diagram illustrating the components included with the Keychron Q1 Fully Assembled Version, including the keyboard, cables, and tools.
2. ڪي بورڊ کي ڳنڍڻ
Connect the provided USB Type-C cable to the Type-C port on the back of the keyboard and the other end to your computer's USB port. The keyboard is wired and does not require batteries.

تصوير: ويجهو تصوير view of the Keychron Q1's USB-C port with a cable connected, highlighting the wired connection.
3. Operating System Switch
Locate the operating system switch on the back of the keyboard. Toggle it to the appropriate position for your computer (Windows or macOS) to ensure correct key mapping and functionality.
ڪي بورڊ هلائڻ
1. QMK/VIA پروگراميبلٽي
The Keychron Q1 supports QMK firmware and VIA software, allowing for extensive customization of key assignments, macros, and lighting effects. To use VIA:
- Connect your Keychron Q1 to your device via the USB-C cable.
- Download the appropriate keymap JSON file for your Q1 model from the Keychron webسائيٽ.
- Open the VIA software.
- In VIA, navigate to the "Settings" tab and enable "Show Design tab".
- Drag the downloaded JSON file into the "Design" tab in VIA to load your keyboard's keymap.
- You can now remap keys, create macros, and adjust lighting settings intuitively.

Image: Screenshot of the Keychron QMK/VIA launcher interface, demonstrating the graphical user interface for key remapping and macro programming.
2. گرم مٽائي سگھڻ وارا سوئچ
The Q1 features hot-swappable sockets, allowing you to change mechanical switches without soldering. It is compatible with most 3-pin and 5-pin MX-style mechanical switches (e.g., Gateron, Cherry, Kailh). The keyboard comes pre-installed with pre-lubed Gateron G Pro Blue switches.

تصوير: ويجهو تصوير view of the Keychron Q1's south-facing RGB lighting illuminating Gateron G Pro Blue switches.
3. Double Gasket Design
The keyboard incorporates a double-gasket design, which includes silicone pads between the top and bottom cases in addition to the plate gaskets. This design significantly reduces sound resonance and noise from impacted metals, providing a more flexible and improved typing sound.
4. Programmable Knob
The rotary knob on the top right of the keyboard is programmable via VIA. By default, it controls media volume (rotate) and play/pause (press). You can customize its functions to suit your workflow.

تصوير: ويجهو تصوير view of the programmable rotary knob on the Keychron Q1 keyboard, positioned above the 'del' key.
5. RGB Backlighting
The keyboard features customizable RGB backlighting. Lighting effects and colors can be adjusted directly on the keyboard using key combinations or through the VIA software for more detailed control.
سار سنڀال
1. صفائي
To clean your keyboard, disconnect it from your computer. Use a soft, lint-free cloth to wipe the keycaps and case. For stubborn dirt, a slightly damp cloth with mild soap can be used, ensuring no liquid enters the keyboard. Use compressed air to remove debris from between keycaps.
2. سوئچ ۽ ڪي ڪيپ جي متبادل
Use the provided keycap puller to carefully remove keycaps. For switches, use the switch puller to gently grasp and pull the switch straight up from the PCB. When installing new switches, align the pins correctly with the sockets and press down firmly until it clicks into place. Ensure the keyboard is disconnected during this process.
مشڪلاتون
- ڪي بورڊ جواب نه ڏئي رهيو آهي: Ensure the USB-C cable is securely connected to both the keyboard and the computer. Try a different USB port or cable. Check the operating system switch on the back of the keyboard.
- رجسٽر نه ٿيندڙ چاٻيون: If specific keys are not working, carefully remove the keycap and switch for that key. Re-seat the switch firmly. If the issue persists, try swapping the switch with a known working one to determine if the switch or the PCB socket is faulty.
- VIA Software Not Detecting Keyboard: Ensure the keyboard is connected via USB-C. Download the correct JSON keymap file for your Q1 model and load it into VIA's "Design" tab. Restart VIA and your computer if necessary.
- آر جي بي لائيٽنگ جا مسئلا: Check keyboard shortcuts for lighting control. If using VIA, ensure lighting settings are correctly configured and applied.
وضاحتون
| برانڊ | ڪيڪرون |
| ماڊل نمبر | Q1-N2 |
| پيداوار جي ماپ | 12.87 x 5.71 x 1.38 انچ |
| شيءِ جو وزن | 4.05 پائونڊ |
| رابطي ٽيڪنالاجي | USB-C (وائرڊ) |
| ڪي بورڊ جي وضاحت | ايرگونومڪ، ميڪيڪل |
| خاص خصوصيت | Backlit (RGB), Hot-swappable Switches, Programmable Knob |
| سوئچ جو قسم | Gateron G Pro Blue (Mechanical) |
| مطابقت رکندڙ ڊوائيسز | PC (Mac, Windows, Linux) |
| رنگ | سلور گرين |
وارنٽي ۽ سپورٽ
For warranty information and technical support, please refer to the official Keychron website or contact Keychron customer service directly. Details regarding product registration, warranty claims, and further assistance can be found on their support pages.


