1. تعارف
This manual provides essential information for the safe and efficient use of your AOC U34V5C/BK 34-inch WQHD LED Monitor. Please read this manual thoroughly before operating the device and retain it for future reference. The AOC U34V5C/BK is designed to deliver a high-quality visual experience with its 3440 x 1440 WQHD resolution and 21:9 aspect ratio, suitable for various applications from professional work to entertainment.
2. حفاظت جي ڄاڻ
مانيٽر کي نقصان کان بچائڻ ۽ ذاتي حفاظت کي يقيني بڻائڻ لاءِ هيٺ ڏنل حفاظتي احتياطن تي عمل ڪريو:
- باهه يا جھٽڪي جي خطرن کان بچڻ لاءِ مانيٽر کي مينهن يا نمي جي سامهون نه رکو.
- مانيٽر نه کوليو casing. اندر ڪو به استعمال ڪندڙ جي خدمت لائق پرزا نه آهن. سڀني سروسنگ کي قابل سروس اهلڪارن جي حوالي ڪريو.
- مانيٽر کي هڪ مستحڪم، فليٽ مٿاڇري تي رکو ته جيئن ان کي ڪري نه پوي.
- مانيٽر جي چوڌاري مناسب وينٽيليشن کي يقيني بڻايو. وينٽيليشن جي سوراخن کي بند نه ڪريو.
- صرف مانيٽر سان فراهم ڪيل پاور ڪنڊ ۽ اڊاپٽر استعمال ڪريو.
- بجلي جي طوفان دوران يا ڊگهي عرصي تائين استعمال نه ٿيڻ تي مانيٽر کي پاور آئوٽليٽ مان ڪڍو.
3. پيڪيج مواد
پڪ ڪريو ته سڀئي شيون پيڪيج ۾ موجود آهن:
- AOC U34V5C/BK Monitor
- مانيٽر اسٽينڊ (بنياد ۽ گردن)
- پاور ڪيبل
- HDMI ڪيبل
- ڊسپلي پورٽ ڪيبل
- USB-سي ڪيبل
- استعمال ڪندڙ جو دستياب (ھي دستاويز)
4. پراڊڪٽ ختمview
The AOC U34V5C/BK monitor features a 34-inch VA panel with WQHD resolution, USB-C connectivity with 65W Power Delivery, and a 100Hz refresh rate with AMD FreeSync support.
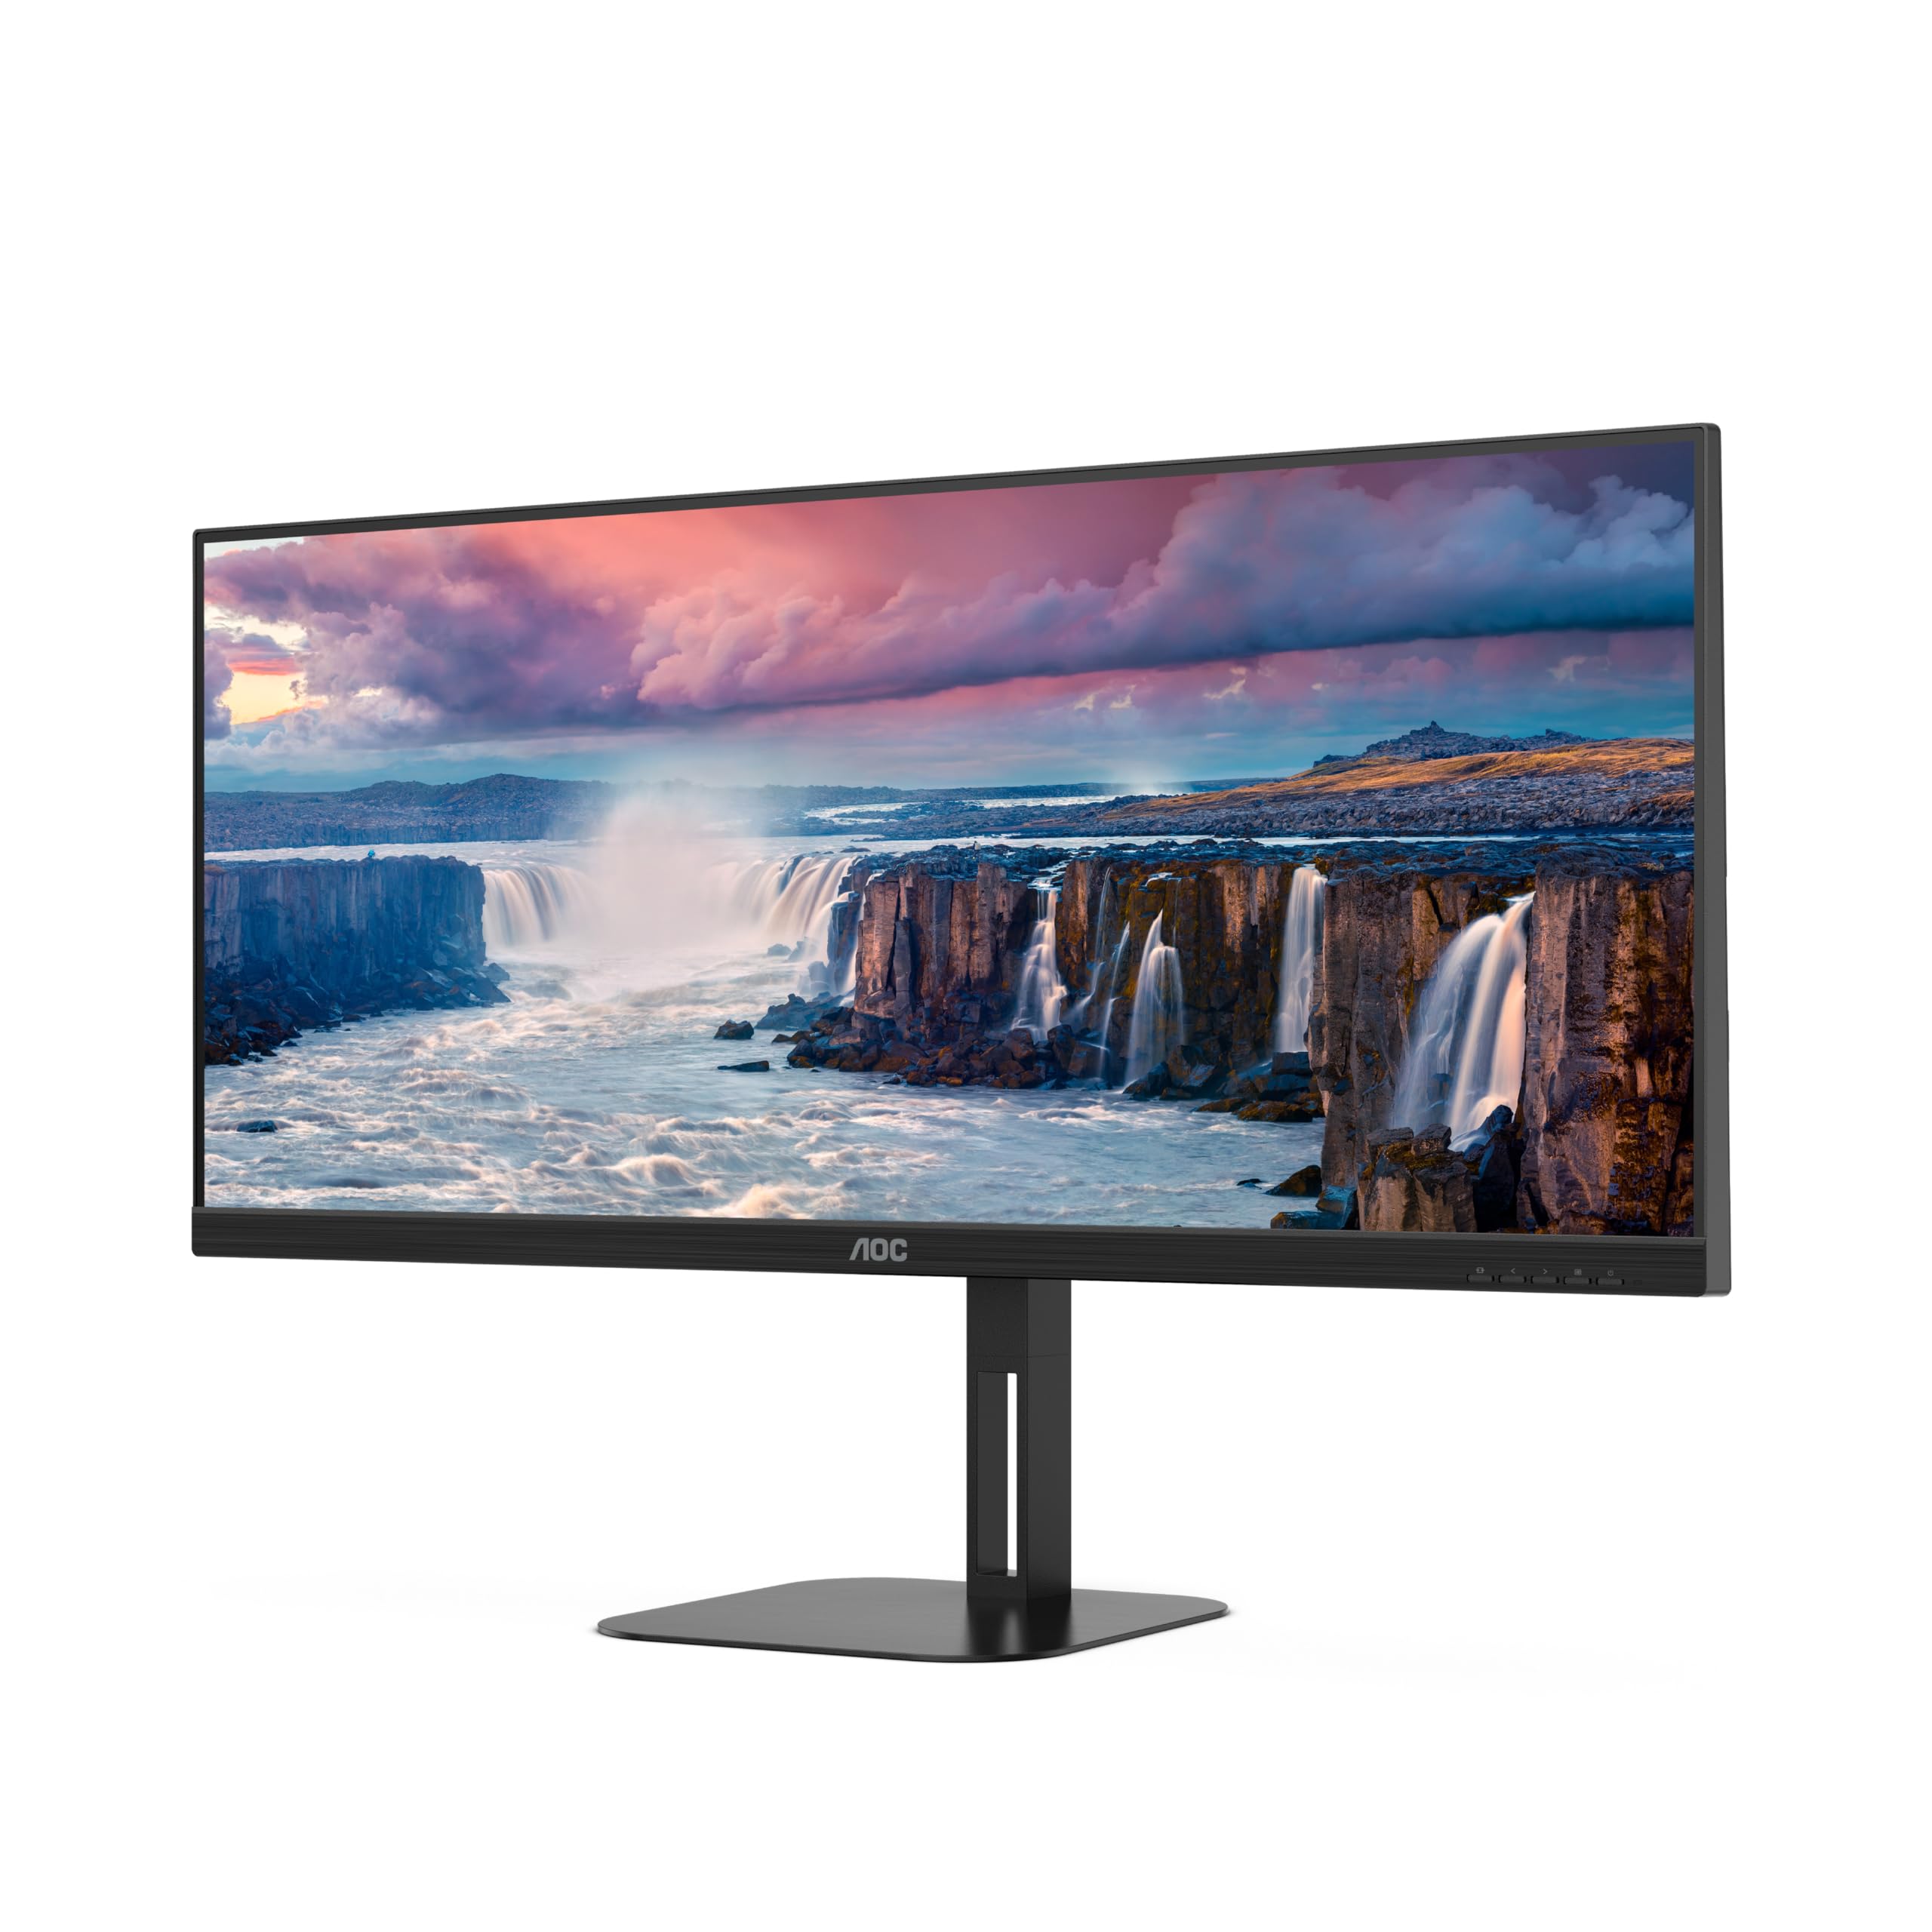
شڪل 4.1: سامهون view of the AOC U34V5C/BK monitor highlighting its 34-inch VA panel, USB-C port with 65W Power Delivery, 100Hz refresh rate, and AMD FreeSync technology.
4.1 Monitor Components
Familiarize yourself with the various parts of your monitor:
- سامهون پينل: Display screen, OSD control buttons (usually located on the bottom right bezel).
- ريسل پينل: Power input, video input ports (HDMI, DisplayPort, USB-C), USB hub ports, security lock slot.
- اسٽينڊ: Provides stable support and allows for height, tilt, and swivel adjustments.

شڪل 4.2: پوئتي view of the AOC U34V5C/BK monitor, showing the VESA mount compatibility and the stand attachment point.

شڪل 4.3: هيٺيون view of the AOC U34V5C/BK monitor, detailing the power input, DisplayPort, HDMI, USB-C, and USB-A hub ports.
5. سيٽ اپ
5.1 اسٽينڊ کي گڏ ڪرڻ
- ڇڪڻ کان بچڻ لاءِ مانيٽر جو مُنهن احتياط سان نرم، صاف ڪپڙي تي رکو.
- اسٽينڊ نيڪ کي مانيٽر جي پوئين پاسي سان ڳنڍيو جيستائين اهو جاءِ تي ڪلڪ نه ڪري يا اسڪرو سان محفوظ نه ٿئي (جيڪڏهن لاڳو هجي).
- Attach the stand base to the stand neck and tighten the captive screw at the bottom of the base.
- احتياط سان مانيٽر کڻو ۽ ان کي هڪ مستحڪم ڊيسڪ تي رکو.
5.2 مانيٽر کي ڳنڍڻ
پڪ ڪريو ته ڪو به ڪنيڪشن ٺاهڻ کان اڳ توهان جو ڪمپيوٽر ۽ مانيٽر بند آهن.
- پاور ڪنيڪشن: پاور ڪيبل کي مانيٽر جي پاور ان پٽ سان ڳنڍيو ۽ پوءِ گرائونڊ ٿيل اليڪٽريڪل آئوٽليٽ سان ڳنڍيو.
- وڊيو ڪنيڪشن: ھيٺ ڏنل اختيارن مان ھڪڙو چونڊيو:
- HDMI: Connect one end of the HDMI cable to your computer's HDMI output and the other end to an HDMI input on the monitor.
- ڊسپلي پورٽ: Connect one end of the DisplayPort cable to your computer's DisplayPort output and the other end to the DisplayPort input on the monitor.
- USB-سي: Connect one end of the USB-C cable to your computer's USB-C port (which supports video output) and the other end to the USB-C input on the monitor. This connection can also provide power delivery and USB data transfer.
- USB حب ڪنيڪشن (اختياري): If using the monitor's USB hub, connect a USB upstream cable (USB-C to USB-A or USB-C to USB-C, depending on your computer) from your computer to the monitor's USB upstream port. This enables the monitor's USB-A ports for peripherals.
6. مانيٽر کي هلائڻ
6.1 پاور آن/آف
Press the power button, usually located on the bottom right bezel, to turn the monitor on or off. The power indicator light will illuminate when the monitor is on.
6.2 آن اسڪرين ڊسپلي (OSD) مينيو
The OSD menu allows you to adjust various monitor settings. Use the control buttons (joystick or individual buttons) on the monitor's bezel to navigate the menu.
- Press the Menu button (or push the joystick) to open the OSD menu.
- Use the navigation buttons (or joystick) to move through the menu options.
- Press the Select button (or push the joystick) to enter a sub-menu or confirm a selection.
- Use the Exit button (or move the joystick left) to go back to the previous menu or exit the OSD.
6.3 عام او ايس ڊي سيٽنگون
- روشني: Adjust brightness, contrast, and gamma.
- تصويري سيٽ اپ: Fine-tune image quality, sharpness, and pixel clock.
- Color Setup: رنگ جي درجه حرارت، sRGB موڊ، يا استعمال ڪندڙ پاران بيان ڪيل رنگ سيٽنگون چونڊيو.
- Picture Boost: Enhance specific areas of the screen.
- او ايس ڊي سيٽ اپ: او ايس ڊي ٻولي، پوزيشن، ۽ شفافيت کي ترتيب ڏيو.
- راند جي جوڙجڪ: Enable/disable FreeSync, adjust overdrive, and game modes.
- اضافي: Select input source, reset settings, view ڄاڻ.
7. سار سنڀال
7.1 مانيٽر جي صفائي
- هميشه صاف ڪرڻ کان اڳ مانيٽر کي انپلگ ڪريو.
- استعمال ڪريو نرم، lint-آزاد ڪپڙو روشنيءَ سان ڊيampپاڻي يا نرم، غير رگڙيندڙ اسڪرين ڪلينر سان صاف ڪيو وڃي.
- Do not use alcohol, ammonia, or abrasive cleaners, as they may damage the screen or casing.
- Wipe the screen gently. Do not apply excessive pressure.
7.2 عام سنڀال
- مانيٽر يا ان جي ڪيبل تي ڳري شيون رکڻ کان پاسو ڪريو.
- مانيٽر کي سڌي سج جي روشني، گرمي جي ذريعن ۽ انتهائي گرمي پد کان پري رکو.
- Do not expose the monitor to strong vibrations or impacts.
8. مسئلا حل ڪرڻ
جيڪڏهن توهان کي پنهنجي مانيٽر سان مسئلا درپيش اچن ٿا، ته هيٺ ڏنل عام مسئلن ۽ حلن جو حوالو ڏيو:
| مسئلو | ممڪن سبب | حل |
|---|---|---|
| اسڪرين تي ڪوبه تصوير نه آهي | Monitor not powered on; Incorrect input source; Loose video cable | Press power button; Select correct input via OSD; Reconnect video cable securely |
| تصوير تمام گهڻي اونداهي/روشن آهي | چمڪ/ڪنٽراسٽ سيٽنگون غلط آهن | Adjust Brightness and Contrast in OSD menu |
| چمڪندڙ تصوير | Incorrect refresh rate; Faulty cable | Set refresh rate to 100Hz in display settings; Try a different video cable |
| USB بندرگاهن ڪم نه ڪري رهيا آهن | USB اپ اسٽريم ڪيبل ڳنڍيل نه آهي | Connect the USB-C upstream cable from the monitor to your computer |
If the problem persists after trying these solutions, contact AOC customer support.
9. وضاحتون
Below are the technical specifications for the AOC U34V5C/BK monitor:

Figure 9.1: Product Information Sheet for AOC U34V5C/BK, detailing energy efficiency and technical parameters.
| پيرا ميٽر | قدر |
|---|---|
| برانڊ | AOC |
| ماڊل | U34V5C/BK |
| اسڪرين جي ماپ | 34 انچ (86.4 سينٽي) |
| قرارداد | 3440 x 1440 WQHD |
| اسپيڪٽ ريشو | 21:9 |
| جوابي وقت | 4 ملي سيڪنڊ |
| ريفريش جي شرح | 100 Hz (default 60 Hz) |
| پينل ٽيڪنالاجي | VA Panel, LED LCD |
| Viewزاويه | 178 درجا (افقي/عمودي) |
| ھارڊويئر انٽرفيس | DisplayPort, HDMI, USB-C |
| ڪل USB بندرگاهن | 4 (USB Hub) |
| پاور پهچائڻ (USB-C) | 65W |
| جلدtage | 5 Volts (Internal Power Supply) |
| پيداوار جي ماپ | 50 x 25 x 40 سينٽي ميٽر؛ 7 ڪلوگرام |
| توانائي جي ڪارڪردگي ڪلاس (SDR) | G |
| بجلي جو استعمال (ايس ڊي آر) | 34.0 ڊبليو |
| توانائي جي ڪارڪردگي ڪلاس (HDR) | G |
| بجلي جو استعمال (HDR) | 35.0 ڊبليو |
| اسٽينڊ بائي پاور | 0.5 ڊبليو |
| Minimum guaranteed software/firmware updates | 8 سال |
| Minimum guaranteed spare parts availability | 7 سال |
| گھٽ ۾ گھٽ ضمانت واري پراڊڪٽ سپورٽ | 8 سال |
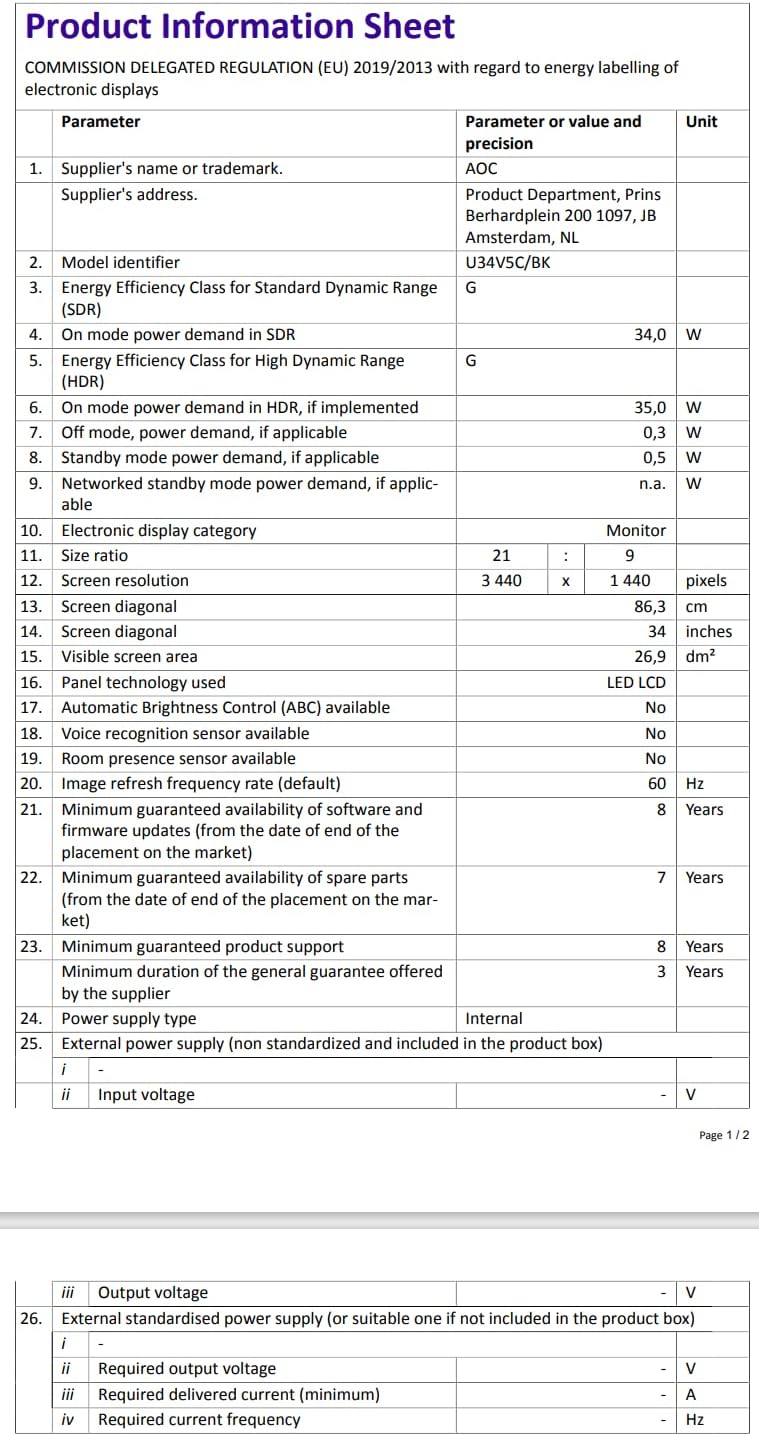
Figure 9.2: Energy Label for AOC U34V5C/BK. For more details, visit the اي پي آر ايل ڊيٽابيس.
10. وارنٽي ۽ سپورٽ
The AOC U34V5C/BK monitor comes with a minimum guaranteed general warranty of 3 سال فراهم ڪندڙ طرفان فراهم ڪيل.
For technical support, warranty claims, or service inquiries, please visit the official AOC website or contact your local AOC customer service center. Ensure you have your monitor's model number (U34V5C/BK) and serial number ready when contacting support.