1. تعارف
This manual provides essential information for the safe and efficient use of your AOC CU34P3CV 34-inch Ultrawide Quad HD LED Monitor. Please read this manual thoroughly before operating the device and retain it for future reference.
The AOC CU34P3CV is a 34-inch ultrawide curved monitor designed for productivity and immersive viewing, featuring a 3440 x 1440 Quad HD resolution, a VA panel, and a versatile USB-C docking solution.
2. حفاظت جي ڄاڻ
- طاقت جو ذريعو: صرف مانيٽر سان گڏ فراهم ڪيل پاور ڪنڊ ۽ اڊاپٽر استعمال ڪريو. پڪ ڪريو ته پاور آئوٽليٽ صحيح طرح سان گرائونڊ ٿيل آهي.
- وينٽيليشن: وينٽيليشن جي سوراخن کي نه روڪيو. مناسب هوا جي وهڪري لاءِ مانيٽر جي چوڌاري مناسب جاءِ ڏيو.
- مائع جي نمائش: مانيٽر کي پاڻي يا ٻين مائعات کان پري رکو. وڌيڪ نمي واري ماحول ۾ ڪم نه ڪريو.
- صفائي: صفائي ڪرڻ کان اڳ بجلي جي تار کي ڌار ڪريو. نرم، سڪل ڪپڙو استعمال ڪريو. مائع يا ايروسول صاف ڪندڙن کان پاسو ڪريو.
- لڳائڻ: مانيٽر کي هڪ مستحڪم، هموار مٿاڇري تي رکو. سڌي سج جي روشني، گرمي جي ذريعن، يا گهڻي مٽيءَ کان پاسو ڪريو.
- خدمت ڪرڻ: پاڻ مانيٽر جي سروس ڪرڻ جي ڪوشش نه ڪريو. سڀني سروسنگ کي قابل سروس اهلڪارن جي حوالي ڪريو.
3. پيڪيج مواد
مھرباني ڪري پيڪنگ کولڻ وقت پيڪيج جي مواد کي چيڪ ڪريو. جيڪڏھن ڪا به شيءِ غائب يا خراب آھي، پنھنجي پرچون ڪندڙ سان رابطو ڪريو.
- AOC CU34P3CV Monitor
- مانيٽر اسٽينڊ (بنياد ۽ گردن)
- پاور ڪيبل
- HDMI ڪيبل
- ڊسپلي پورٽ ڪيبل
- USB-سي ڪيبل
- استعمال ڪندڙ جو دستياب (ھي دستاويز)
4. سيٽ اپ
4.1. اسٽينڊ گڏ ڪرڻ
- ڇڪڻ کان بچڻ لاءِ مانيٽر جو منهن نرم، صاف مٿاڇري تي احتياط سان رکو.
- Attach the stand neck to the back of the monitor. Secure with screws if provided.
- Attach the stand base to the stand neck. Secure with the thumb screw or screws provided.
Image: AOC CU34P3CV Monitor Front View
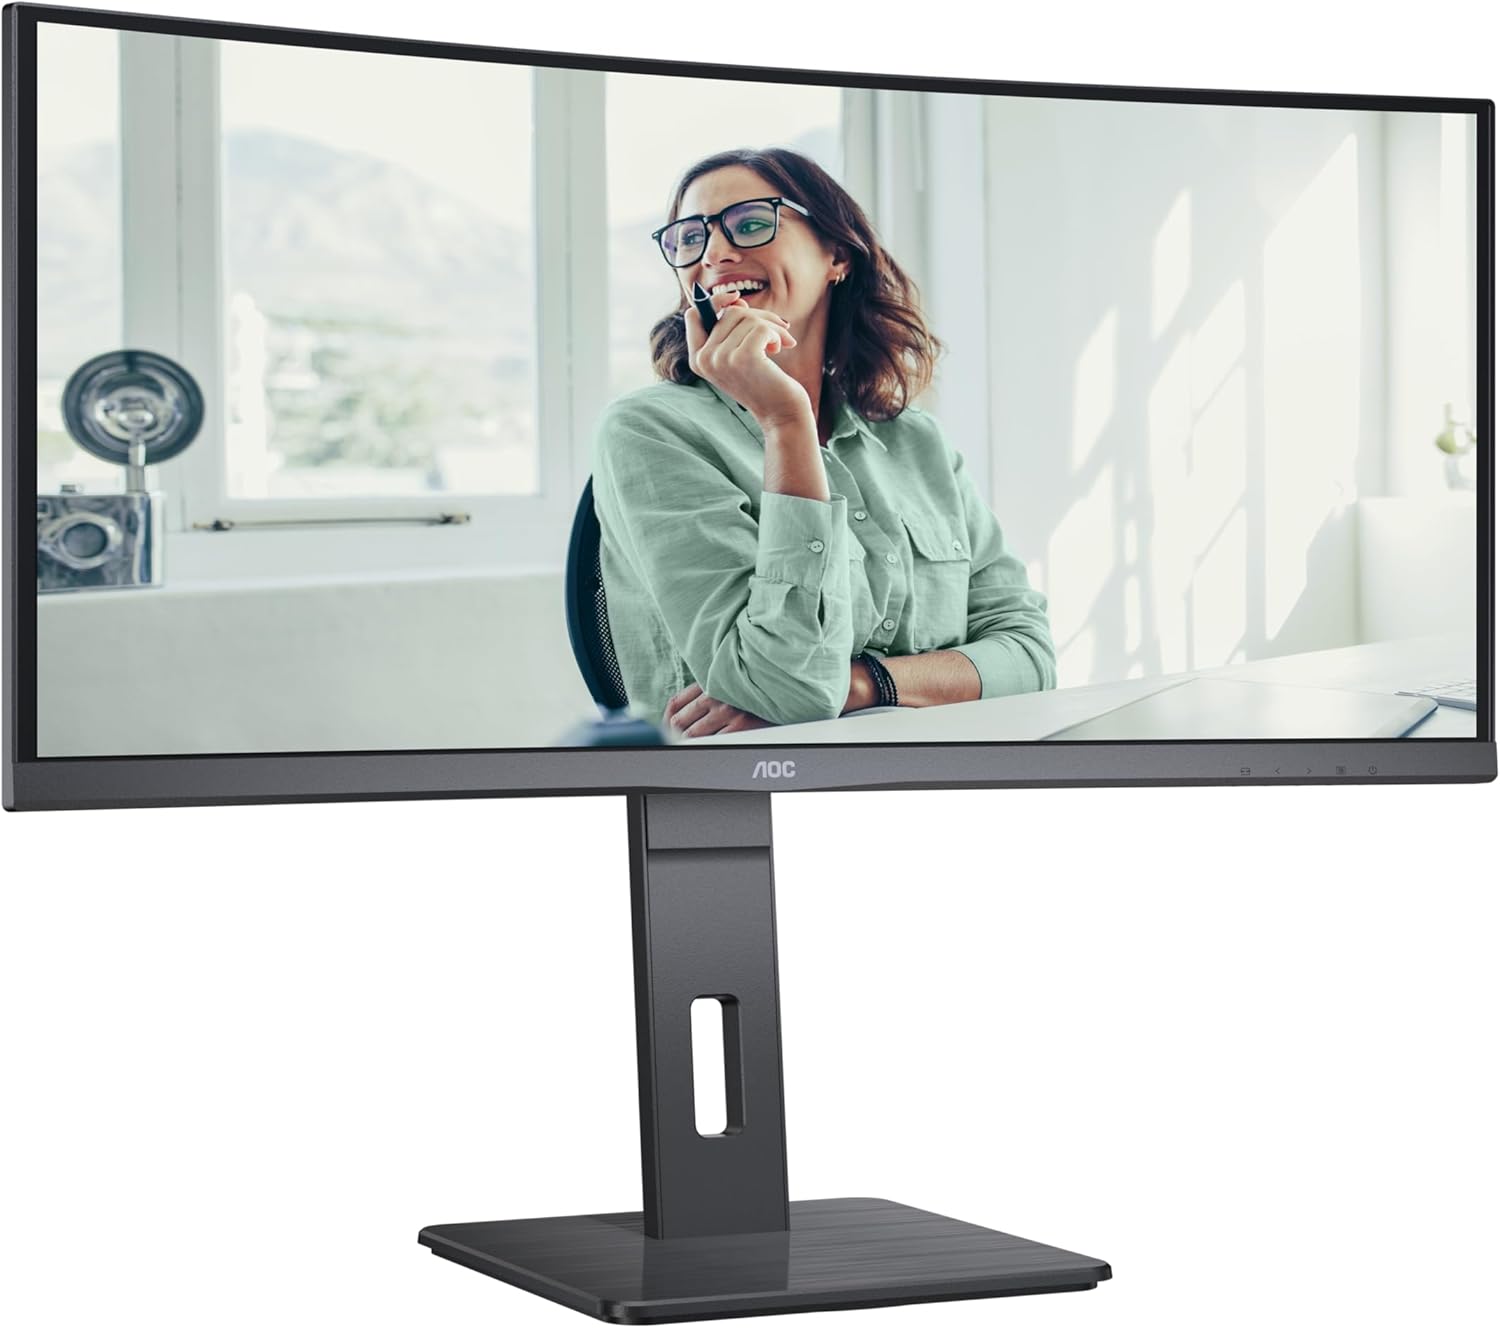
This image shows the AOC CU34P3CV monitor from the front, with its stand, displaying a vibrant image on its curved screen.
Image: AOC CU34P3CV Monitor Features Overview

هي تصوير سامهون ڏيکاري ٿي view of the AOC CU34P3CV monitor, with graphical overlays indicating its key features such as 34-inch size, WQHD resolution, VA panel, 3-sided frameless design, adjustable stand, and curved display.
4.2. مانيٽر کي ڳنڍڻ
پوئتي موٽڻ جو حوالو ڏيو view پورٽ جي جڳهن لاءِ تصوير.

This image displays the rear of the AOC CU34P3CV monitor, detailing the arrangement of its power input, video input ports (HDMI, DisplayPort, USB-C), and USB hub ports.
- پاور ڪنيڪشن: پاور ڪيبل کي مانيٽر جي پاور ان پٽ سان ڳنڍيو ۽ پوءِ گرائونڊ ٿيل اليڪٽريڪل آئوٽليٽ سان ڳنڍيو.
- وڊيو ڪنيڪشن:
- USB-سي: For a single-cable solution providing video, data, and power delivery (up to 65W), connect the USB-C cable from your computer to the monitor's USB-C port.
- HDMI/ڊسپلي پورٽ: Connect an HDMI or DisplayPort cable from your computer's video output to the corresponding port on the monitor.
- USB حب: Connect the upstream USB-C cable (if using USB-C for video) or a separate USB upstream cable (if using HDMI/DP) from your computer to the monitor to enable the integrated USB hub ports.
- نيٽ ورڪ (RJ45): If your monitor supports an integrated Ethernet port via USB-C docking, connect an Ethernet cable from your network router/modem to the RJ45 port on the monitor.
4.3. شروعاتي پاور آن
- پڪ ڪريو ته سڀئي ڪيبل محفوظ طور تي ڳنڍيل آهن.
- مانيٽر تي پاور بٽڻ کي دٻايو.
- Turn on your computer. The monitor should automatically detect the input signal. If not, you may need to manually select the input source using the On-Screen Display (OSD) menu.
5. آپريٽنگ هدايتون
5.1. پاور آن/آف
مانيٽر کي آن يا آف ڪرڻ لاءِ، پاور بٽڻ کي دٻايو، جيڪو عام طور تي مانيٽر جي هيٺان ساڄي يا پوئين پاسي هوندو آهي.
5.2. آن-اسڪرين ڊسپلي (OSD) مينيو
The OSD menu allows you to adjust various monitor settings. Use the control buttons (joystick or individual buttons) typically located on the bottom or rear of the monitor to navigate the menu.
- ان پٽ چونڊيو: Choose between USB-C, HDMI, or DisplayPort inputs.
- تصويري سيٽنگون: Adjust Brightness, Contrast, Gamma, Color Temperature, and various picture modes.
- Color Setup: Fine-tune color settings.
- او ايس ڊي سيٽ اپ: او ايس ڊي ٻولي، شفافيت، ۽ وقت ختم ٿيڻ کي ترتيب ڏيو.
- اضافي: Access information about the current resolution and refresh rate.
5.3. مانيٽر جي پوزيشن کي ترتيب ڏيڻ
The monitor stand allows for ergonomic adjustments.
- اونچائي جي ترتيب: Gently push or pull the monitor up or down to adjust its height.
- جھلڻ جي ترتيب: Tilt the monitor screen forward or backward to find your preferred viewزاويه.
- گھمڻ واري ترتيب: مانيٽر کي ان جي بنياد تي کاٻي يا ساڄي طرف گھمايو.
Image: AOC CU34P3CV Monitor Side View USB پورٽ سان

هي تصوير هڪ سائڊ پرو ڏيکاري ٿي.file of the AOC CU34P3CV monitor, highlighting two easily accessible USB ports on the side of the display.
Image: AOC CU34P3CV Monitor Side View with Stand Adjustment

This image illustrates the side view of the AOC CU34P3CV monitor, showcasing the flexibility of its stand for height and tilt adjustments.
Image: AOC CU34P3CV Monitor Top View
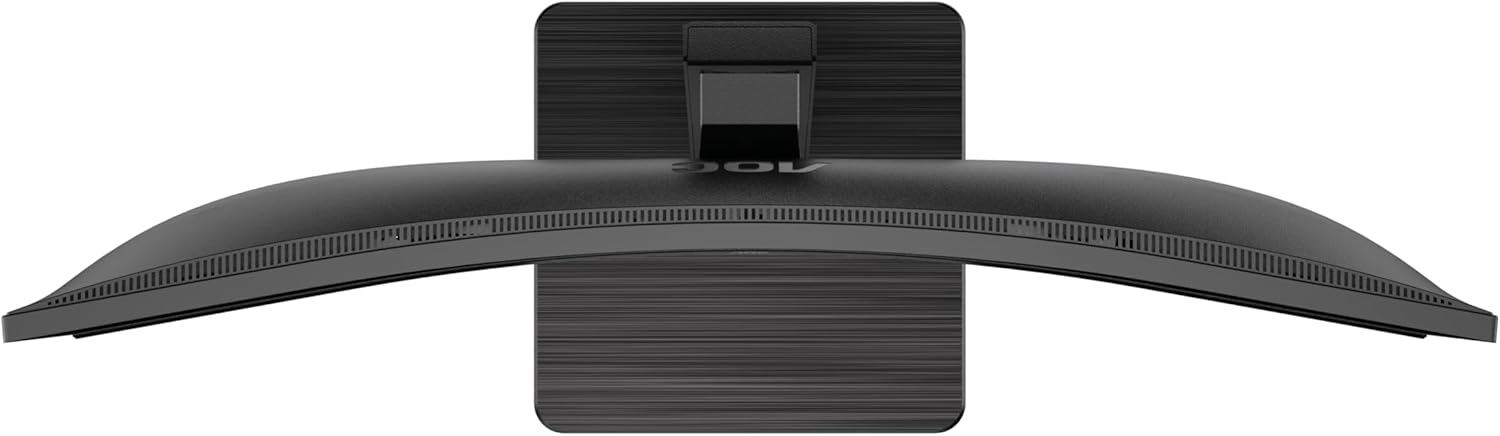
This image provides a top-down perspective of the AOC CU34P3CV monitor, clearly showing the curvature of its ultrawide screen.
6. سار سنڀال
6.1. مانيٽر جي صفائي
- صفائي ڪرڻ کان اڳ هميشه مانيٽر کي پاور آئوٽليٽ مان ڪڍي ڇڏيو.
- اسڪرين ۽ ٻاهرين سطحن کي نرميءَ سان صاف ڪرڻ لاءِ نرم، لِنٽ فري ڪپڙو استعمال ڪريو.
- ضدي نشانن لاءِ، هلڪو ڊيampڪپڙي کي پاڻي يا نرم، غير رگڙندڙ اسڪرين ڪلينر سان ڌوئڻ ڏيو. ڪلينر کي سڌو سنئون اسڪرين تي نه اسپري ڪريو.
- بينزين، ٿنڀا، امونيا تي ٻڌل ڪلينر، يا رگڙيندڙ صفائي ايجنٽ استعمال ڪرڻ کان پاسو ڪريو.
7. مسئلا حل ڪرڻ
جيڪڏهن توهان کي پنهنجي مانيٽر سان مسئلا درپيش اچن ٿا، ته هيٺ ڏنل عام مسئلن ۽ حلن جو حوالو ڏيو:
| مسئلو | ممڪن سبب | حل |
|---|---|---|
| No power/No image | Power cable not connected; Monitor off | Ensure power cable is securely connected; Press the power button to turn on the monitor. |
| No signal/"No Input" message | وڊيو ڪيبل ڳنڍيل نه آهي؛ غلط ان پٽ سورس چونڊيو ويو آهي. | Check video cable connections (HDMI, DisplayPort, USB-C); Use OSD menu to select the correct input source. |
| تصوير تمام گهڻي اونداهي/روشن آهي | چمڪ/ڪنٽراسٽ سيٽنگون غلط آهن | Adjust Brightness and Contrast settings via the OSD menu. |
| چمڪندڙ تصوير | Incorrect refresh rate; Loose cable | Ensure refresh rate is set to 60Hz in your computer's display settings; Check video cable connections. |
| USB بندرگاهن ڪم نه ڪري رهيا آهن | USB upstream cable not connected; Driver issue | Ensure the USB-C cable (for video and data) or a separate USB upstream cable is connected to your computer; Check computer's device manager for USB driver issues. |
8. وضاحتون
ماڊل: AOC CU34P3CV
| خاصيت | تفصيل |
|---|---|
| اسڪرين جي ماپ | 34 انچ (86.4 سينٽي) |
| قرارداد | 3440 x 1440 Quad HD |
| اسپيڪٽ ريشو | 21:9 |
| پينل جو قسم | VA پينل |
| ريفريش جي شرح | 60 هز |
| تصويري قسطن جو تناسب | 1000:1 |
| رابطي | USB-C (with Power Delivery), HDMI, DisplayPort, USB Hub, Ethernet (RJ45) |
| بجلي جو استعمال (ايس ڊي آر) | 32.0 ڊبليو |
| بجلي جو استعمال (HDR) | 35.0 ڊبليو |
| بجلي جو استعمال (آف موڊ) | 0.3 ڊبليو |
| بجلي جو استعمال (Standby) | 0.5 ڊبليو |
| پيداوار جا طول و عرض (تقريبن) | 11.81 x 11.81 x 11.81 انچ (اسٽينڊ سان) |
| شيءِ جو وزن (تقريبن) | 2.2 پائونڊ (اسٽينڊ کانسواءِ) |
| Guaranteed Software/Firmware Updates | 8 سال |
| Guaranteed Spare Parts | 7 سال |
| ضمانتي پراڊڪٽ سپورٽ | 8 سال |
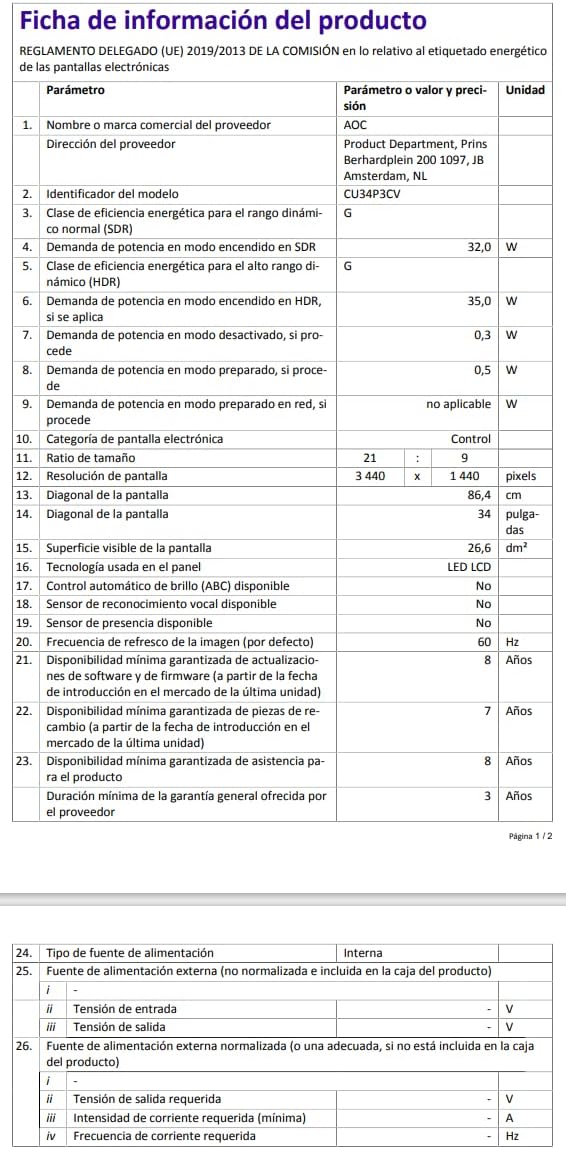
Image: Product Information Sheet
This image displays the official Product Information Sheet for the AOC CU34P3CV monitor, providing detailed technical specifications and compliance information.
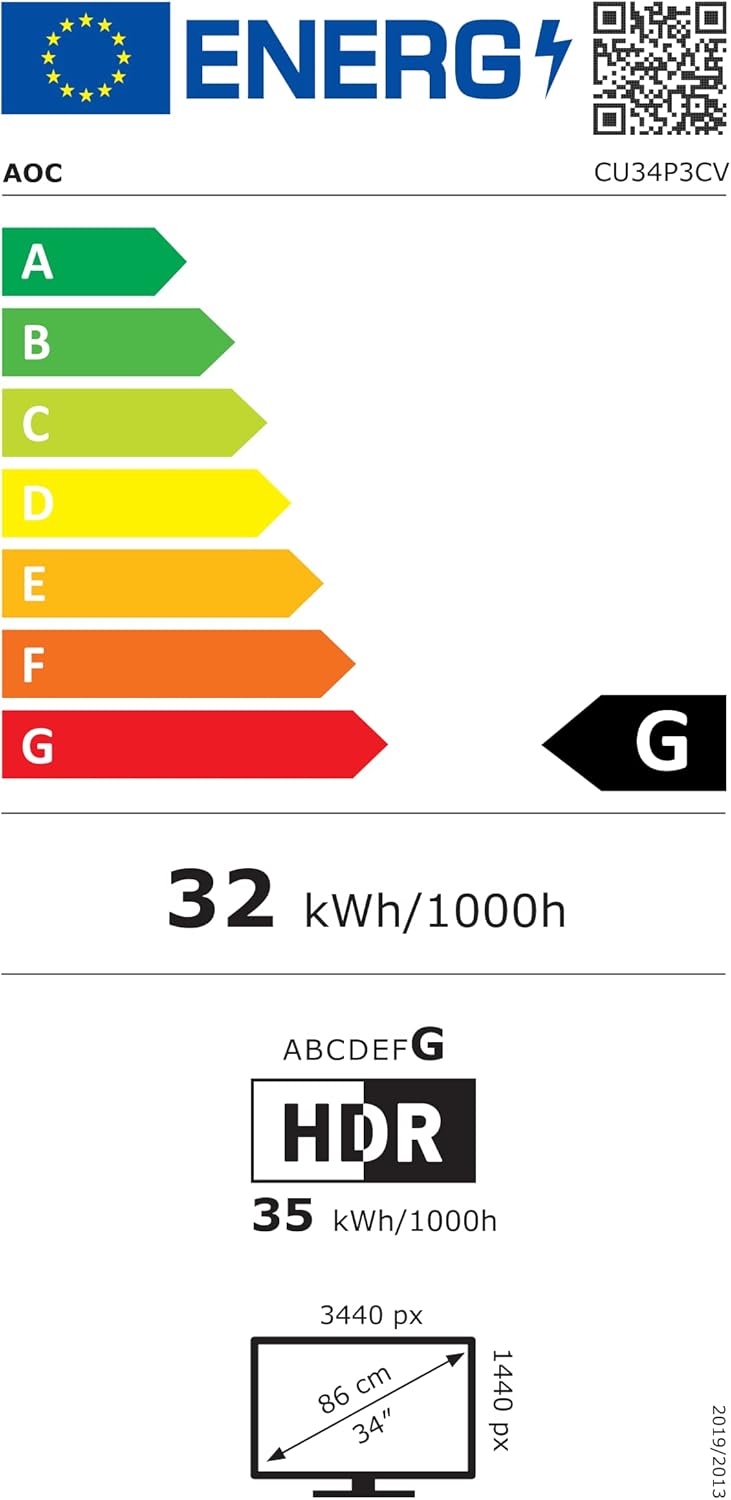
Image: Energy Label
This image presents the EU Energy Label for the AOC CU34P3CV monitor, indicating its energy efficiency class and annual power consumption.
وڌيڪ تفصيلي توانائي جي معلومات لاءِ، مهرباني ڪري EPREL ڊيٽابيس جو دورو ڪريو: https://eprel.ec.europa.eu/qr/1362085
9. وارنٽي ۽ سپورٽ
Your AOC CU34P3CV monitor comes with a minimum general guarantee of 3 سال provided by the supplier. Additionally, AOC guarantees minimum availability of software and firmware updates for 8 years, spare parts for 7 years, and product support for 8 years from the date of end of placement on the market.
For technical support, warranty claims, or further assistance, please visit the official AOC website or contact your local AOC customer service center. Keep your purchase receipt as proof of purchase for warranty purposes.