1. تعارف
The KEYESTUDIO Inventor Starter Kit for Arduino ESP32 is an integrated platform designed for learning electronics and programming. It combines various modules and sensors onto a single board, simplifying wiring and reducing connection errors. This kit supports both Arduino and Scratch programming, offering 30 diverse projects suitable for adults and teens interested in STEM education.
2. پيڪيج مواد
تصديق ڪريو ته هيٺ ڏنل سڀئي جزا توهان جي پيڪيج ۾ شامل آهن:
- Keyestudio Expansion Board: 1 unit
- ESP32 Development Board: 1 unit
- Battery Holder with DC Connector: 1 unit
- Servo: 1 unit
- IR Remote Control: 1 unit
- Rubber Pad: 1 unit
- Rotary Button: 1 unit
- Button Cap: 4 units
- USB Cable: 1 unit
- 20cm DuPont Wires: 1 set
- 10cm DuPont Wires: 1 set

تصوير 2.1: مٿيview of all components included in the KEYESTUDIO Inventor Starter Kit. This image displays the main expansion board, ESP32 development board, battery holder, servo, IR remote, various buttons, USB cable, and DuPont wires.
3. پراڊڪٽ ختمview
3.1 پن جي وضاحت
The expansion board features various ports and pins for connecting and interacting with the integrated modules and external components. Understanding these connections is crucial for programming and project development.

Image 3.1: Detailed pin description of the KEYESTUDIO Inventor Starter Kit expansion board. Key areas include the LCD switch (ON/OFF), LCD backlight adjustment, LCD port, Digital tube port, WS2812/buzzer/SPK port, Dot matrix port, Port of ESP32 pins, ESP32 socket, NANO socket, Port of NANO pins, DC power port (7-12V), VCC voltage controls switch, I2C, UART, Ultrasonic port, LED port, Sound sensor sensitivity adjustment, Pir/IR/DHT11 port, Speaker sound regulation, Pot/light/sound port, and Button port.
3.2 Module Description
The kit integrates 15 modules and sensors directly onto the expansion board, eliminating complex wiring for basic projects.

Image 3.2: Description of integrated modules on the KEYESTUDIO Inventor Starter Kit board. Modules include an 8x8 dot matrix display, LCD 1602 display, 4-digit tube display, WS2812 RGB LED, Potentiometer, Speaker, Photoresistor, Sound sensor, Active buzzer, IR receiver, Ultrasonic sensor, LED, Button module, DHT11 temperature and humidity sensor, and PIR motion sensor.
4. اهم خاصيتون
This kit is designed to streamline the learning process with several key features:
- آسان وائرنگ: All modules are pre-connected on a single platform, significantly reducing setup time and the potential for wiring errors.
- Reduced Short Circuits: The integrated design minimizes the risk of incorrect connections that could lead to short circuits, enhancing safety and durability.
- High Expansibility: While modules are in-built, lead-out pins for VCC and GND are reserved, allowing for expansion with external modules.
- پورٽيبلٽي: The compact design concentrates all modules on one board, making it easy to transport and use in various settings.
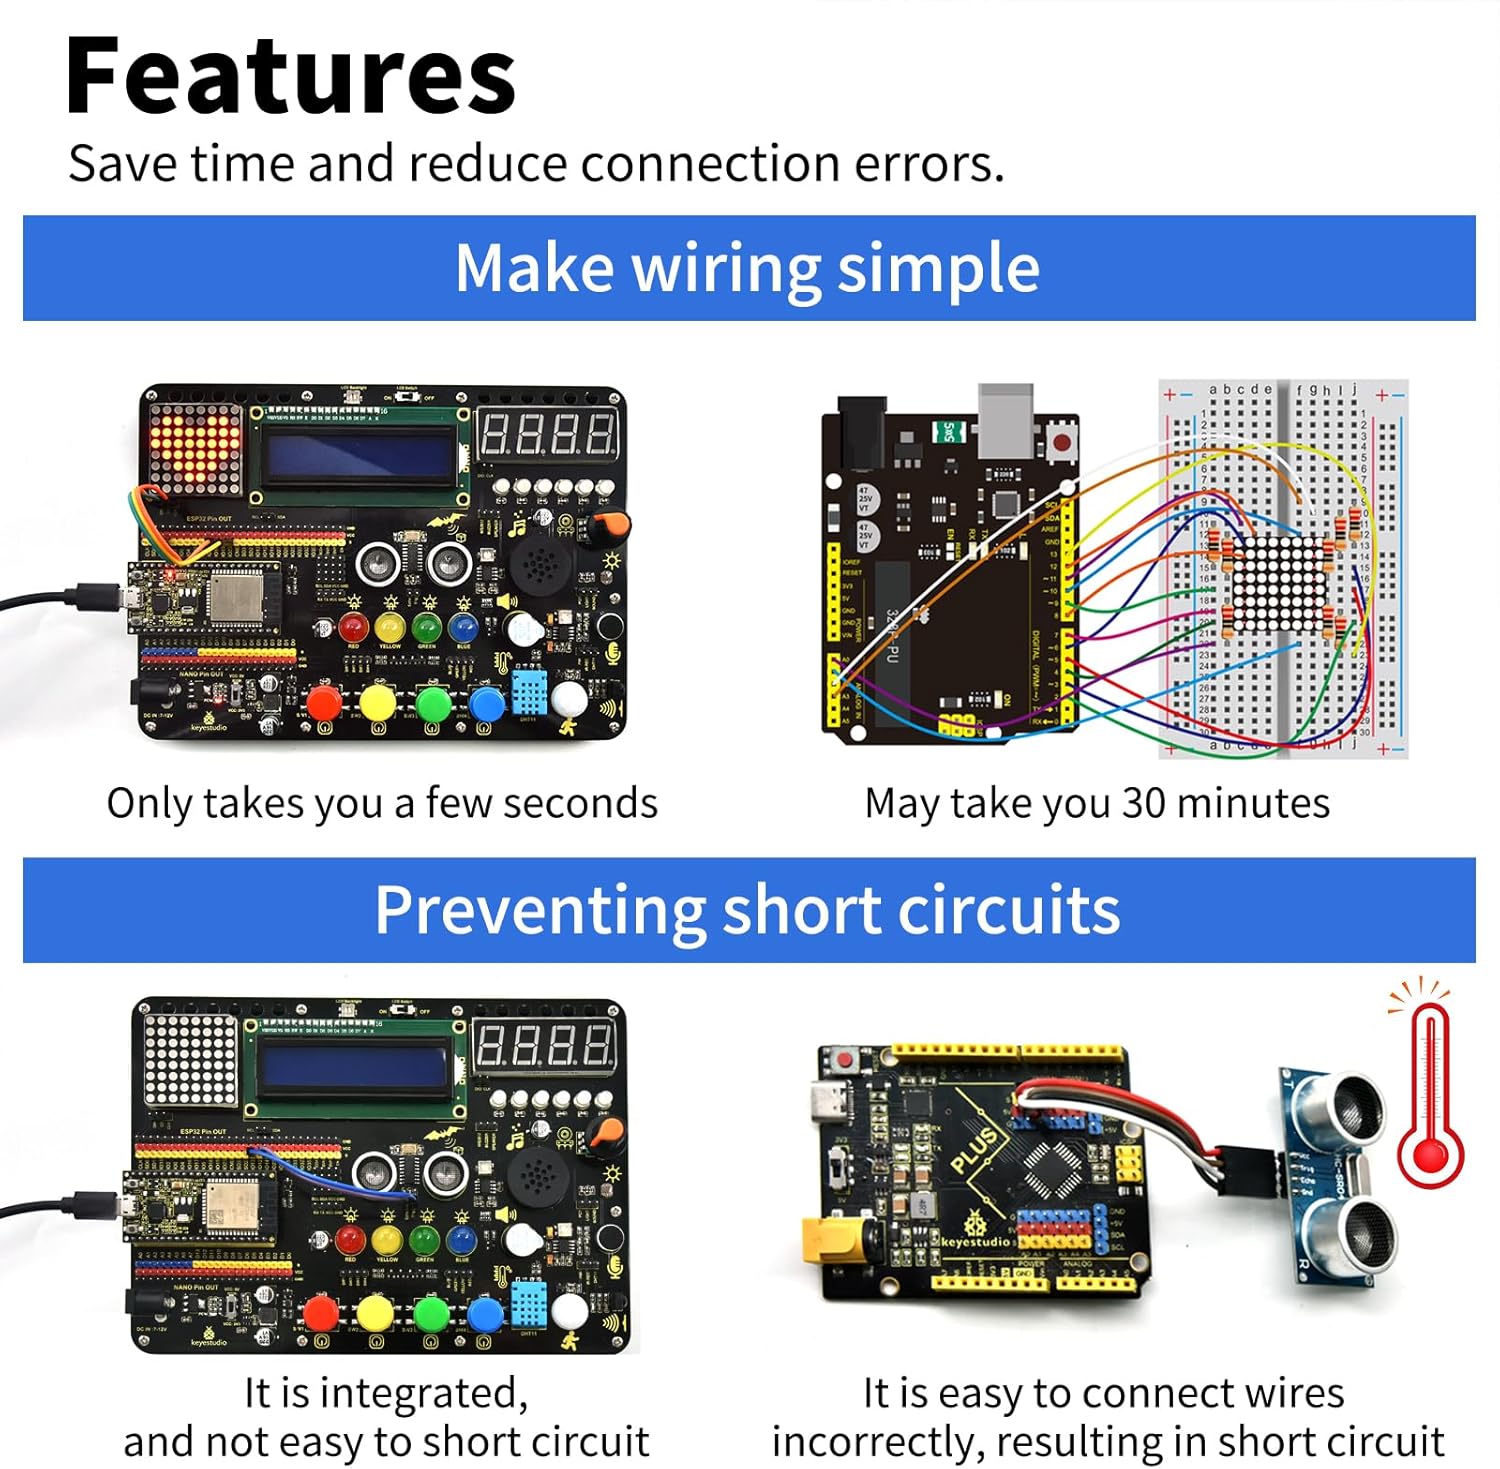
Image 4.1: Visual representation of the kit's features, highlighting how it simplifies wiring and prevents short circuits compared to traditional breadboard setups. The image shows the integrated board requiring minimal connections versus a breadboard setup with numerous wires.

Image 4.2: The compact size of the KEYESTUDIO Inventor Starter Kit, demonstrating its portability. The image shows the board fitting easily into a small bag, emphasizing its convenience for on-the-go learning and projects.
5. سيٽ اپ ۽ آپريشن
5.1 شروعاتي سيٽ اپ
- Insert Development Board: Carefully insert the ESP32 development board into its designated socket on the expansion board. Ensure correct orientation.
- پاور ڪنيڪشن: Connect the USB cable to the ESP32 board and to your computer. Alternatively, use the battery holder with DC connector to provide power (7-12V).
- سافٽ ويئر انسٽاليشن: Install the Arduino IDE on your computer. For ESP32 programming, you may need to add the ESP32 board manager URL in the Arduino IDE preferences and install the ESP32 boards.
- ڊرائيور لڳائڻ: Ensure necessary USB-to-serial drivers (e.g., CP210x or CH340) are installed for your operating system to allow communication with the ESP32 board.
5.2 بنيادي پروگرامنگ
The kit supports two primary programming environments:
- ڇڪڻ: A graphical programming tool suitable for beginners, especially teenagers, to learn programming concepts through drag-and-drop blocks.
- C/C++ (Arduino IDE): The C/C++ language, widely used in embedded systems, is supported through the Arduino IDE. This allows for more advanced programming and direct control over the hardware.
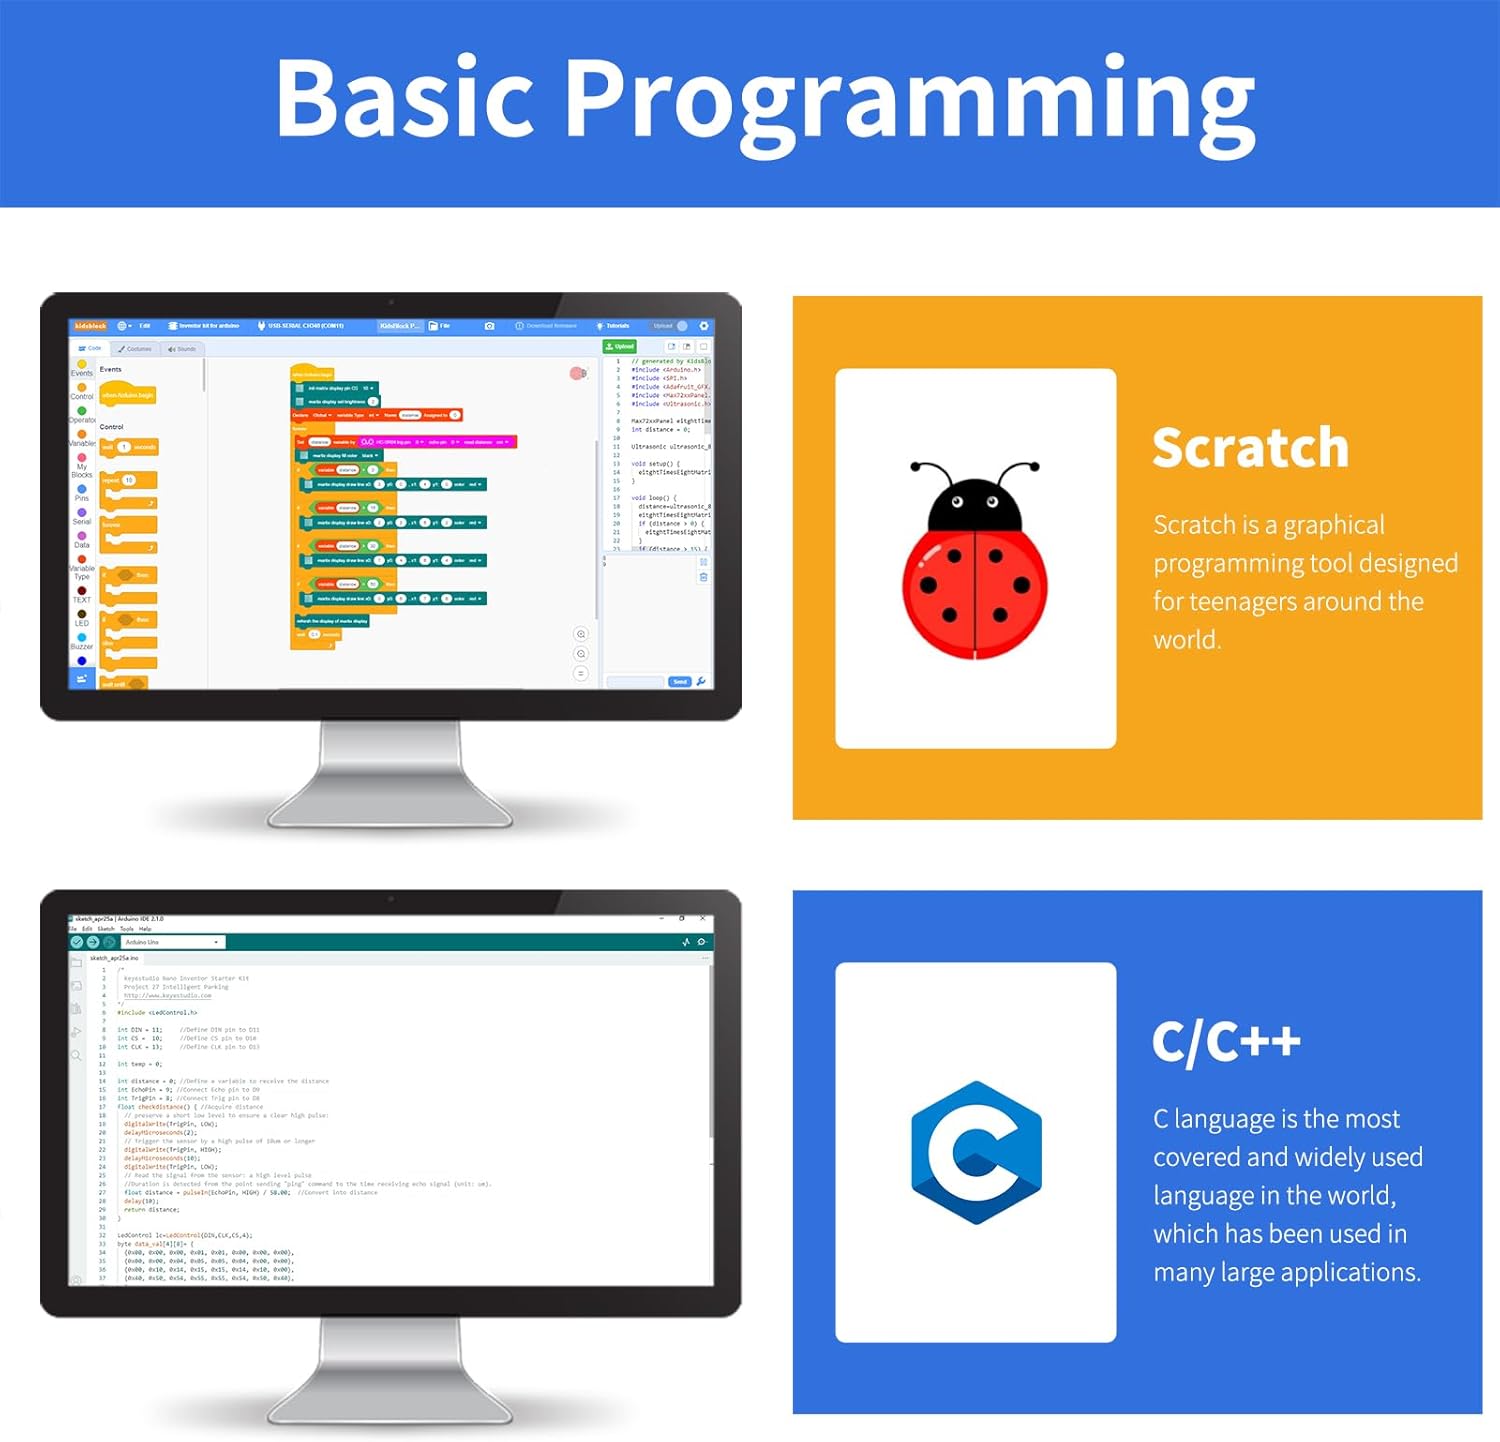
Image 5.1: Illustration of the two primary programming environments supported by the kit: Scratch (top) for visual block-based coding and C/C++ via the Arduino IDE (bottom) for text-based programming.
6. Projects and Functional Display
6.1 Included Projects
The kit provides resources for 30 distinct projects, designed to teach various electronic and programming concepts. These projects range from basic LED control to more complex sensor interactions.

Image 6.1: A list of the 30 projects included with the kit, such as Blinking LED, Breathing Light, SOS Distress Device, Traffic Light, Rainbow Ambient Light, Water Flow Light, Buzzer, Music Performer, Digital Tube Display, Dot Matrix Display, LCD, Servo, Mini Lamp, Counter, Responder, Timebomb, Invasion Alarm, Beating Heart, Dimming Lamp, Light Pillar, Voice Control Light, Noisemeter, Smart Cup, Meteorological Station, Ultrasonic Diastimeter, Human Body Piano, Intelligent Parking, Intelligent Gate, IR Remote Control, and Smart Home.
6.2 LCD Data Display
The integrated LCD can display various sensor readings and project outputs. The kit includes functionality to display data based on button presses:
- بٽڻ 1: LCD displays temperature.
- بٽڻ 2: LCD displays humidity value.
- بٽڻ 3: LCD displays distance value (from ultrasonic sensor).
- بٽڻ 4: LCD displays brightness value (from photoresistor).
- بٽڻ 5: LCD displays brightness value (from photoresistor).
- بٽڻ 6: LCD displays potentiometer value.
- OKيڪ بٽڻ: ڊسپلي کي صاف ڪري ٿو.

Image 6.2: The LCD displaying data, with a table detailing which button press corresponds to which data display (temperature, humidity, distance, brightness, potentiometer value, and clear display).
6.3 فنڪشنل اوورview
The kit's integrated modules provide a wide range of functionalities for various applications:

Image 6.3: Icons representing the various functions available on the board, including Dot matrix display, LCD display, Digital tube display, Seven-color LED, LED, Ultrasonic ranging, PIR detection, Button control, Detect temperature, Detect humidity, Speaker, Remote control, Brightness detection, Sound detection, and Potentiometer adjustment.
7. مسئلا حل ڪرڻ
- بورڊ نه مليو: Ensure USB cable is securely connected. Verify that the correct USB-to-serial drivers (e.g., CP210x or CH340) are installed on your computer. Check if the correct board and port are selected in the Arduino IDE.
- Code Upload Failure: Confirm that the ESP32 board is correctly inserted and powered. Check for compilation errors in the Arduino IDE. Ensure the correct board type and COM port are selected.
- ماڊيول جواب نه ڏئي رهيو آهي: Verify that the VCC voltage control switch is in the correct position. Check for any loose connections if external modules are used. Ensure the code correctly initializes and interacts with the specific module.
- پاور مسئلا: If using battery power, ensure batteries are fresh and correctly inserted into the battery holder. Check the DC connector for a secure fit.
- ڊسپلي مسئلا: For LCD, check the LCD switch (ON/OFF) and backlight adjustment. For other displays, ensure they are correctly initialized in the code.
8. وضاحتون
| وصف | قدر |
|---|---|
| برانڊ | KEYESTUDIO |
| ماڊل نالو | Inventor Starter Kit for Arduino ESP32 |
| رام ميموري ٽيڪنالاجي | ايل پي ڊي ڊي آر |
| آپريٽنگ سسٽم | لينڪس (مطابقت رکندڙ) |
| پروسيسر برانڊ | ايسپريسف |
| پروسيسر شمار | 2 |
| مطابقت رکندڙ ڊوائيسز | Computer (for programming), External modules |
| بيٽريون شامل آهن | نه |
| بيٽرين جي ضرورت آهي | No (for USB power), Yes (for portable DC power) |
| وائرليس جو قسم | Infrared (for remote control) |
| ڪل USB بندرگاهن | 1 (on ESP32 board) |
| پيڪيج جي ماپ | 22.02 x 13.97 x 5.21 سينٽي |
| پيڪيج جو وزن | 453.59 جي |
9. سپورٽ ۽ وارنٽي
9.1 ٽيڪنيڪل سپورٽ
For detailed guides and further assistance, please search for "KEYESTUDIO FKS0001" in Google Chrome to access the comprehensive online manual. If you encounter any problems during use, please contact KEYESTUDIO technical support. They aim to respond quickly within working days.
9.2 وارنٽي ڄاڻ
Specific warranty details are not provided in the product information. Please refer to the retailer's return policy or contact KEYESTUDIO directly for warranty inquiries.


