1. تعارف
This manual provides detailed instructions for the installation, operation, and maintenance of your TESmart USB 3.0 HDMI+DP+USB C KVM Switch (Model HDC403-P23). This device allows you to control up to four computers (three desktops and one USB-C laptop) from a single set of keyboard, mouse, and three monitors, supporting 4K@60Hz resolution. It integrates KVM functionality with a USB 3.0 docking station, offering enhanced connectivity and display management.
2. حفاظت جي ڄاڻ
مھرباني ڪري ڊوائيس هلائڻ کان اڳ ھيٺ ڏنل حفاظتي احتياط پڙھو ۽ سمجھو:
- پڪ ڪريو ته پاور اڊاپٽر صحيح طرح سان ڳنڍيل آهي ۽ مخصوص وول سان ملندو آهيtage.
- ڊوائيس کي پاڻي، نمي، يا انتهائي گرمي پد جي سامهون نه آڻيو.
- ڊوائيس تي ڳري شيون رکڻ کان پاسو ڪريو.
- پاڻ ڊوائيس کي کولڻ يا مرمت ڪرڻ جي ڪوشش نه ڪريو. سڀني سروسنگ کي قابل اهلڪارن جي حوالي ڪريو.
- نقصان کان بچڻ لاءِ صرف مهيا ڪيل پاور اڊاپٽر ۽ ڪيبل استعمال ڪريو.
- Disconnect power before cleaning the device. Use a soft, dry cloth.
3. پيڪيج مواد
پڪ ڪريو ته سڀئي شيون پيڪيج ۾ موجود آهن:

Image: A diagram illustrating the contents of the product package, including the KVM switch, various cables, power adapter, and accessories.
- 1x TESmart 4x3 KVM Switch (Model HDC403-P23)
- 1x DC 20V پاور اڊاپٽر
- 2x KVM Cables (USB-B to USB-A, HDMI, DP)
- 4x HDMI ڪيبل
- 1x ڊسپلي پورٽ ڪيبل
- 1x USB-C ڪيبل
- 1x استعمال ڪندڙ دستياب (هي دستاويز)
- 1x آئي آر ريموٽر ڪنٽرول
- 1x USB 3.0 Type-A to Type-B Cable
- 2x Rack-Ears
4. پراڊڪٽ ختمview ۽ وضاحتون
4.1. اهم خاصيتون
- 4-Port Triple Monitor KVM Switch: Manages up to four computers (3 desktops + 1 USB-C laptop) with three monitors.
- Integrated USB 3.0 Docking Station: Features 4x USB 3.0 ports (two with power delivery), 2x USB 2.0 ports, 1x LAN port, 1x 3.5mm headphone jack, and 3 HDMI outputs.
- Ultra HD 4K Visuals: Supports resolutions up to 3840x2160 (4K) @60Hz, 3440x1440@100Hz, and 2560x1440@144Hz. Compatible with 3D, HDR, HDCP, and Dolby Vision, delivering clear and authentic video.
- EDID Emulators: Ensures consistent display settings across all connected computers, preventing resolution changes or window rearrangement during switching.
- MST Mode Support: For Windows laptops, a single USB-C cable can transmit audio, video, and USB data.
- Wired Network Sharing: Allows all four connected PCs to share a single wired network connection via the built-in USB Ethernet adapter.
- Multiple Switching Modes: Switch between computers using keyboard hotkeys, IR remote control, or front panel buttons.
- K&M Pass-through Mode: Ensures compatibility with various keyboard and mouse types, including wired, wireless, mechanical, and gaming peripherals.
4.2. ٽيڪنيڪل وضاحتون
| خاصيت | تفصيل |
|---|---|
| ماڊل نمبر | HDC403-P23 |
| پيداوار جي ماپ | 16.5 x 8.7 x 4.7 انچ |
| وزن | 6.94 پائونڊ |
| وڊيو انپٽس | HDMI، ڊسپلي پورٽ، USB-C |
| وڊيو آئوٽ | 3x HDMI |
| وڌ ۾ وڌ ريڪارڊ | 4K@60Hz (3840x2160), 3440x1440@100Hz, 2560x1440@144Hz |
| USB بندرگاهن | 4x USB 3.0 (2 with power delivery), 2x USB 2.0 |
| نيٽ ورڪ پورٽ | 1x LAN (RJ45) |
| آڊيو پورٽ | 1x 3.5 ايم ايم هيڊ فون جڪ |
| آپريٽنگ جلدtage | 20V ڊي سي |
| موجوده درجه بندي | 5 Amps |
| آپريشن موڊ | چالو بند |
5. سيٽ اپ ۽ ڪنيڪشن
5.1. ڪنيڪشن ڊاگرام
Refer to the diagram below for a visual guide on connecting your computers and monitors to the KVM switch.
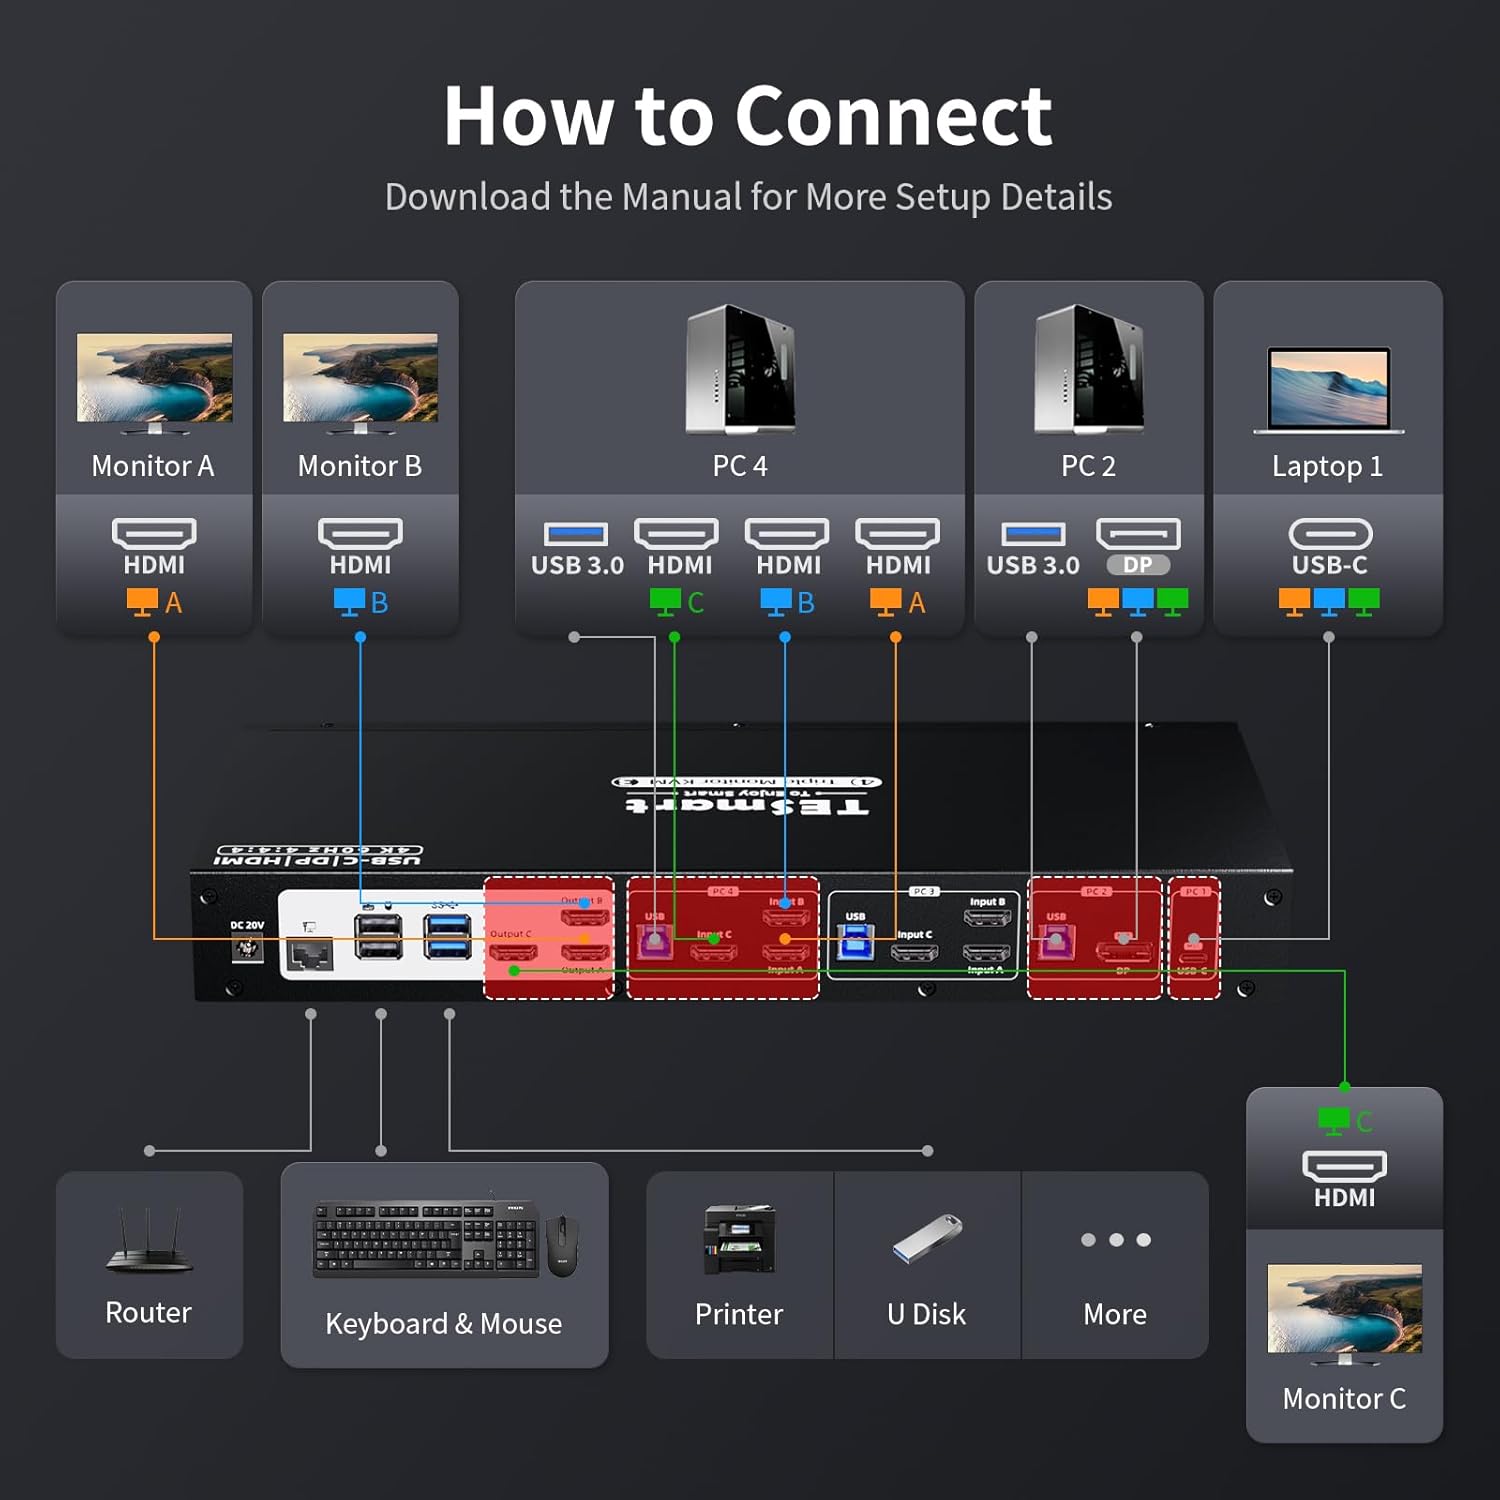
Image: A detailed diagram illustrating how to connect monitors (A, B, C) and various PCs (PC4, PC2, Laptop1) to the KVM switch, along with peripherals like keyboard, mouse, printer, and router.
5.2. Step-by-Step Connection
- پاور آف ڊوائيسز: Ensure all computers and monitors are powered off before making any connections.
- ڳنڍڻ مانيٽر: Connect your three monitors to the KVM switch's HDMI Output A, B, and C ports using the provided HDMI cables.
- ڪمپيوٽرن کي ڳنڍيو:
- For each desktop PC, connect the video outputs (HDMI, DisplayPort) and a USB 3.0 cable from the PC to the corresponding Input A, B, C, and USB ports on the KVM switch.
- For a USB-C laptop, connect a USB-C cable from the laptop to the USB-C input on the KVM switch. This single cable can handle video, audio, and USB data for Windows systems supporting MST.
- پردي سان ڳنڍڻ:
- Connect your keyboard and mouse to the dedicated USB 2.0 ports on the KVM switch.
- Connect other USB devices (e.g., printer, USB drive) to the USB 3.0 ports.
- Connect your headset or speakers to the 3.5mm audio jack.
- Connect an Ethernet cable from your router to the LAN port on the KVM switch to enable wired network sharing for all connected PCs.
- پاور آن: Connect the DC 20V power adapter to the KVM switch and then plug it into a power outlet. Power on the KVM switch, followed by your monitors and computers.
5.3. EDID Emulators
The KVM switch features built-in EDID emulators. These emulators store the display information of your monitors, ensuring that your computers always receive the correct display settings. This prevents issues like resolution changes or window rearrangement when switching between inputs.

Image: A comparison showing how display settings can change without EDID emulators, and how they remain stable with EDID emulators enabled.
5.4. MST Mode and Wired Network
The KVM switch supports Multi-Stream Transport (MST) mode, particularly beneficial for Windows notebooks. With MST, a single USB-C connection to the KVM switch can transmit audio, video, and USB data, simplifying cable management.

Image: An illustration of MST mode, demonstrating how a single USB-C connection from a laptop to the KVM can manage multiple monitors.
Additionally, the integrated USB Ethernet adapter allows all connected PCs to share a single wired network connection, eliminating the need for separate network cables for each computer.

Image: A diagram showing a router connected to the KVM switch's LAN port, providing network access to all connected PCs.
6. آپريٽنگ هدايتون
6.1. ڪمپيوٽرن جي وچ ۾ سوئچنگ
The KVM switch offers three methods for switching between connected computers:
- ڪي بورڊ Hotkeys: Use predefined key combinations on your connected keyboard to switch inputs. Refer to the specific hotkey commands in the full user manual for details (e.g., Right-Ctrl + Scroll Lock).
- سامهون پينل بٽڻ: Press the corresponding input button on the front panel of the KVM switch to select a computer.
- IR ريموٽ ڪنٽرول: Use the included IR remote control to switch between inputs. Ensure the remote has a clear line of sight to the KVM switch's IR receiver.

Image: Visual representation of the three switching methods: keyboard hotkeys, front panel buttons, and IR remote control.
6.2. ڊسپلي موڊس
The KVM switch supports two primary display modes for managing your triple monitors:
- Shared Display Mode (Display Mode 1): All three monitors display content from the currently selected PC, extending the desktop across them or duplicating content as configured on the PC.
- Independent PC Views (Display Mode 2): Each monitor can display content from a different PC, allowing for a multi-computer, multi-monitor setup where you can view outputs from various sources simultaneously.

Image: Illustrations of Display Mode 1 (all monitors showing one PC) and Display Mode 2 (monitors showing different PCs).
6.3. USB 3.0 Docking Station Functionality
The integrated USB 3.0 docking station allows you to share various USB peripherals across all connected computers. This includes:
- ڊيٽا جي منتقلي: Connect USB drives, external hard drives, and other storage devices for shared access.
- چارج ڪرڻ: Two USB 3.0 ports offer power delivery for charging devices like smartphones.
- پردي: Connect printers, scanners, webcams, and other USB accessories.

Image: A visual guide to the KVM's docking station capabilities, showing connections for phone, hard disk drive, printer, USB driver, headset, audio splitter, speaker, and microphone.
The K&M pass-through mode ensures broad compatibility with various keyboard and mouse types, including specialized gaming or mechanical keyboards, by directly passing through their signals.
7. سار سنڀال
توهان جي KVM سوئچ جي ڊگهي عمر ۽ بهترين ڪارڪردگي کي يقيني بڻائڻ لاءِ، انهن سار سنڀال جي هدايتن تي عمل ڪريو:
- صفائي: Regularly wipe the device with a soft, dry, anti-static cloth. Avoid using liquid or aerosol cleaners, as they may damage the casing يا اندروني جزا.
- وينٽيليشن: پڪ ڪريو ته KVM سوئچ کي وڌيڪ گرم ٿيڻ کان روڪڻ لاءِ سٺي هوادار علائقي ۾ رکيو ويو آهي. ڪنهن به وينٽيليشن جي سوراخن کي نه بلاڪ ڪريو.
- ڪيبل جو انتظام: Keep cables organized and free from kinks or excessive bending to prevent signal degradation or damage.
- پاور سائيڪل: جيڪڏهن ڊوائيس غير جوابده ٿي وڃي، ته پاور اڊاپٽر کي ڊسڪنيڪٽ ڪريو، ڪجهه سيڪنڊ انتظار ڪريو، ۽ پوءِ ان کي ٻيهر ڳنڍيو.
8. مسئلا حل ڪرڻ
جيڪڏهن توهان کي پنهنجي KVM سوئچ سان مسئلا درپيش اچن ٿا، ته هيٺ ڏنل عام مسئلن ۽ حلن جو حوالو ڏيو:
| مسئلو | ممڪن سبب / حل |
|---|---|
| No display on monitors after switching. |
|
| ڪي بورڊ يا مائوس جواب نه ڏئي رهيو آهي. |
|
| Display resolution or arrangement changes after switching. |
|
| USB devices (e.g., external drive, printer) not detected. |
|
| نيٽ ورڪ ڪنيڪشن جا مسئلا. |
|
| MacBook Pro/Air second monitor not working. |
|
9. وارنٽي ۽ سپورٽ
9.1. وارنٽي ڄاڻ
The TESmart KVM Switch (Model HDC403-P23) comes with a standard 1 سال وارنٽي, which can be extended by an additional 2 سال upon product registration, totaling a 3-year warranty period. Please refer to the warranty card included in your package or visit the official TESmart webتفصيلي شرطن ۽ شرطن لاء سائيٽ.
9.2. ٽيڪنيڪل سپورٽ
For any technical assistance, troubleshooting, or inquiries regarding your TESmart KVM switch, please contact TESmart customer support. 24/7 ٽيڪنيڪل سپورٽ is available to assist you.
Contact information can typically be found on the TESmart official webسائيٽ يا پيداوار جي پيڪنگنگ ۾.
10. ريگيوليٽري تعميل
This device complies with relevant regulatory standards. For specific compliance details, please refer to the product packaging or the official TESmart webسائيٽ.


