1. تعارف
The Offgridtec Autark Pro XL 24V 800W Solar System is a comprehensive solution designed for independent energy supply. This system integrates high-efficiency solar panels, a robust LiFePO4 battery, an intelligent MPPT charge controller, and a powerful sine wave inverter to provide reliable power for various applications, including recreational vehicles, remote cabins, and off-grid installations. This manual provides essential information for safe installation, operation, and maintenance of your solar system.
2. حفاظتي هدايتون
Please read all safety instructions carefully before installing or operating the system. Failure to follow these instructions may result in electric shock, fire, serious injury, or property damage.
- قابل عملو: تنصيب ۽ سار سنڀال صرف قابل عملدار طرفان ڪئي وڃي.
- برقي حفاظت: Always disconnect power before making or breaking electrical connections. Use insulated tools.
- بيٽري جي حفاظت: LiFePO4 batteries are generally safe, but avoid short-circuiting terminals, puncturing, or exposing to extreme temperatures. Do not open the battery casing.
- Solar Panel Handling: Solar panels generate electricity when exposed to light. Cover panels during installation to prevent electrical shock.
- وينٽيليشن: Ensure adequate ventilation around the inverter and charge controller to prevent overheating.
- پاڻي ۽ نمي: Keep all components dry and away from water or excessive moisture.
- گرائونڊنگ: Ensure all components are properly grounded according to local electrical codes.
3. پيڪيج مواد
پڪ ڪريو ته هيٺ ڏنل سڀئي جزا موجود آهن ۽ پيڪنگ کولڻ تي انهن کي نقصان نه پهتو آهي.
- 4 x Offgridtec MONO 200W V2 Solar Modules
- 1 x 100Ah LiFePO4 Battery with integrated BMS
- 1 x MPPT Charge Controller
- 1 x Sine Wave Voltage Converter (2000W continuous, 3200W peak)
- 8m Solar Cable (for panel connection)
- 1 x 1.5m 10mm² Battery Cable with MIDI fuse holder and M8 screw terminal
- 5 x 40A 58V MIDI Fuses
- 5 x 150A 32V MEGA Fuses
- 1 x MEGA Fuse Holder
- Necessary connection accessories (e.g., MC4 connectors, Y-branch connectors)
4. سسٽم جا حصا ختمview

شڪل 4.1: Complete Offgridtec Autark Pro XL 24V 800W Solar System kit, showing all major components including solar panels, battery, charge controller, and inverter.

شڪل 4.2: Four Offgridtec MONO 200W V2 Solar Modules, designed for high efficiency energy generation.
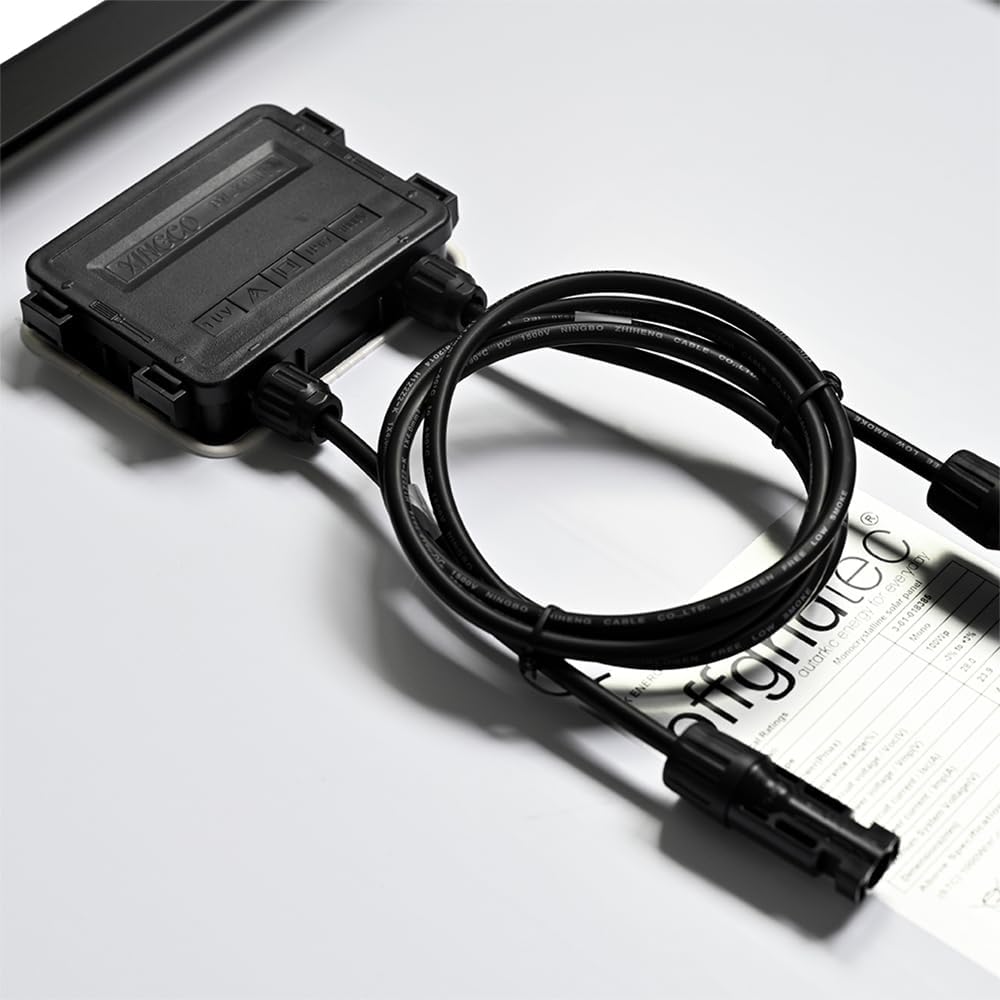
شڪل 4.3: Detail of a solar panel's junction box and MC4 connectors, showing the robust cabling for outdoor use.
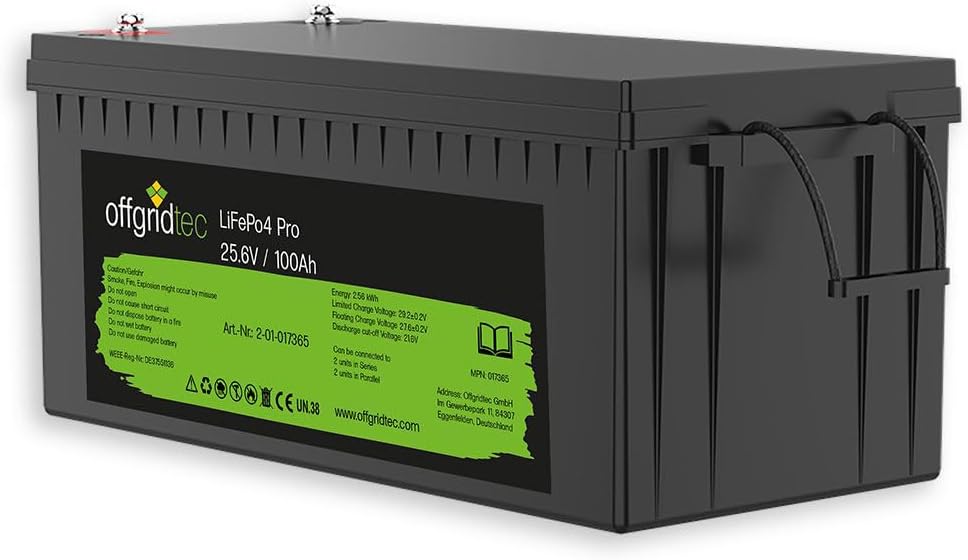
شڪل 4.4: The 100Ah LiFePO4 Battery with integrated Battery Management System (BMS), providing stable and long-lasting power storage.

شڪل 4.5: The MPPT Solar Charge Controller, featuring an LCD display for monitoring system status and optimizing energy harvest.
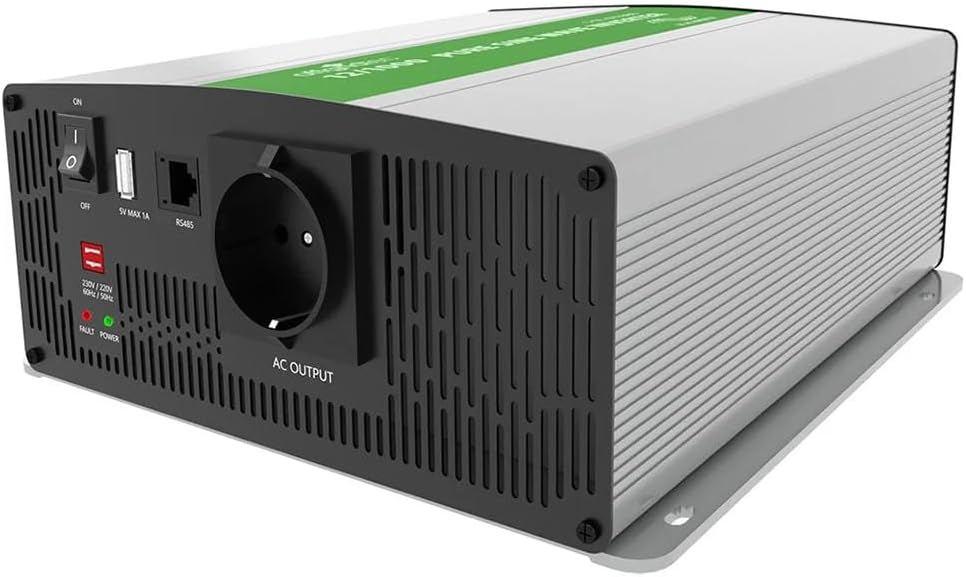
شڪل 4.6: The Sine Wave Voltage Converter (Inverter), capable of delivering 2000W continuous AC power for household appliances.

شڪل 4.7: Various connection cables and accessories, including solar cables and battery connection cables, for system integration.

شڪل 4.8: Fuse holder with included MIDI and MEGA fuses, essential for protecting the system from overcurrents.
5. سيٽ اپ ۽ تنصيب
Follow these steps carefully to set up your Offgridtec Autark Pro XL solar system. Ensure all safety precautions are observed.
5.1. Mounting Solar Panels
- Choose a location for the solar panels that receives maximum direct sunlight throughout the day, free from shading.
- Securely mount the four 200W solar panels using appropriate mounting hardware (not included) for your specific application (e.g., roof mounts for RVs, ground mounts for stationary use).
- Ensure proper tilt and orientation for optimal energy harvest based on your geographical location.
5.2. Wiring Solar Panels to Charge Controller
- Connect the solar panels in series or parallel as required to meet the MPPT charge controller's input voltage and current specifications. For this 24V system, typically panels are wired in series-parallel configuration.
- Use the provided 8m solar cable and MC4 connectors to connect the solar panel array to the 'PV Input' terminals on the MPPT charge controller. Ensure correct polarity (+ to + and - to -).
- اهم: Cover the solar panels with an opaque material during wiring to prevent voltage generation and potential shock.
5.3. Connecting Battery to Charge Controller
- Place the 100Ah LiFePO4 battery in a secure, well-ventilated location.
- Connect the provided 1.5m 10mm² battery cable with the MIDI fuse holder to the positive terminal of the battery. Install one of the 40A MIDI fuses into the holder.
- Connect the other end of the battery cable (with M8 screw terminal) to the 'Battery Input' positive terminal on the MPPT charge controller.
- Connect a separate negative battery cable (not included, but typically part of the system wiring) from the battery's negative terminal to the 'Battery Input' negative terminal on the MPPT charge controller.
- نوٽ: Always connect the battery to the charge controller اڳ connecting the solar panels.
5.4. Connecting Inverter to Battery
- Mount the sine wave voltage converter in a dry, well-ventilated area, ensuring sufficient clearance for cooling.
- Install the MEGA fuse holder between the inverter's positive input terminal and the battery's positive terminal. Insert one of the 150A MEGA fuses.
- Connect the inverter's positive input to the battery's positive terminal (via the MEGA fuse).
- Connect the inverter's negative input directly to the battery's negative terminal.
- پڪ ڪريو ته سڀئي ڪنيڪشن مضبوط ۽ محفوظ آهن.
5.5. Initial Power-Up Sequence
- Once all connections are verified, first connect the battery to the MPPT charge controller. The controller's display should illuminate.
- Next, uncover the solar panels. The charge controller will begin to detect the solar input and start charging the battery.
- Finally, switch on the sine wave inverter. Check for any error indicators on the inverter.
6. آپريشن
Understanding the operation of your solar system components is key to maximizing its efficiency and lifespan.
6.1. MPPT Charge Controller Operation
- LCD ڊسپلي: The integrated LCD display provides real-time information on battery voltage, charging current, solar panel voltage, and accumulated energy.
- سيٽنگون: Use the buttons on the controller to navigate through menus and adjust settings such as battery type (though LiFePO4 is pre-configured), load control, and timer functions. Refer to the specific charge controller manual for detailed programming.
- توانائي جي اصلاح: The MPPT (Maximum Power Point Tracking) technology automatically optimizes the power output from your solar panels to ensure maximum charging efficiency for your battery.
- حفاظتي خاصيتون: The controller includes protections against overcharge, over-discharge, reverse polarity, and short circuits.
6.2. Sine Wave Voltage Converter (Inverter) Usage
- Powering AC Devices: Plug your 230V AC appliances into the inverter's output sockets. Ensure the total continuous power consumption does not exceed 2000W.
- چوٽي بجلي The inverter can handle peak loads up to 3200W for short durations, suitable for starting motors or compressors.
- Pure Sine Wave Output: The pure sine wave output ensures compatibility with sensitive electronics, preventing damage and ensuring efficient operation.
- USB آئوٽ پُٽ: Use the integrated USB ports (5V) for charging small electronic devices.
- نگراني: The inverter typically has indicator lights for power, fault, and battery status. Consult the inverter's specific manual for detailed error codes.
7. سار سنڀال
Regular maintenance ensures the longevity and optimal performance of your solar system.
- شمسي پينل: Periodically clean the surface of the solar panels with a soft cloth and water to remove dirt, dust, and debris that can reduce efficiency. Inspect for any physical damage or loose connections.
- بيٽري: The LiFePO4 battery is maintenance-free. However, ensure its terminals are clean and connections are tight. Monitor the battery voltage via the charge controller display.
- ڪنيڪشن: Annually inspect all electrical connections for tightness and corrosion. Loose connections can cause resistance, heat, and power loss.
- وينٽيليشن: Ensure that the charge controller and inverter have unobstructed airflow for cooling. Clean any dust buildup from vents.
- فیوز: Check fuses if a component stops working. Replace blown fuses only with fuses of the same type and rating.
8. مسئلا حل ڪرڻ
This section addresses common issues you might encounter with your solar system.
| مسئلو | ممڪن سبب | حل |
|---|---|---|
| No power from solar panels to charge controller | Panels are shaded; Loose or incorrect wiring; Blown PV fuse; Faulty panel. | Check for shading; Verify all PV connections and polarity; Check/replace PV fuse; Test individual panels. |
| بيٽري چارج نه ٿي رهي آهي يا سست چارج ٿي رهي آهي | Insufficient sunlight; Dirty panels; Incorrect charge controller settings; Battery fault. | Ensure full sun exposure; Clean panels; Verify charge controller settings (e.g., battery type); Check battery health. |
| Inverter not turning on or no AC output | گھٽ بيٽري جو حجمtage; Overload; Blown inverter fuse; Loose battery connections. | Charge battery; Reduce load; Check/replace inverter fuse (MEGA fuse); Tighten battery cables. |
| MPPT controller display is off | No battery connected; Battery voltage too low; Loose battery connection. | Connect battery first; Charge battery; Check battery wiring to controller. |
9. ٽيڪنيڪل وضاحتون
Detailed specifications for the Offgridtec Autark Pro XL 24V 800W Solar System.
| جزو | تفصيل |
|---|---|
| شمسي پينل | 4 x Offgridtec MONO 200W V2 Modules (Total 800W) سيل جي ڪارڪردگي: 22.3٪ |
| بيٽري | 1 x 100Ah LiFePO4 Battery (25.6V nominal) مربوط BMS Cycle Life: >4000 cycles at 100% DoD |
| ايم پي پي ٽي چارج ڪنٽرولر | Automatic energy yield optimization LCD display for status monitoring RS485 port for PC configuration |
| Sine Wave Voltage ڪنورٽر | مسلسل پاور: 2000W چوٽي پاور: 3200W اوٽ وولٽtage: 230V AC USB Outputs: 5V |
| سسٽم Voltage | 24V ڊي سي |
| Average Daily Yield | Approx. 3200Wh (March to October, optimal conditions) |
| ڪيبل شامل آهن | 8m Solar Cable 1.5m 10mm² Battery Cable with MIDI fuse holder |
| حفاظتي خاصيتون | Overload protection, Undervoltagاي تحفظ، شارٽ سرڪٽ تحفظ، ريورس پولارٽي تحفظ |
10. وارنٽي ۽ سپورٽ
For warranty information and technical support, please refer to the documentation provided with your purchase or contact Offgridtec customer service directly. Keep your proof of purchase for warranty claims.
ٺاهيندڙ: آفگرڊيڪڪ
ماڊل نمبر: 4-01-019940


