1. تعارف
This manual provides detailed instructions for the installation, operation, and maintenance of your MT-VIKI 17-inch 16-Port Rack KVM Switch. This device is designed to manage up to 16 computers or servers from a single console, integrating a 17-inch LCD monitor, keyboard, and touchpad into a compact 1U rack-mountable drawer.

Image 1.1: The MT-VIKI 17-inch 16-Port Rack KVM Switch console, featuring an integrated LCD, keyboard, and touchpad.
2. حفاظت جي ڄاڻ
Please read and follow these safety guidelines to ensure proper operation and prevent damage to the device or injury to yourself.
- پڪ ڪريو ته ڊوائيس هڪ سٺي هوادار علائقي ۾ نصب ٿيل آهي ته جيئن وڌيڪ گرم ٿيڻ کان بچي سگهجي.
- Use only the provided power adapter. Using an incorrect adapter may cause damage.
- ڊوائيس کي پاڻي، نمي، يا انتهائي گرمي پد جي سامهون نه آڻيو.
- ڊوائيس تي ڳري شيون رکڻ کان پاسو ڪريو.
- صفائي ڪرڻ يا ڪنهن به سار سنڀال ڪرڻ کان اڳ بجلي بند ڪريو.
3. پيڪيج مواد
پڪ ڪريو ته سڀئي شيون توهان جي پيڪيج ۾ موجود آهن:
- 1x MT-VIKI 17-inch 16-Port Rack KVM Switch Console (Model: MT-1716UL)
- 16x VGA KVM Cables (various lengths)
- 1x پاور اڊاپٽر
- 1x استعمال ڪندڙ دستياب

Image 3.1: The KVM console and the assortment of included VGA KVM cables.
4. پراڊڪٽ ختمview
The MT-VIKI 17-inch 16-Port Rack KVM Switch integrates essential components for server management into a single unit.
4.1 فرنٽ پينل جا حصا
- 17 انچ LCD مانيٽر: Displays video output from connected computers.
- ڪي بورڊ: Standard 98-key layout for input.
- ٽچ پيڊ: Integrated pointing device.
- Panel Switch Buttons: For direct port selection.
- External USB Interface: اضافي USB ڊوائيسز کي ڳنڍڻ لاءِ.
4.2 ريئر پينل پورٽس
- KVM Control Interface: Connects to the KVM module.
- USB Software Debug Port: For firmware updates or diagnostics.
- پاور سوئچ بٽڻ: يونٽ کي آن/آف ڪرڻ لاءِ.
- VGA ٻاھر: For connecting an external monitor (if supported).
- External USB Interface: Additional USB connectivity.
- پاور ان پٽ: For the DC12V power adapter.
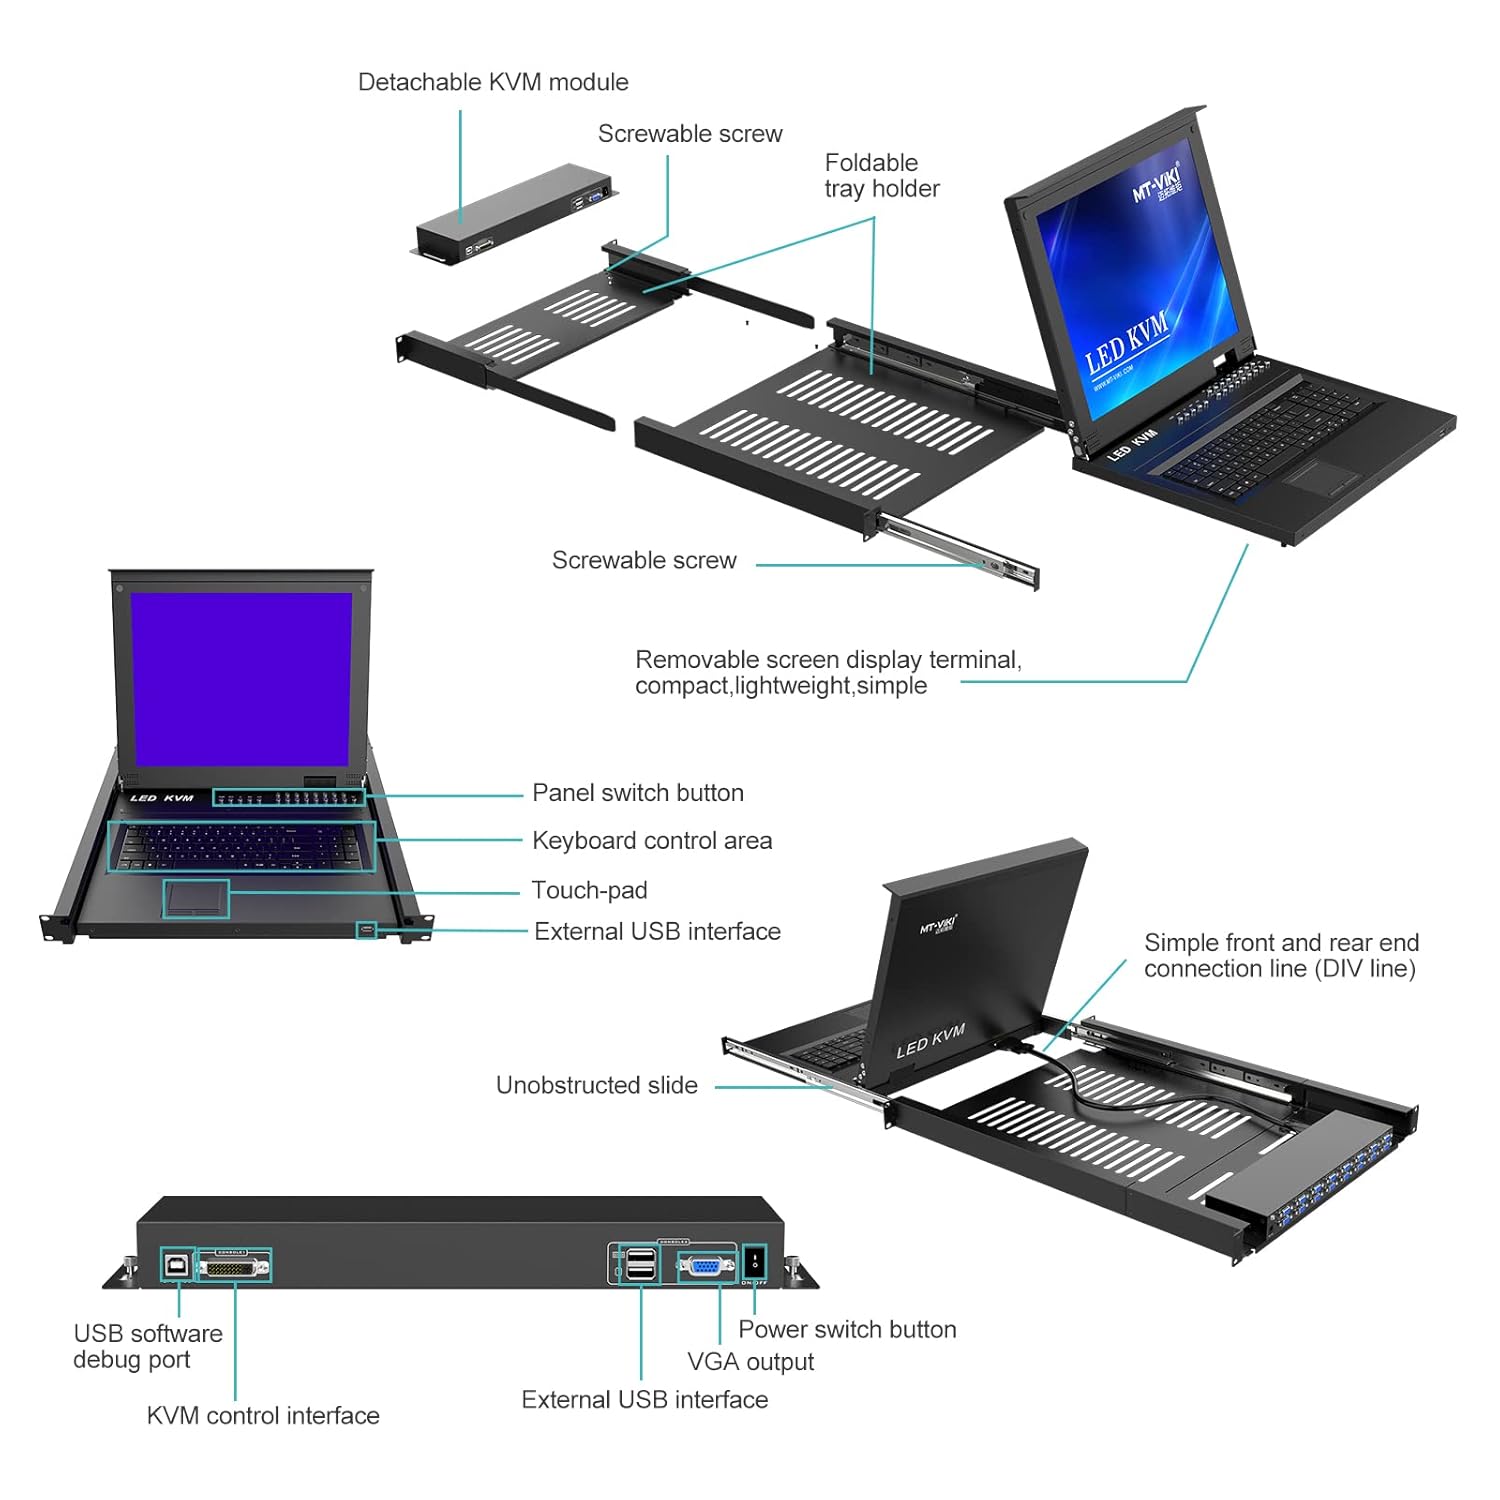
Image 4.1: Detailed diagram illustrating the detachable KVM module, screwable screws, foldable tray holder, panel switch button, keyboard control area, touchpad, external USB interface, unobstructed slide, simple front and rear end connection line, USB software debug port, KVM control interface, power switch button, VGA output, and external USB interface.

تصوير 4.2: ريئر view of the KVM module, highlighting the USB software debug port, KVM control interface, power switch button, VGA output, and external USB interface.
5. سيٽ اپ
5.1 ريڪ لڳائڻ
The KVM switch is designed for installation in a standard 1U 19-inch rack. The cabinet installation depth should be between 23.6 inches (60cm) and 31.8 inches (81cm).
- Extend the mounting rails from the KVM console.
- Secure the console into the 19-inch rack using appropriate rack screws.
- Ensure the console slides smoothly in and out of the rack.

Image 5.1: The KVM console mounted in a 1U server rack, illustrating the mounting depth range of 23.6 to 31.8 inches and the convenient front USB port.

Image 5.2: The KVM console integrated into a server room setup, demonstrating its application in managing multiple servers.
5.2 Connecting Computers
Use the provided VGA KVM cables to connect your computers to the KVM switch.
- Connect the VGA connector of a KVM cable to the VGA output of your computer.
- Connect the USB connector of the same KVM cable to a USB port on your computer.
- Connect the other end of the KVM cable to an available KVM port on the rear of the KVM switch.
- Repeat for all computers you wish to connect.
5.3 پاور آن
- Connect the DC12V power adapter to the power input port on the KVM switch.
- پاور اڊاپٽر کي مناسب پاور آئوٽليٽ ۾ لڳايو.
- Press the power switch button on the rear panel to turn on the KVM switch.
6. KVM سوئچ هلائڻ
The MT-VIKI KVM switch offers multiple methods for switching between connected computers.
6.1 Switching Methods
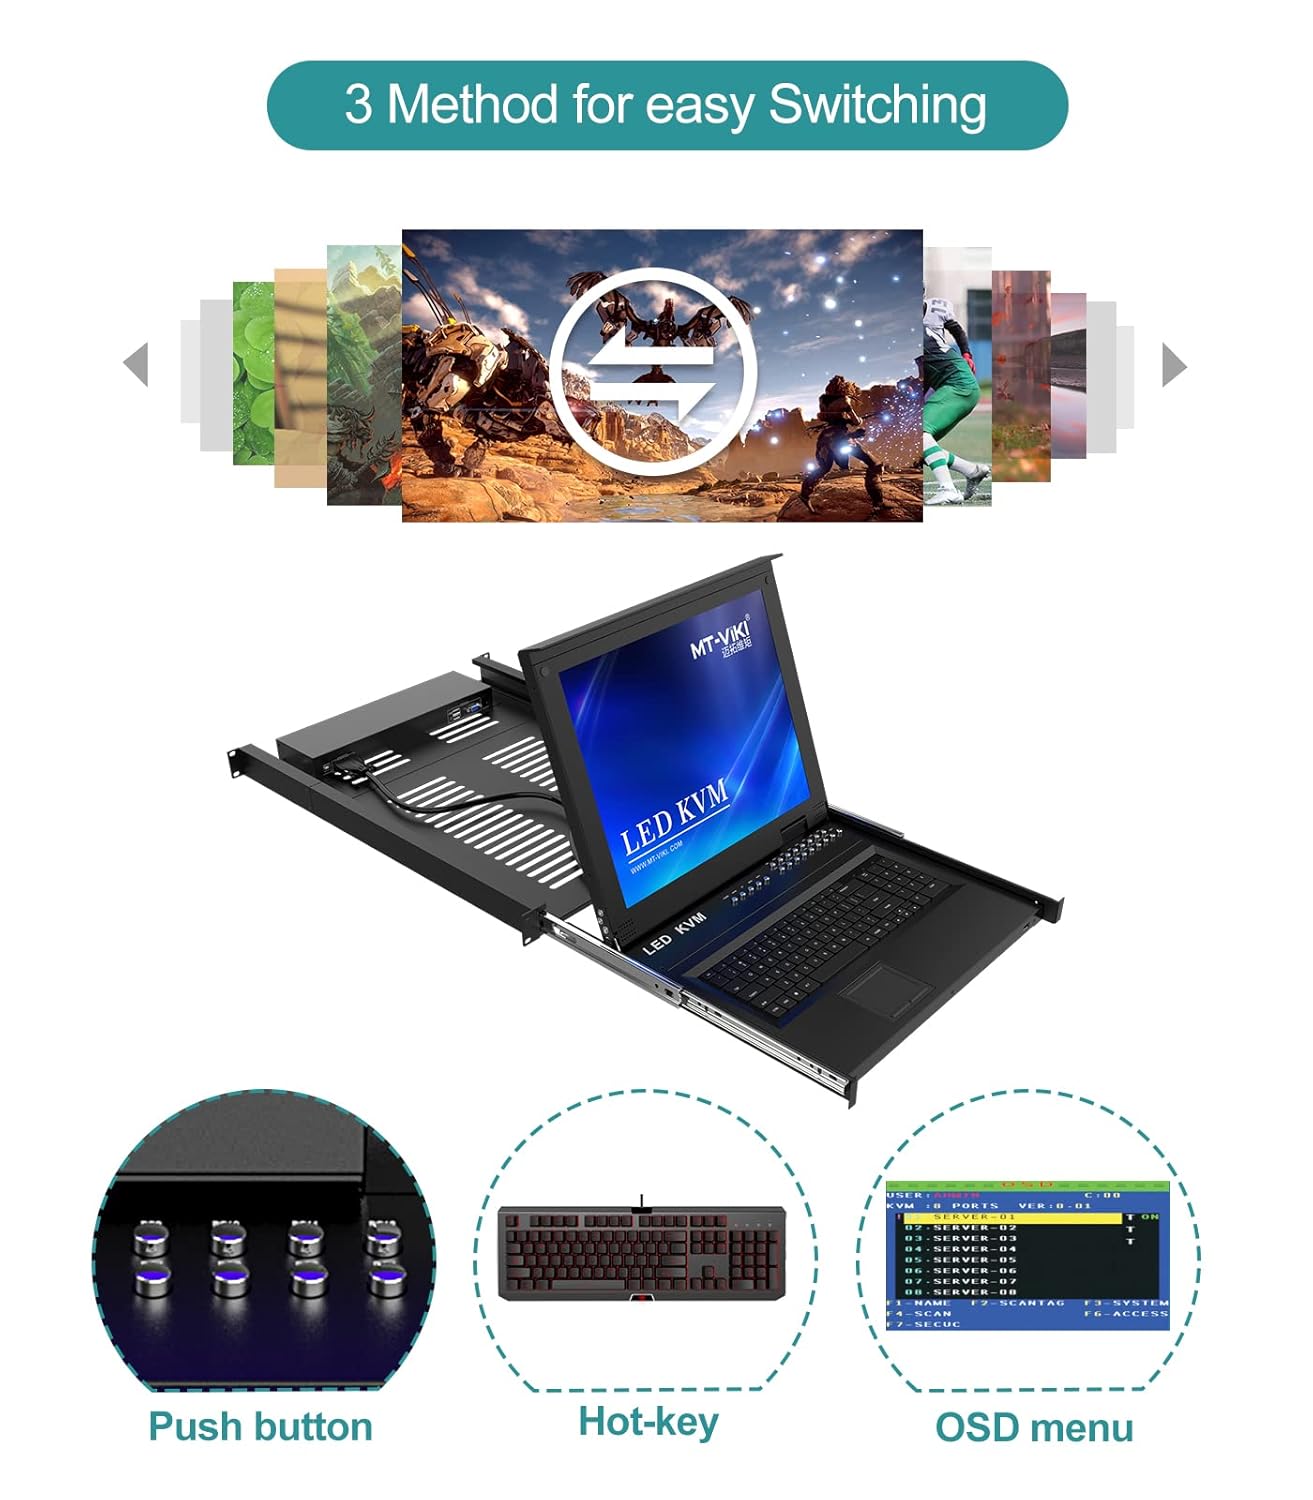
Image 6.1: Illustration of the three available methods for switching between connected computers: Push button, Hot-key commands, and the On-Screen Display (OSD) menu.
- پش بٽڻ: Use the physical buttons on the front panel of the KVM console to directly select a port.
- Hotkey: Utilize keyboard hotkey combinations to switch between ports. Refer to the OSD menu for specific hotkey sequences.
- او ايس ڊي مينيو: Access the On-Screen Display menu to navigate and select ports, configure settings, and manage security.
6.2 او ايس ڊي مينيو نيويگيشن
The OSD menu provides a graphical interface for managing the KVM switch. Typically, you can activate the OSD menu by pressing a specific hotkey combination (e.g., Scroll Lock + Scroll Lock, or Ctrl + Ctrl). Once activated, use the arrow keys and Enter key on the keyboard to navigate and make selections.
6.3 سيڪيورٽي خاصيتون
The KVM switch supports 2-level password security, allowing for administrator and user accounts. Up to 8 authorized users and an administrator can view and control the connected computers. Refer to the OSD menu for setting up and managing user accounts and passwords.
6.4 Daisy-Chaining
This KVM switch supports daisy-chaining, allowing you to control up to 256 computers by connecting multiple KVM units. Consult the daisy-chaining diagram and instructions for proper setup.

Image 6.2: Diagram showing the daisy-chaining capability, allowing control of up to 256 computers by connecting multiple 16-port KVM switches.
7. سار سنڀال
7.1 صفائي
- Before cleaning, ensure the KVM switch is powered off and disconnected from the power source.
- ٻاهرين سطحن کي صاف ڪرڻ لاءِ نرم، سڪل ڪپڙو استعمال ڪريو.
- For the LCD screen, use a screen-specific cleaning solution and a microfiber cloth. Do not spray liquid directly onto the screen.
- گھڻائي صاف ڪندڙ يا محلول استعمال ڪرڻ کان پاسو ڪريو.
7.2 ماحولياتي خيالات
To ensure longevity and optimal performance, operate the KVM switch within the specified temperature and humidity ranges. Avoid dusty environments.
8. مسئلا حل ڪرڻ
جيڪڏهن توهان کي پنهنجي KVM سوئچ سان مسئلا درپيش اچن ٿا، ته هيٺ ڏنل عام مسئلن ۽ حلن جو حوالو ڏيو:
| مسئلو | ممڪن سبب | حل |
|---|---|---|
| LCD تي ڪابه ڊسپلي | Power cable disconnected; KVM cable loose; Computer not powered on; Incorrect port selected. | Check power connections; Ensure KVM cables are securely connected; Verify computer is on; Select correct port via button/hotkey/OSD. |
| ڪي بورڊ/ماؤس جواب نه ڏئي رهيو آهي | USB cable loose; KVM cable faulty; Driver issue on computer. | Check USB connections; Try a different KVM cable; Restart the computer; Ensure KVM switch is powered on. |
| Cannot switch between computers | Hotkey conflict; OSD menu frozen; KVM switch malfunction. | Check hotkey settings in OSD; Power cycle the KVM switch; Ensure all KVM cables are properly connected. |
| غريب وڊيو معيار | KVM cable too long or low quality; Resolution mismatch. | Use shorter or higher quality KVM cables; Adjust computer's display resolution to 1280x1024. |
9. وضاحتون
| خاصيت | تفصيل |
|---|---|
| ماڊل | MT-1716UL |
| LCD سائيز | 17 inches TFT LED |
| اسپيڪٽ ريشو | 4:3 |
| قرارداد | 1280x1024 |
| رنگ ڊسپلي | 16.7 ملين |
| روشني | 300 cd/m² |
| LCD عمر | 50,000 ڪلاڪ کان وڌيڪ |
| بجلي جو استعمال | وڌو. 24W |
| ڪي بورڊ | 98 keys, internal PS/2 port, external USB port |
| Touchpad Lifespan | 1,000,000 ڀيرا |
| پاور ان پٽ | ڊي سي 12 وي |
| هائوسنگ مواد | المونيم + ڌاتو |
| پيداوار جي ماپ (W×D×H) | 600x400x45mm (23.6x15.7x1.78 inches) |
| ڪابينا جي تنصيب جي کوٽائي | 600-810mm (23.6-31.8 انچ) |
| آپريشن جي درجه حرارت | -45°C کان 60°C |
| اسٽوريج جي درجه حرارت | -20°C کان 65°C |
| سرڪٽ جو قسم | 16-رستو |
10. وارنٽي ۽ سپورٽ
For warranty information, technical support, or service inquiries, please contact MT-VIKI customer support or visit the official MT-VIKI webسائيٽ. وارنٽي جي دعوي لاء توهان جي خريداري جي رسيد رکو.
Manufacturer: MT-VIKI


