1. تعارف
Thank you for choosing the GAMEMAX Starlight 2 AB Mid Tower ATX PC Case. This manual provides essential information for the proper installation, operation, and maintenance of your new PC case. Please read this manual thoroughly before beginning the assembly process to ensure optimal performance and longevity of your system components.
2. حفاظت جي ڄاڻ
- ڪنهن به جزو کي انسٽال ڪرڻ يا هٽائڻ کان اڳ هميشه وال آئوٽليٽ مان بجلي جي فراهمي کي ڊسڪنيڪٽ ڪريو.
- نقصان کان بچڻ لاءِ سڀني حصن کي احتياط سان سنڀاليو.
- حساس حصن کي اليڪٽرو اسٽيٽڪ ڊسچارج (ESD) نقصان کان بچائڻ لاءِ اينٽي اسٽيٽڪ کلائي پٽي پائڻ.
- Keep the case away from direct sunlight, high temperatures, and moisture.
- وڌيڪ گرم ٿيڻ کان بچڻ لاءِ ڪيس جي چوڌاري مناسب وينٽيليشن کي يقيني بڻايو.
- ڪيس يا ان جي حصن کي تبديل ڪرڻ جي ڪوشش نه ڪريو، ڇاڪاڻ ته اهو توهان جي وارنٽي کي رد ڪري سگهي ٿو ۽ حفاظتي خطرو پيدا ڪري سگهي ٿو.
3. پيڪيج مواد
مھرباني ڪري تصديق ڪريو ته سڀ شيون توھان جي پيڪيج ۾ موجود آھن:
- GAMEMAX Starlight 2 AB Mid Tower ATX PC Case
- لوازمات وارو دٻو (جنهن ۾ اسڪرو، اسٽينڊ آف، ڪيبل ٽائي وغيره شامل آهن)
- استعمال ڪندڙ جو دستياب (ھي دستاويز)
4. پراڊڪٽ ختمview
The GAMEMAX Starlight 2 AB is a Mid Tower ATX PC case designed for efficient cooling and versatile configurations. It features a tempered glass side panel, pre-installed ARGB fans, and comprehensive hardware compatibility.
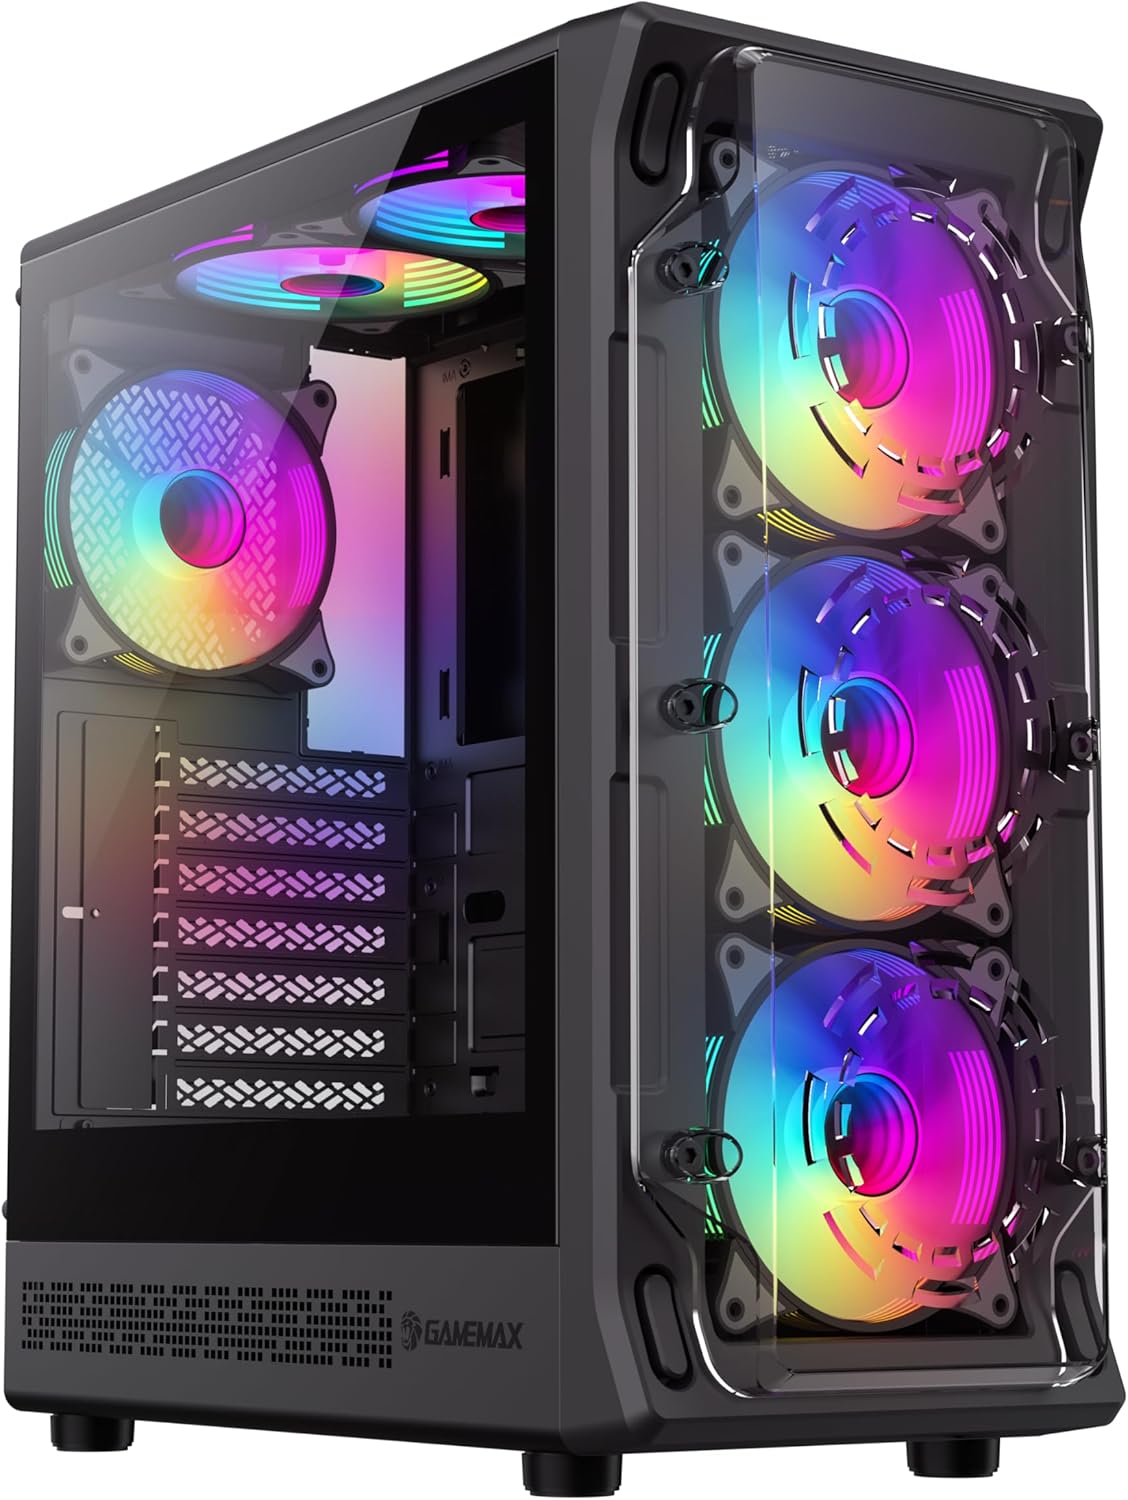
شڪل 4.1: اڳيان- کاٻي view of the GAMEMAX Starlight 2 AB PC Case, showcasing the tempered glass side panel and the vibrant ARGB lighting of the pre-installed fans.

شڪل 4.2: سڌو محاذ view highlighting the three 120mm ARGB fans, visible through the clear front panel, designed for optimal airflow.
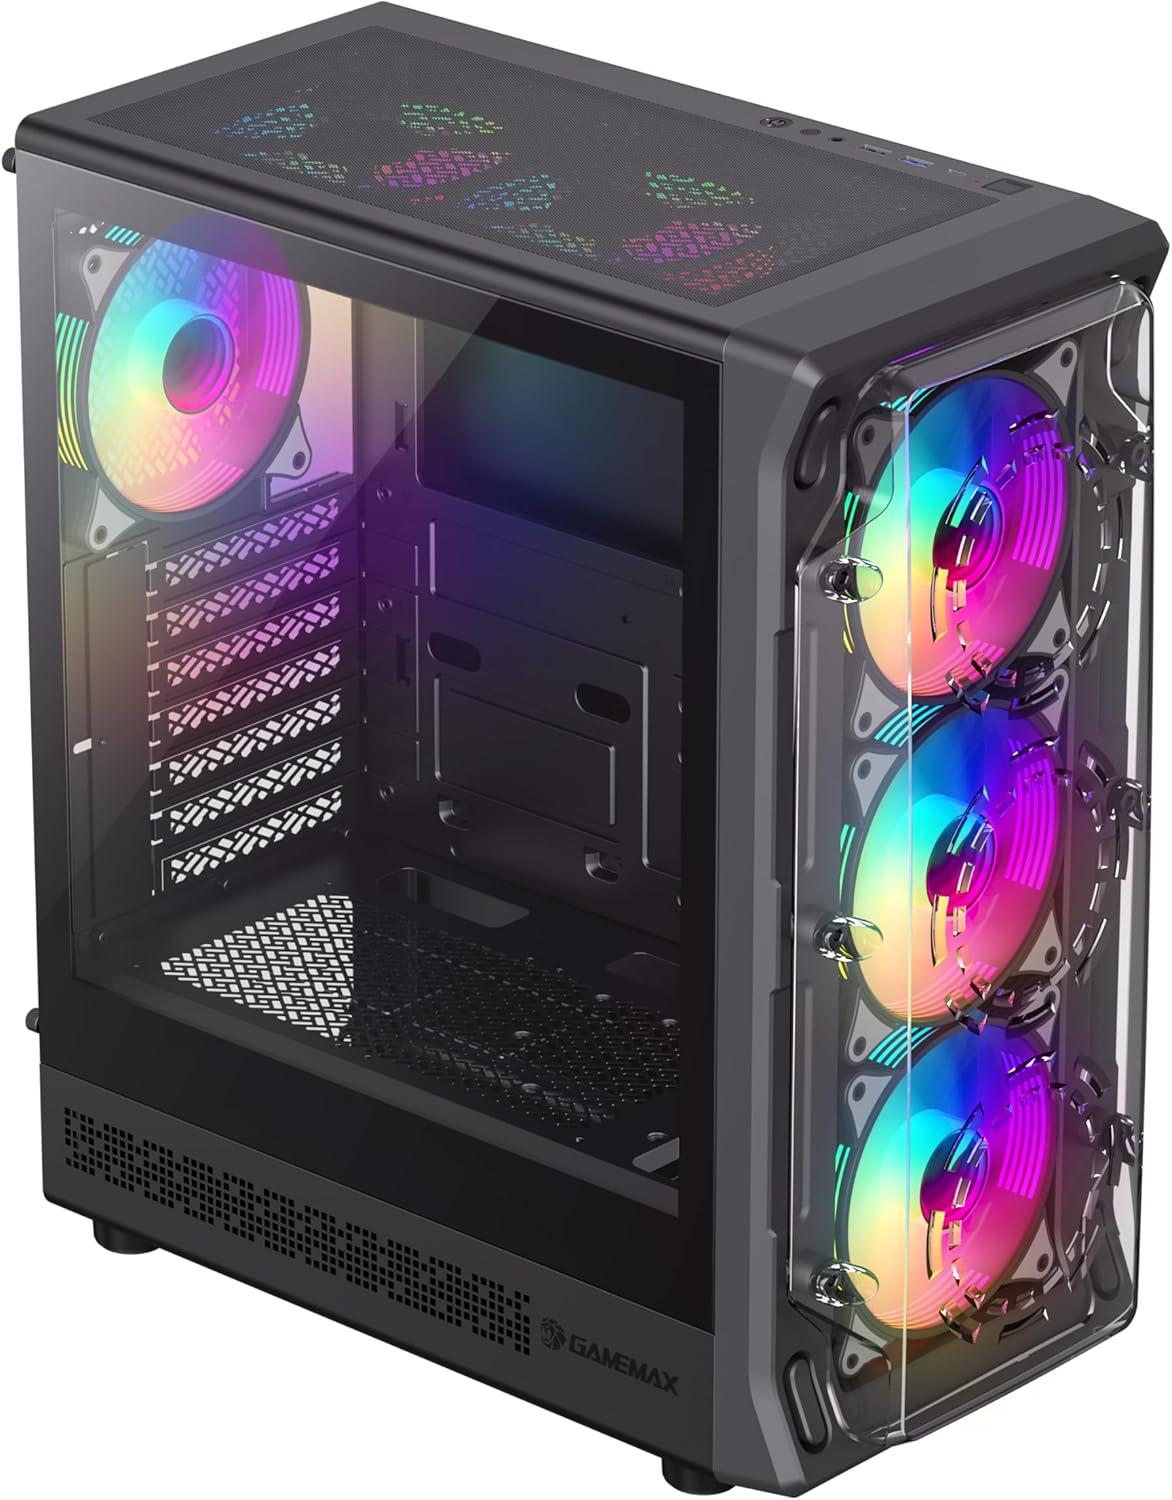
شڪل 4.3: Top-front perspective showing the top-mounted I/O panel, including USB ports and audio jacks, along with the mesh top panel for additional cooling.

شڪل 4.4: ريڙهه view of the PC case, illustrating the rear exhaust fan, expansion slots, and the power supply mounting area at the bottom.

شڪل 4.5: اندريون view of the main chamber, showing the motherboard tray, fan mounts, and ampحصن جي انسٽاليشن لاءِ جاءِ.
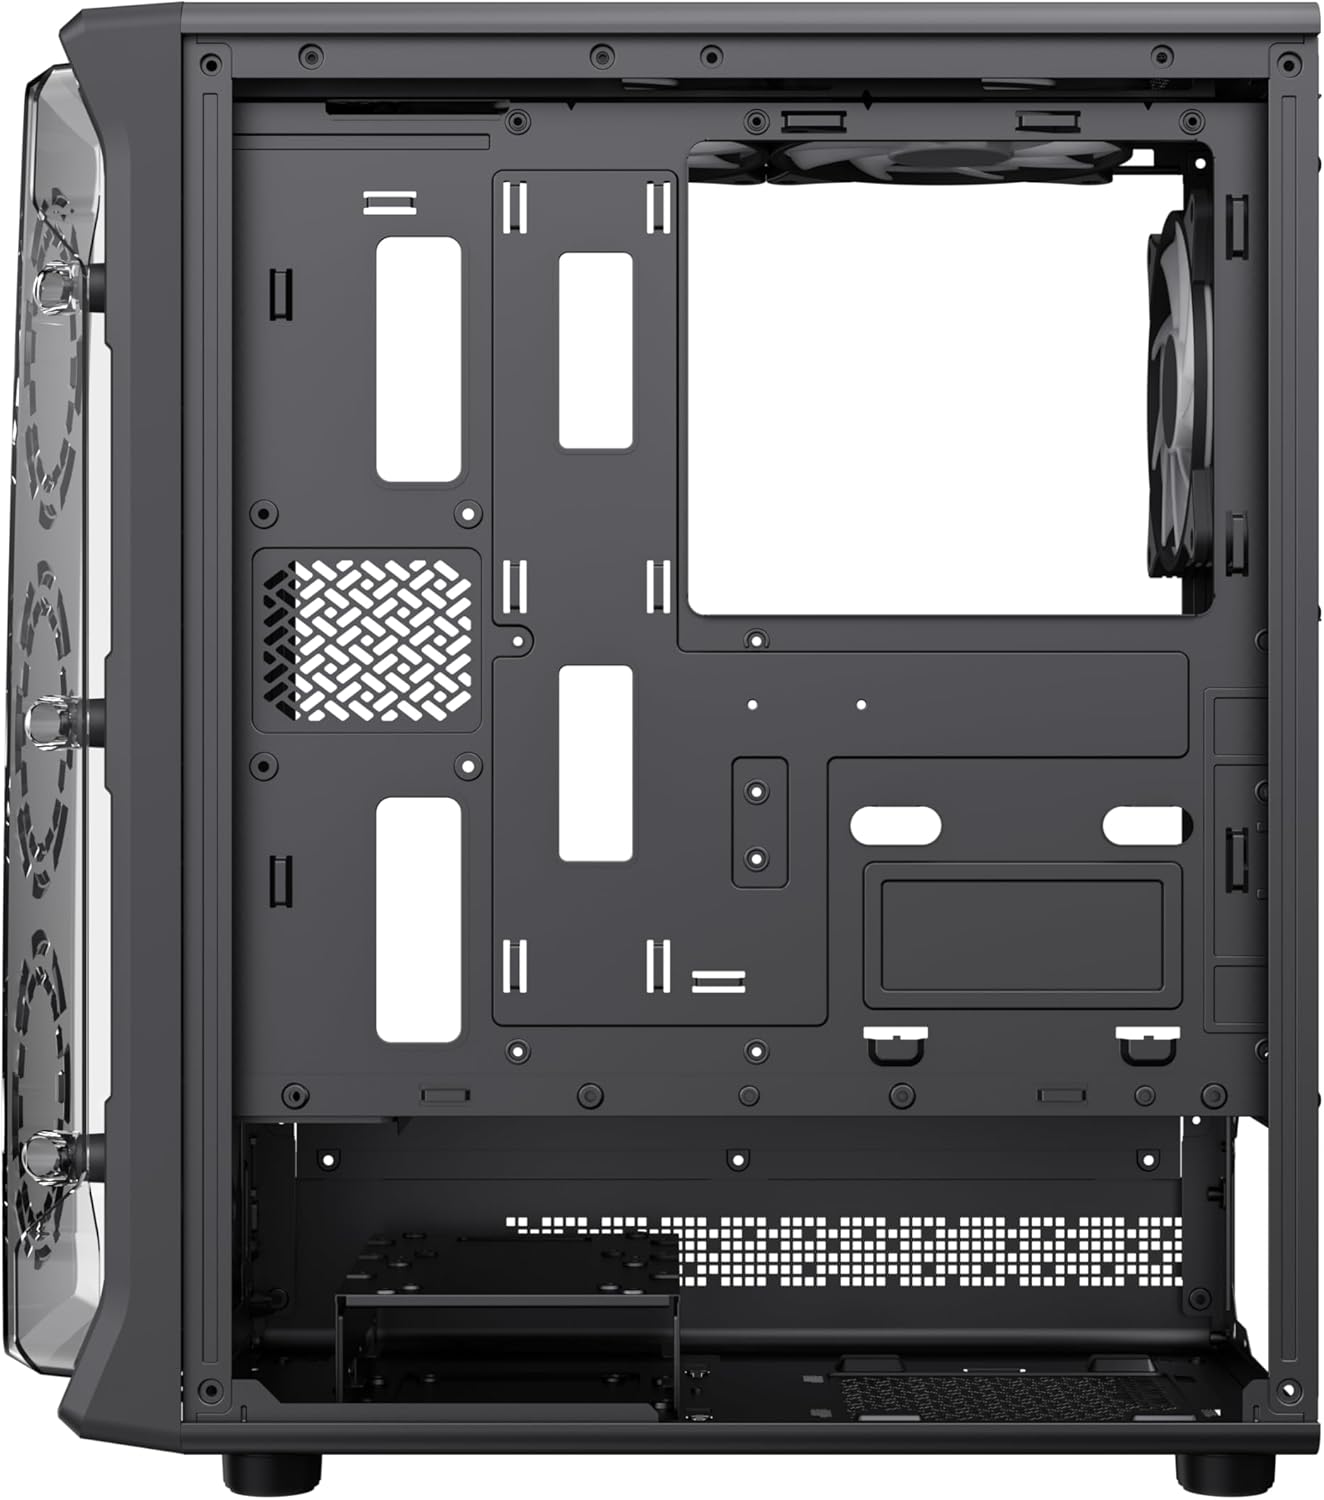
شڪل 4.6: View behind the motherboard tray, revealing cable routing cutouts and mounting points for storage drives, facilitating clean cable management.
5. وضاحتون
| خاصيت | وصف |
|---|---|
| ماڊل | Starlight 2 AB |
| ڪيس جو قسم | مائي ٽاور |
| Motherboard مطابقت | اي ٽي ايڪس، مائڪرو اي ٽي ايڪس، مني آئي ٽي ايڪس |
| طول و عرض (L x W x H) | 34 x 20 x 43.6 سينٽي |
| وزن | 4.55 ڪلو |
| مواد | ڌاتو، ٽمپرڊ گلاس |
| اڳ ۾ نصب ٿيل پرستار | 6 x 120mm ARGB Fans (3 front, 2 top, 1 rear) |
| ريڊيٽر سپورٽ | 120mm، 240mm، 360mm |
| GPU ڪليئرنس | 330mm تائين |
| سي پي يو کولر جي اوچائي | 155mm تائين |
| I/O بندرگاهن | USB 3.0, USB 2.0, Type-C, Audio |
| خاص خاصيتون | Built-In Fan, Dust Filter, RGB Lighting |
6. سيٽ اپ ۽ تنصيب
6.1 ڪيس جي تياري
- ڪيس کي هڪ فليٽ، مستحڪم مٿاڇري تي رکو.
- Carefully remove the tempered glass side panel by unscrewing the thumb screws and sliding it open. Set it aside in a safe place.
- Remove the solid right side panel to access the cable management area.
6.2 Motherboard جي انسٽاليشن
- ڪيس جي پوئين اوپننگ ۾ I/O شيلڊ نصب ڪريو.
- Align your motherboard with the standoffs inside the case. Ensure the standoffs match your motherboard's form factor (ATX, Micro ATX, Mini ITX).
- مهيا ڪيل اسڪرو سان مدر بورڊ کي محفوظ ڪريو.
6.3 پاور سپلائي يونٽ (PSU) لائڻ
- Mount the PSU into the dedicated compartment at the bottom rear of the case.
- ڪيس جي پوئين پاسي کان اسڪرو سان PSU کي محفوظ ڪريو.
6.4 Storage Device Installation (HDD/SSD)
- Locate the drive bays or mounting points for 3.5" HDDs and 2.5" SSDs.
- Install your storage devices using the appropriate screws.
6.5 Graphics Card (GPU) and Expansion Card Installation
- ڪيس جي پوئين پاسي کان ضروري ايڪسپينشن سلاٽ ڪَورز هٽايو.
- پنھنجي مدر بورڊ تي PCIe سلاٽ ۾ پنھنجو گرافڪس ڪارڊ يا ٻيا ايڪسپينشن ڪارڊ داخل ڪريو.
- ڪارڊن کي اسڪرو سان محفوظ ڪريو.
6.6 فرنٽ I/O ڪيبلز کي ڳنڍڻ
Connect the following cables from the case's front I/O panel to the corresponding headers on your motherboard:
- USB 3.0 هيڊر
- USB 2.0 هيڊر
- Type-C Header (if applicable)
- HD آڊيو هيڊر
- Power Switch, Reset Switch, Power LED, HDD LED headers
6.7 ڪيبل مينيجمينٽ
ڪيبلز کي منظم ۽ محفوظ ڪرڻ لاءِ مدر بورڊ ٽري جي پويان ڪيبل روٽنگ ڪٽ آئوٽ ۽ ٽائي ڊائون پوائنٽس استعمال ڪريو. هي هوا جي وهڪري ۽ جمالياتيات کي بهتر بڻائي ٿو.
7. آپريٽنگ هدايتون
7.1 پاور آن
After all components are installed and cables are connected, replace both side panels. Connect your power cable to the PSU and a wall outlet, then press the power button on the case's front I/O panel to start your system.
7.2 ARGB فين ڪنٽرول
The pre-installed ARGB fans can be controlled via your motherboard's ARGB software (e.g., ASUS Aura Sync, MSI Mystic Light Sync, Gigabyte RGB Fusion, ASRock Polychrome Sync) if your motherboard supports a 3-pin 5V ARGB header. Connect the ARGB cable from the case's fan hub to the motherboard's ARGB header. Refer to your motherboard manual for specific instructions on ARGB software usage.
8. سار سنڀال
8.1 مٽي فلٽر صاف ڪرڻ
The case includes integrated removable dust filters. Regularly clean these filters to maintain optimal airflow and prevent dust buildup inside your system. Gently slide out the filters, clean them with a soft brush or rinse with water (ensure they are completely dry before reinstallation), and then reinsert them.
8.2 General Case Cleaning
نرم استعمال ڪريو، ڊيamp cloth to wipe down the exterior surfaces of the case. For the tempered glass panel, use a glass cleaner and a microfiber cloth to avoid streaks. Avoid using harsh chemicals or abrasive materials.
9. مسئلا حل ڪرڻ
- System does not power on: Ensure all power cables (24-pin ATX, 8-pin CPU, GPU power) are securely connected. Verify the PSU switch is in the 'ON' position. Check front panel power switch connection to the motherboard.
- Fans are not spinning or ARGB not working: Check fan power connections to the motherboard or fan hub. Ensure ARGB cables are correctly connected to a 3-pin 5V ARGB header on the motherboard. Verify ARGB software settings.
- ڪابه ڊسپلي آئوٽ پُٽ ناهي: Confirm the graphics card is properly seated in its PCIe slot and power cables are connected. Ensure the monitor cable is connected to the graphics card, not the motherboard's integrated graphics port (unless using integrated graphics).
- گهڻو گرم ٿيڻ: Ensure all fans are spinning correctly and are oriented for proper airflow (intake/exhaust). Clean dust filters regularly. Verify CPU cooler installation.
10. وارنٽي ۽ سپورٽ
For warranty information or technical support, please refer to the GAMEMAX official webسائيٽ تي وڃو يا پنهنجي مقامي پرچون ڪندڙ سان رابطو ڪريو. وارنٽي دعوائن لاءِ خريداري جو ثبوت رکو.
11. نيڪال جي ڄاڻ
Please dispose of this product in accordance with local environmental regulations. Do not dispose of electronic waste with general household waste.


